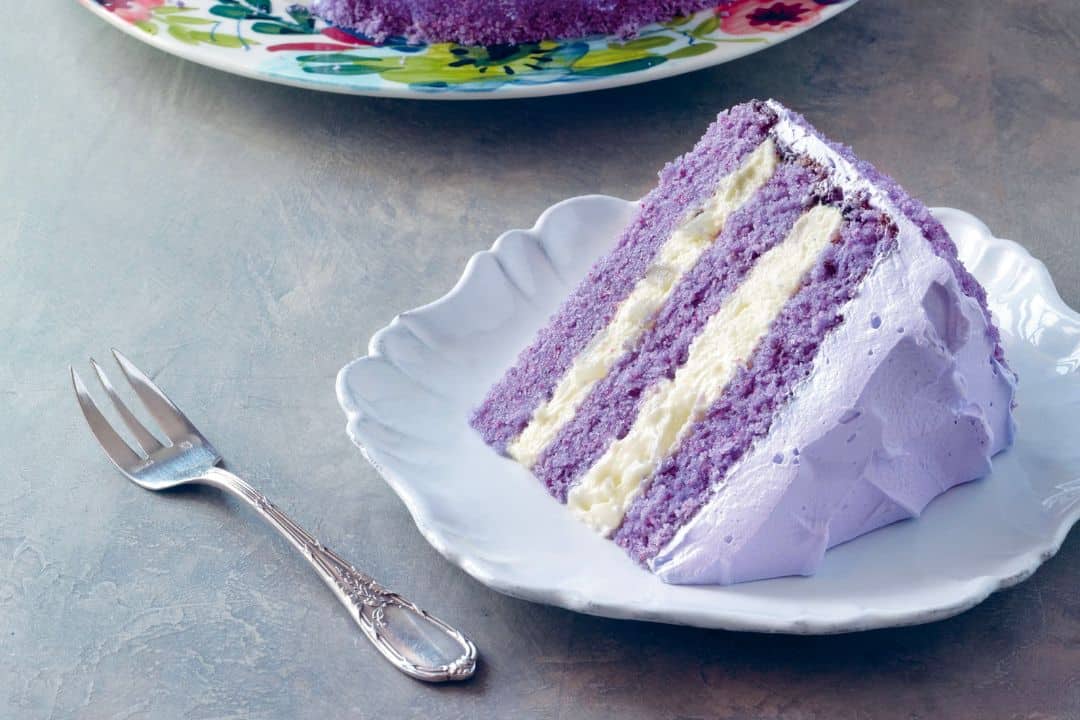
If you’re a fan of Filipino cuisine, you’ve likely heard of ube cake. This vibrant purple dessert is made with ube, a type of yam that is commonly used in Filipino cuisine. Ube cake is a popular dessert in the Philippines, and it has gained popularity around the world in recent years.
Making ube cake at home is easier than you might think. With a few simple ingredients and some basic baking skills, you can create a delicious and beautiful dessert that will impress your friends and family. There are many different recipes for ube cake, but most involve using ube extract or boiled and mashed ube to give the cake its signature flavor and color. Some recipes also call for macapuno, a type of sweetened coconut meat, to add texture and flavor to the cake.
Whether you’re looking to impress your dinner guests or simply satisfy your sweet tooth, ube cake is a great choice. With its unique flavor and stunning purple color, this dessert is sure to be a hit with anyone who tries it. So why not give it a try and see for yourself how delicious and easy it can be to make ube cake at home?
Understanding Ube Cake
What is Ube?
Ube is a type of root vegetable that is native to the Philippines. It is also known as purple yam. Ube has a distinct bright purple color and a sweet, nutty flavor. It is commonly used in Filipino desserts such as cakes, ice cream, and pastries. Ube is also used in savory dishes like stews and curries.
Ube is a good source of carbohydrates, fiber, and potassium. It is also rich in antioxidants and vitamins A and C. Ube is a versatile ingredient that can be used in a wide variety of recipes. It is available fresh, frozen, or in powdered form.
Ube Vs Purple Yam
While ube and purple yam are frequently considered the same, they are distinct root vegetables. Ube boasts a bright purple hue and tends to be sweeter. In contrast, purple yam has a deeper, almost black shade and offers a starchier flavor.
While both ube and purple yam are used in Filipino cuisine, they are also used in other Asian countries. In Japan, purple yam is known as “murasaki imo” and is used in traditional sweets like wagashi. In Korea, purple yam is called “jeon-goguma” and is used in dishes like rice cakes and porridge.
Overall, both ube and purple yam are nutritious and delicious ingredients that can be used in a variety of recipes. Whether you are making a sweet or savory dish, these root vegetables are sure to add a unique flavor and vibrant color to your cooking.
Key Ingredients for Ube Cake Recipe
When it comes to making a delicious ube cake, there are a few key ingredients that you simply can’t do without. In this section, we’ll take a closer look at each of these ingredients and discuss why they are so important.
Ube Halaya
The star of the show, of course, is the ube halaya. This bright purple yam is the key ingredient in any ube cake recipe. Ube halaya is made by boiling and mashing the ube until it forms a smooth and creamy paste. This paste is then mixed into the cake batter, giving the cake its signature purple color and unique flavor.
Cake Flour
Another important ingredient in any ube cake recipe is cake flour. This type of flour has a lower protein content than all-purpose flour, which makes it ideal for creating light and fluffy cakes. When combined with the other ingredients in the recipe, cake flour helps to create a tender and delicate crumb that is perfect for a cake as light and airy as ube cake.
Eggs
In ube cake, as with many cake recipes, eggs play a pivotal role. They act as a binding agent, ensuring the cake maintains its structure. Additionally, they contribute moisture and richness, resulting in a tender and delectable crumb.
Sugar
Sugar is an essential ingredient in any cake recipe, and ube cake is no different. In addition to adding sweetness, sugar also helps to create a light and airy texture in the cake. When beaten together with the eggs, sugar helps to create a light and fluffy batter that is perfect for a cake as delicate as ube cake.
Butter
Finally, butter is another key ingredient in any cake recipe. In addition to adding richness and flavor to the cake, butter also helps to create a tender and moist crumb. When beaten together with the sugar, butter helps to create a light and fluffy batter that is perfect for a cake as delicate as ube cake.
Ube Cake Recipe: Equipment Needed
When making ube cake, it is important to have the right equipment to ensure that your cake turns out perfectly. Here are some of the essential items you will need:
Oven
You will need an oven to bake your cake. Make sure that your oven is preheated to the correct temperature before you start baking. This will ensure that your cake bakes evenly and is cooked all the way through.
Mixing Bowls
You will need mixing bowls to mix your batter. It is best to have a few different sizes of mixing bowls on hand so that you can mix your ingredients without making a mess. You can use glass, stainless steel, or plastic mixing bowls.
Baking Pan
You will need a baking pan to bake your cake in. You can use either a round or rectangular baking pan, depending on your preference. It is important to line your baking pan with parchment paper to prevent your cake from sticking to the pan.
Electric Mixer
An electric mixer will make mixing your ingredients much easier and faster. You can use a hand-held mixer or a stand mixer, depending on your preference. Make sure to use the appropriate attachments for your mixer when making the batter.
Having the right equipment is essential when making ube cake. With the right tools, you can ensure that your cake turns out perfectly every time.
Preparing the Ube
Before you can make a delicious ube cake, you need to prepare the main ingredient: the ube. Here are the steps to follow:
Peeling and Grating
- Wash the ube thoroughly under running water to remove any dirt or debris.
- Peel the ube using a vegetable peeler or a sharp knife. Make sure to remove all the skin and any brown spots.
- Cut the ube into small pieces and grate them using a box grater or a food processor. You can also use a mortar and pestle if you prefer a finer texture.
Boiling and Mashing
- Place the grated ube in a pot and add enough water to cover it.
- Bring the water to a boil over medium heat and let it simmer until the ube is soft and tender. This should take about 20-30 minutes.
- Drain the water and let the ube cool down for a few minutes.
- Mash the ube using a potato masher or a fork until it reaches a smooth and creamy consistency.
Congratulations! You have successfully prepared the ube for your cake. Now you can move on to the next step and start making the batter.
Making the Cake Batter
To make a delicious ube cake, you need to start with a well-mixed batter. This section will guide you through the process of making the perfect cake batter.
Mixing the Ingredients
First, gather all the ingredients you need for the cake batter. You will need butter, sugar, eggs, all-purpose flour, baking powder, salt, milk, and ube extract.
Next, preheat your oven to 350°F (175°C) and prepare your cake pans by greasing them with a combination of lard, oil, and flour. This will ensure that your cake comes out of the pan easily and without sticking.
In a large mixing bowl, cream together the butter and sugar until light and fluffy. Then, add the eggs one at a time, mixing well after each addition.
In a separate bowl, whisk together the flour, baking powder, and salt. Gradually add the dry ingredients to the butter mixture, alternating with the milk until everything is well combined.
Combining Wet and Dry Ingredients
Finally, add the ube extract to the batter and mix until the color is even throughout. Be careful not to overmix the batter at this point, as it can make the cake tough.
Pour the batter into your prepared cake pans and smooth the top with a spatula. Bake in the preheated oven for 25-30 minutes, or until a toothpick inserted into the center of the cake comes out clean.
Once the cake is done, remove it from the oven and let it cool in the pan for 10 minutes. Then, remove the cake from the pan and let it cool completely on a wire rack before frosting or decorating.
By following these simple steps, you can make a delicious and moist ube cake that will impress your family and friends.
Baking the Ube Cake
Preheating the Oven
Before you start baking the ube cake, you need to preheat your oven. Preheating the oven is essential to ensure that your cake bakes evenly. It takes about 10 to 15 minutes to preheat an oven to the desired temperature.
To preheat your oven, follow these steps:
- Turn on your oven and set it to the desired temperature.
- Wait for the oven to reach the desired temperature before placing the cake inside.
Pouring the Batter
Once you have preheated the oven, it’s time to pour the cake batter. Here are the steps to follow:
- Grease the cake pan with butter or cooking spray to prevent the cake from sticking to the pan.
- Pour the batter into the prepared cake pan.
- Use a spatula to spread the batter evenly in the pan.
Baking Time
The baking time for an ube cake depends on the size of the cake pan and the oven temperature. Here are some general guidelines:
- Bake the cake at 350°F for 25 to 30 minutes if you’re using a 9-inch cake pan.
- Bake the cake at 350°F for 30 to 35 minutes if you’re using a 10-inch cake pan.
- Insert a toothpick into the center of the cake to check if it’s done. If the toothpick comes out clean, the cake is ready.
Once the cake is done, remove it from the oven and let it cool for a few minutes before removing it from the pan. Use a knife to loosen the edges of the cake from the pan, then invert the pan onto a wire rack. Let the cake cool completely before frosting it.
Finishing Touches
Once your ube cake has finished baking and has cooled down, it’s time to add the finishing touches to make it look and taste amazing. This section will cover the two main steps to complete your cake: cooling and icing.
Cooling the Cake
Before you start icing your cake, you need to make sure it’s completely cool. If you start adding icing while the cake is still warm, the icing will melt and slide off the cake. Here are some tips to help your cake cool down quickly and evenly:
- Let the cake cool down in the pan for 10-15 minutes before removing it from the pan. Use a butter knife to loosen the edges of the cake from the pan before flipping it over onto a wire rack.
- Place the wire rack on a flat surface and let the cake cool down completely before icing it. This can take up to an hour.
Icing and Decoration
Now that your cake has cooled down, it’s time to add the icing and decoration. Here’s how to do it:
- Prepare the icing: There are many different types of icing you can use for your ube cake, such as buttercream, cream cheese, or whipped cream. Choose the one that best suits your taste and follow the recipe instructions to prepare it. You can also add food coloring to the icing to match the color of the cake.
- Apply the icing: Use a spatula to spread the icing evenly on the top and sides of the cake. Start with a thin layer of icing, then add more until you reach the desired thickness. Smooth out the icing with the spatula to create a clean finish.
- Add decoration: You can decorate your ube cake with a variety of toppings, such as fresh fruit, nuts, or sprinkles. Arrange the toppings on top of the icing in a decorative pattern. You can also use a piping bag to add more intricate designs to the cake.
And there you have it, your delicious and beautiful ube cake is ready to be served! Enjoy!
- “After enjoying the unique flavors of our Ube Cake, why not indulge in a quick dessert with our Oreo Mug Cake Recipe? It’s a delightful treat that’s ready in a jiffy!”
- “For a savory dish to complement your meal, our Faidley’s Crab Cake Recipe offers a taste of the iconic Baltimore dish.”
Ube Cake: Storing and Serving Suggestions
Refrigeration
To keep your ube cake fresh for longer, it is best to store it in the refrigerator. Cover the cake with plastic wrap or place it in an airtight container to prevent it from drying out or absorbing any odors from other foods in the fridge. Ube cake can last up to 5 days in the refrigerator.
Serving Size
When serving ube cake, slice it into individual portions using a sharp knife. The size of the slice will depend on your personal preference, but we recommend cutting the cake into 12 equal slices. This will ensure that everyone gets a fair share of the delicious cake.
If you are serving the cake at a party or gathering, you can also cut the cake into smaller bite-sized pieces. This is a great way to allow guests to try a variety of desserts without feeling too full.
To add some extra flair to your serving presentation, consider garnishing the cake with some fresh fruit or a dollop of whipped cream. This will not only make the cake look more appealing, but it will also add some complementary flavors to the dish.
Overall, ube cake is a versatile and delicious dessert that can be enjoyed in a variety of ways. By following these simple storing and serving suggestions, you can ensure that your cake stays fresh and tastes amazing every time you serve it.
Ube Cake Recipe: Potential Variations
If you’re looking to switch things up or cater to specific dietary needs, there are a few variations you can try with your ube cake recipe. Here are a few ideas to get you started:
Vegan Ube Cake
For a vegan version of ube cake, you can substitute the traditional cake ingredients with vegan-friendly alternatives. Instead of eggs, use applesauce or flax eggs. Instead of butter, use vegan margarine or coconut oil. For milk, use almond milk or coconut milk. And for the frosting, use vegan cream cheese or coconut cream.
Here’s a basic vegan ube cake recipe to get you started:
| Ingredients | Quantity |
|---|---|
| All-purpose flour | 2 cups |
| Baking powder | 2 tsp |
| Salt | 1/2 tsp |
| Granulated sugar | 1 cup |
| Coconut oil | 1/2 cup |
| Unsweetened applesauce | 1/2 cup |
| Vanilla extract | 2 tsp |
| Ube halaya | 1 cup |
| Almond milk | 1 cup |
- Preheat your oven to 350°F (180°C).
- In a mixing bowl, whisk together the flour, baking powder, and salt.
- In a separate bowl, cream together the sugar and coconut oil.
- Add the applesauce, vanilla extract, and ube halaya to the sugar mixture and mix well.
- Gradually add the flour mixture and almond milk to the sugar mixture, alternating between the two until well combined.
- Pour the batter into a greased 9-inch cake pan and bake for 30-35 minutes, or until a toothpick inserted in the center comes out clean.
- Let the cake cool completely before frosting with your favorite vegan frosting.
Ube Cupcakes
If you’re looking for a fun and portable way to enjoy your ube cake, try making ube cupcakes instead. Simply use your favorite ube cake recipe, but divide the batter into cupcake liners instead of a cake pan. Bake for 18-20 minutes, or until a toothpick inserted in the center comes out clean. Top with your favorite frosting and enjoy!
Gluten-Free Ube Cake
For those who are sensitive to gluten, you can make a gluten-free version of ube cake by using gluten-free flour instead of all-purpose flour. You can also use almond flour or coconut flour for a grain-free option. Here’s a basic gluten-free ube cake recipe to get you started:
| Ingredients | Quantity |
|---|---|
| Gluten-free flour | 2 cups |
| Baking powder | 2 tsp |
| Salt | 1/2 tsp |
| Granulated sugar | 1 cup |
| Unsalted butter, softened | 1/2 cup |
| Eggs | 2 |
| Vanilla extract | 2 tsp |
| Ube halaya | 1 cup |
| Milk | 1 cup |
- Preheat your oven to 350°F (180°C).
- In a mixing bowl, whisk together the gluten-free flour, baking powder, and salt.
- In a separate bowl, cream together the sugar and butter.
- Add the eggs and vanilla extract to the sugar mixture and mix well.
- Add the ube halaya to the sugar mixture and mix until well combined.
- Gradually add the flour mixture and milk to the sugar mixture, alternating between the two until well combined.
- Pour the batter into a greased 9-inch cake pan and bake for 30-35 minutes, or until a toothpick inserted in the center comes out clean.
- Let the cake cool completely before frosting with your favorite gluten-free frosting.
With these variations, you can customize your ube cake recipe to fit your dietary needs and preferences. Whether you’re vegan, gluten-free, or just looking for a fun twist on the classic ube cake, these variations are sure to delight your taste buds.
Frequently Asked Questions
What is Ube cake made of?
Ube cake is made of ube, a purple yam that is commonly used in Filipino desserts. The cake batter typically includes flour, sugar, baking powder, salt, eggs, milk, oil, and ube extract or mashed ube. Some recipes also call for coconut milk or cream.
What is the best ube cake recipe?
There are many variations of ube cake recipes, and the best one depends on personal preference. Some people prefer a denser cake, while others prefer a lighter, fluffier cake. It’s important to follow a recipe that has been tested and has good reviews. You can try different recipes and adjust the ingredients to suit your taste.
What is the taste of Ube cake?
Ube cake has a unique flavor that is sweet, nutty, and slightly vanilla-y. The ube gives the cake a distinct purple color and a subtle earthy taste. The cake is not overly sweet and has a light, fluffy texture.
What fruit goes well with ube?
Ube cake can be served with a variety of fruits, but some popular choices include fresh berries, mango, and pineapple. These fruits complement the sweetness and nuttiness of the ube cake and add a refreshing contrast to the rich cake.
What are the ingredients of Ube cake?
The main ingredients of Ube cake include flour, sugar, baking powder, salt, eggs, milk, oil, and ube extract or mashed ube. Some recipes also call for coconut milk or cream. Ube extract or mashed ube gives the cake its distinct purple color and flavor.
What gives Ube cake its unique flavor?
Ube cake gets its unique flavor from the ube, a purple yam that is commonly used in Filipino desserts. The ube has a sweet, nutty, and slightly vanilla-y taste that adds a distinct flavor to the cake. The purple color of the ube also gives the cake its signature look.
Print
Ube Cake Recipe
- Prep Time: 30 Mins
- Cook Time: 1 Hr 15 Mins
- Total Time: 1 Hr 45 Mins
- Yield: 8 Servings 1x
- Category: Desserts
- Method: Baking
- Cuisine: Filipino
Description
Discover the magic of our Ube Cake Recipe! A vibrant, sweet treat that’s both delicious and eye-catching. Perfect for special occasions!
Ingredients
Pan Release Grease:
- 2 tablespoons lard or shortening
- 2 tablespoons oil
- 2 tablespoons flour
Cake Batter:
- ½ cup butter, softened at room temperature
- ½ cup vegetable or coconut oil
- 1 cup sugar
- 4 medium eggs, at room temperature
- 2 teaspoons vanilla extract
- 2 teaspoons Ube extract/food color (adjust if needed)
- 3 cups all-purpose flour
- 3 teaspoons baking powder
- ½ teaspoon salt
- 1 cup milk
- ¾ to 1 cup ube halaya or jam
Frosting:
- 1 pack (200g) cream cheese
- ½ cup powdered sugar
- 2 cups whipping/heavy cream
- 1 teaspoon vanilla extract
- Drops of ube extract/color
Instructions
-
Pan Release Grease: In a small bowl, combine lard or shortening, oil, and flour. Mix until smooth. Grease the bottom and sides of an 8-inch round cake pan (20 cm) that is at least 3 inches high or use 2 pans.
-
Preheat Your Oven: Preheat your oven to 300°F (150°C) using conventional settings (no fan).
-
Cream Butter and Sugar: In a mixing bowl, use an electric mixer to cream together the butter, oil, and sugar until the mixture is light and fluffy (about 2-3 minutes).
-
Add Eggs and Flavoring: Add the eggs one at a time, mixing just until well blended after each addition. Then add the vanilla extract and ube food color or extract and mix.
-
Sift Dry Ingredients: Sift in the flour, baking powder, and salt (do not mix yet). Pour the milk on top of the dry ingredients and beat on medium-low speed just until combined. Do not overmix.
-
Create Ube Batter: Take about ½ cup of the batter and divide it into 2 muffin molds lined with cupcake liners (or use a small baking dish). Add ube jam to the remaining batter and beat until combined.
-
Baking: Pour the remaining batter into the prepared pan and spread it evenly. If using 2 pans, divide the batter equally. Tap the sides and bottom of the pans to remove trapped air. Bake for 50 minutes to 1 hour in the preheated oven or until a toothpick inserted in the center comes out clean. If using 2 pans, it might be done in 20-30 minutes. Cupcakes will be done in 20-25 minutes. You can bake them together and remove the cupcakes after 20-25 minutes.
-
Prepare Cake Crumbs: Allow the cupcakes to cool slightly. Remove the liners and break them into chunks or crumbs using your hands. Spread them on a baking sheet lined with parchment paper. Once the cake is done, remove it from the oven, let it cool in the pan for about 10 minutes, then remove it to a cooling rack. Put the sheet of crumbs back in the oven and bake for 15 minutes. After cooling down, transfer the crumbs to a food processor or blender and pulse several times to turn them into fine crumbs.
-
Prepare Frosting: In a large bowl, place the cream cheese and powdered sugar, and beat on medium speed until smooth. Pour the heavy cream down the side of the bowl in a slow, steady stream, stopping to scrape the bottom and sides of the bowl as needed. Once all the cream has been added, increase the mixer speed to medium-high and whip until the frosting holds stiff peaks. Fold in the vanilla extract, if desired.
-
Assemble the Cake: Place the cake plate or cake board on a cake turntable. Pipe a bit of the purple frosting in the center to secure the cake’s position. Place the top part of the cake (top-side-down) in the center of the plate. Fill it with half of the white frosting, starting from the middle and moving outward. Place the other half of the cake on top, with the nicer, more even-cut side up. Use the ube frosting to cover the sides by piping from the bottom going up while turning the cake around. Cover the top as well; it doesn’t have to be perfect. Use a spatula to smooth the frosting all over the cake. Cover the cake completely with the cake crumbs. Finish by piping some rosettes on top using the remaining frosting.
Notes
-
Ube Extract/Color: Adjust the amount of ube extract or food color according to your desired shade of purple. Start with a smaller amount and add more as needed to achieve your preferred color.
-
Baking Time: The baking time may vary depending on your oven, so use a toothpick test to determine when the cake is fully baked. Insert a toothpick into the center, and if it comes out clean, the cake is ready.
-
Cooling Cake Crumbs: Ensure the cake crumbs are completely cooled before transferring them to a food processor or blender for grinding. Warm crumbs can affect the texture.
-
Refrigeration: Refrigerating the cake can help it set and firm up faster if you’re in a hurry to serve. It’s also a good idea to refrigerate leftovers to maintain freshness.
-
Pre-cut Cake: If you find it challenging to evenly divide the cake into two layers, consider using a long serrated knife or cake leveler for precise results.
Nutrition
- Serving Size: 1 slice
- Calories: 845 kcal
- Sugar: 52.1g
- Sodium: 419mg
- Fat: 43.2g
- Saturated Fat: 27g
- Carbohydrates: 103.7g
- Fiber: 2.4g
- Protein: 13g
- Cholesterol: 151mg
Keywords: Ube Cake Recipe, Ube Cake