
If you’re a fan of rich desserts that combine classic flavors with a fun twist, you’re in for a treat. I absolutely love this Red Velvet Cheesecake with Oreo Crust Recipe because it marries that velvety smooth red velvet cheesecake with the perfect chocolatey crunch of an Oreo crust. When I first made it, my family went crazy over the unique combo. Trust me, once you try this, it’ll be your new favorite showstopper for celebrations or a weekend indulgence.
Why You’ll Love This Recipe
- Rich, Creamy Texture: The cheesecake layer is incredibly smooth and luscious, thanks to the balance of cream cheese and sour cream.
- Oreo Crust Crunch: The Oreo crust adds a chocolatey, slightly crunchy base that perfectly complements the red velvet flavors.
- Striking Presentation: That vibrant red velvet color against the dark crust makes this cheesecake as beautiful as it is delicious.
- Family-Approved: My family insists I make this for every holiday now — it’s a guaranteed crowd-pleaser!

Ingredients You’ll Need
The ingredients here are straightforward but thoughtfully chosen to bring out the best in this Red Velvet Cheesecake with Oreo Crust Recipe. I recommend using good quality cream cheese and Dutch-processed cocoa powder to deepen those chocolate notes.

- Oreo Cookies: Crushed finely, they make the perfect chocolate base—no need for extra sugar since Oreos are sweet enough.
- Unsalted Butter: Melted to bind your crust perfectly without overwhelming flavor.
- Cream Cheese: Use full-fat and softened cream cheese to get that silky cheesecake texture.
- Granulated Sugar: Adds balanced sweetness to the cheesecake layer.
- Dutch-Processed Cocoa Powder: This gives the cheesecake its subtle cocoa depth and richer red velvet tone.
- Sour Cream: Keeps the cheesecake moist and adds a nice tang that brightens up the flavor.
- White Vinegar: Helps maintain a tender texture and enhances the red velvet’s classic taste.
- Vanilla Extract: Brings warmth and depth for that lovely aroma.
- Red Food Coloring: I suggest gel or liquid, starting with 1 ounce and adjusting to your desired vibrant red.
- Eggs: Room temperature and lightly beaten for smooth incorporation.
- Confectioners’ Sugar: For the frosting, adds sweetness and smoothness.
- Butter (for frosting): Softened to blend seamlessly with cream cheese in the frosting.
Variations
One of the best parts about this Red Velvet Cheesecake with Oreo Crust Recipe is how easy it is to personalize! Over time, I’ve tinkered with a few variations that you might want to try to make it your own.
- Chocolate Chips in the Batter: I once added mini white chocolate chips to the batter for extra texture — it was a fun surprise with every bite!
- Dairy-Free Option: Swap cream cheese and sour cream for dairy-free alternatives if you need a vegan or lactose-free version; it still tastes amazing.
- Different Crusts: While Oreos are my go-to, a simple graham cracker crust or even crushed pretzels can add a unique twist.
- Flavored Frosting: Try a cream cheese frosting with a hint of orange zest or espresso for a sophisticated flavor boost.
How to Make Red Velvet Cheesecake with Oreo Crust Recipe
Step 1: Making the Crunchy Oreo Crust
Start by preheating your oven to 350°F and prepping your 9-inch springform pan by wrapping the outside bottom tightly with two layers of heavy-duty foil—this is crucial for preventing water from leaking into your cheesecake during the water bath. Then combine about 2 ½ cups of crushed Oreo cookies with 5 tablespoons of melted unsalted butter. I like to press this mixture firmly into the bottom and up the sides (about 2 inches) of the pan to create a sturdy crust. Pop it into the oven for 10 minutes to set, then let it cool while you prepare the filling. This step helps the crust hold together nicely and adds that irresistible crunch you’ll love.
Step 2: Crafting the Decadent Red Velvet Cheesecake Filling
Reduce your oven to 300°F now. Using a stand mixer with a paddle attachment (or a handheld mixer), beat 32 ounces of softened cream cheese on medium-low speed until it’s beautifully smooth—about a minute is perfect. Add 1 ⅓ cups sugar and ½ cup Dutch-processed cocoa powder, continuing to mix gently so the cocoa is fully incorporated without overmixing. Then, pour in 1 cup of room temperature sour cream, 1 tablespoon white vinegar, 1 tablespoon vanilla extract, and your red food coloring (I usually start with 1 ounce and add more to reach my preferred shade). Mix until silky and smooth.
Finally, using a silicone spatula, fold in 4 lightly beaten eggs just until combined—no need to overbeat here or the cheesecake might crack. Pour the batter on top of your cooled Oreo crust and make sure it’s evenly spread.
Step 3: Baking in a Water Bath for Perfection
Here’s the magic: place your springform pan inside a larger roasting pan, then carefully pour boiling water into the roasting pan until it reaches halfway up the springform. This water bath helps regulate the heat and moisture, preventing cracks and ensuring that smooth, creamy texture we all crave.
Bake for about 1 hour at 300°F. You’ll want the edges to be set but the center to remain slightly jiggly—that’s key. If after an hour the center still seems too loose, give it a little more time, checking every 10 minutes. Then, turn off the oven but leave the cheesecake inside for another hour with the water bath still on. This slow cooling step prevents cracks and keeps your cheesecake silky.
Step 4: Cooling, Chilling, and Frosting
Remove the cheesecake from the water bath and place it on a wire rack to cool completely. Run a small knife around the edges to loosen it from the pan—it helps the sides come away cleanly. Then cover and refrigerate for at least 4 hours or, better yet, overnight.
For the frosting, beat 4 ounces softened cream cheese and ¼ cup unsalted butter together until creamy. Add 2 cups confectioners’ sugar and 1 teaspoon vanilla extract, starting on low speed and then beating until fluffy. Spread this frosting over your chilled cheesecake just before serving—it adds the perfect sweet, creamy finishing touch.
Pro Tips for Making Red Velvet Cheesecake with Oreo Crust Recipe
- Use Room Temperature Ingredients: This helps everything blend smoothly and prevents lumps in your batter.
- Wrap the Pan Well for the Water Bath: I once skipped the double foil wrap and nearly had a soggy crust leak — don’t make my mistake!
- Don’t Overmix the Batter: Stir in the eggs gently to avoid incorporating too much air, which can cause cracks.
- Test for Doneness by Jiggle: The center should jiggle slightly but not look wet; if needed, extend baking time in 10-minute increments.
How to Serve Red Velvet Cheesecake with Oreo Crust Recipe

Garnishes
I love topping mine with a few fresh raspberries or strawberries to add a fresh fruity note and a pop of color. A dusting of extra cocoa powder or some grated white chocolate also adds a nice touch if you want to keep it simple but elegant.
Side Dishes
This cheesecake pairs beautifully with a hot cup of coffee or a creamy chai latte. If you want a lighter side, fresh seasonal fruit salad or a tangy raspberry coulis complements the richness wonderfully.
Creative Ways to Present
For birthdays or special dinners, I’ve served this cheesecake as individual mini cheesecakes by halving the recipe and using muffin tins lined with paper cups. Swirling some cherry pie filling on top before chilling gives it a fun festive look. For a dramatic effect, adding edible gold leaf or chocolate shards elevates the presentation without much extra work.
Make Ahead and Storage
Storing Leftovers
Once frosted and chilled, this cheesecake stays fresh for up to 4 days in the refrigerator. I always keep it covered tightly to prevent it from absorbing other fridge smells. It tastes just as delicious the next day—sometimes even better, as the flavors have had more time to meld.
Freezing
I’ve frozen this cheesecake several times without losing that creamy texture. Wrap it tightly in plastic wrap and then aluminum foil before freezing. Thaw it overnight in the refrigerator for best results. I recommend frosting it fresh after thawing for maximum freshness.
Reheating
Since cheesecake is best served chilled, I skip reheating altogether. If you want to serve it a bit softer, let it sit at room temperature for 15-20 minutes before slicing—it makes cutting much easier and brings out the flavors beautifully.
FAQs
-
Can I use a different crust instead of Oreo for this cheesecake?
Absolutely! While the Oreo crust gives a great chocolatey crunch that pairs amazingly with red velvet, you can substitute graham cracker crust, chocolate wafer cookies, or even a nut-based crust if preferred. Just make sure the crust has enough fat (like butter) to hold it together well.
-
Why is the cheesecake baked in a water bath?
Baking in a water bath provides gentle, even heat and moisture, which prevents cracks from forming on the cheesecake and keeps the texture creamy and smooth. It’s a little extra step but totally worth it for that flawless finish.
-
How much red food coloring should I use?
I usually start with 1 ounce of red food coloring and add more to reach your preferred shade, up to 1.5 or 2 ounces. Using gel food coloring can give more vibrant color without thinning your batter.
-
Can I make this recipe ahead for a party?
Definitely! This cheesecake benefits from resting in the fridge overnight to fully set and develop flavors. Just frost it the day of, or add frosting the night before and keep well covered.
-
How do I prevent cracks in my cheesecake?
Use room temperature ingredients, don’t overmix the batter, bake in a water bath, and allow the cheesecake to cool gradually with the oven turned off and door closed. These tricks helped me finally bake crack-free red velvet cheesecakes every time!
Final Thoughts
This Red Velvet Cheesecake with Oreo Crust Recipe has truly become one of my signature desserts that makes any occasion feel extra special. I love how it balances the richness of cheesecake with the nostalgic flavor of red velvet and the fun crunch of Oreos. If you’re looking for a recipe that’s impressive but also totally doable, you’ll enjoy making and sharing this one as much as I do. Give it a try—I promise the smiles and compliments will follow!
Print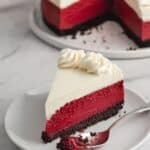
Red Velvet Cheesecake with Oreo Crust Recipe
- Prep Time: 1 hour 25 minutes
- Cook Time: 1 hour 17 minutes
- Total Time: 6 hours 42 minutes
- Yield: 12 servings 1x
- Category: Dessert
- Method: Baking
- Cuisine: American
Description
This Red Velvet Cheesecake combines the rich, creamy texture of classic cheesecake with the vibrant color and subtle cocoa flavor of red velvet cake. Featuring a buttery Oreo cookie crust and topped with a smooth cream cheese frosting, this indulgent dessert is perfect for special occasions or any time you want to impress with a show-stopping treat.
Ingredients
For the crust
- 2 ½ cups (250 g) crushed Oreo cookies, about 30 cookies
- 5 tablespoons unsalted butter, melted
For the cheesecake
- 32 ounces (908 g) cream cheese, softened
- 1 ⅓ cups (267 g) granulated sugar
- ½ cup (42 g) Dutch-processed cocoa powder
- 1 cup (227 g) sour cream, room temperature
- 1 tablespoon white vinegar
- 1 tablespoon vanilla extract
- 1–2 ounces red food coloring (I used 1.5 ounces)
- 4 large eggs, room temperature, lightly beaten
For the frosting
- 4 ounces (113 g) cream cheese, softened
- ¼ cup (56 g) unsalted butter, softened
- 2 cups (260 g) confectioners’ sugar
- 1 teaspoon vanilla extract
Instructions
- Make the crust: Move the oven rack to the lower third position, just below the center notch, and preheat the oven to 350°F. Wrap the outside bottom of a 9-inch springform pan tightly with two layers of heavy-duty aluminum foil to prevent leaks. Combine the crushed Oreo cookies and melted butter until thoroughly mixed, then press the mixture firmly into the bottom and about 2 inches up the sides of the pan. Bake the crust for 10 minutes, then set it aside to cool while preparing the filling.
- Prepare the cheesecake batter: Lower the oven temperature to 300ºF. In a stand mixer bowl fitted with a paddle attachment or using a handheld mixer, beat the softened cream cheese on medium-low speed until smooth and creamy, about 1 minute. Add granulated sugar and Dutch-processed cocoa powder and mix on medium-low speed until fully combined. Incorporate sour cream, white vinegar, vanilla extract, and red food coloring, mixing until smooth. Gently fold in the lightly beaten eggs using a silicone spatula, mixing just until combined to avoid overmixing.
- Bake the cheesecake: Pour the batter evenly over the cooled crust in the springform pan. Place the springform pan inside a large roasting pan. Carefully fill the roasting pan with boiling water halfway up the sides of the springform pan to create a water bath. Bake for 1 hour or until the edges are set but the center still jiggles slightly when shaken. Turn off the oven and leave the cheesecake in the water bath in the oven for an additional hour to finish cooking gently.
- Cool and chill: Remove the springform pan from the water bath and set on a wire rack. Run a small knife around the edge to loosen the cheesecake from the pan. Allow it to cool completely to room temperature, then cover and refrigerate for at least 4 hours, preferably overnight, to achieve the best texture and flavor. Just before serving, remove the sides of the springform pan.
- Make the frosting: Using a stand mixer or handheld mixer, beat the softened cream cheese and butter together until smooth and creamy. Gradually add confectioners’ sugar and vanilla extract, mixing on low speed until combined, then increase to medium speed and beat until the frosting is smooth. Spread evenly over the chilled cheesecake.
Notes
- Food coloring amount affects the red hue intensity; start with 1 ounce and add more if desired, up to 1.5 ounces as used here.
- Lining the bottom of the springform pan with parchment paper or foil is optional but can help with easier transfer.
- Oven temperatures vary; check doneness by ensuring the edges are firm and the center jiggles slightly. If needed, bake longer then turn off the oven and let it rest inside.
- Ensure the water bath is leakproof to prevent water from seeping into the cheesecake.
- Make ahead tip: Cheesecake keeps up to 4 days refrigerated and can be frozen for up to 3 months; thaw overnight in refrigerator.
Nutrition
- Serving Size: 1 slice (1/12 of cheesecake)
- Calories: 520 kcal
- Sugar: 42 g
- Sodium: 220 mg
- Fat: 36 g
- Saturated Fat: 22 g
- Unsaturated Fat: 12 g
- Trans Fat: 0.5 g
- Carbohydrates: 38 g
- Fiber: 1.5 g
- Protein: 7 g
- Cholesterol: 125 mg

Your email address will not be published. Required fields are marked *