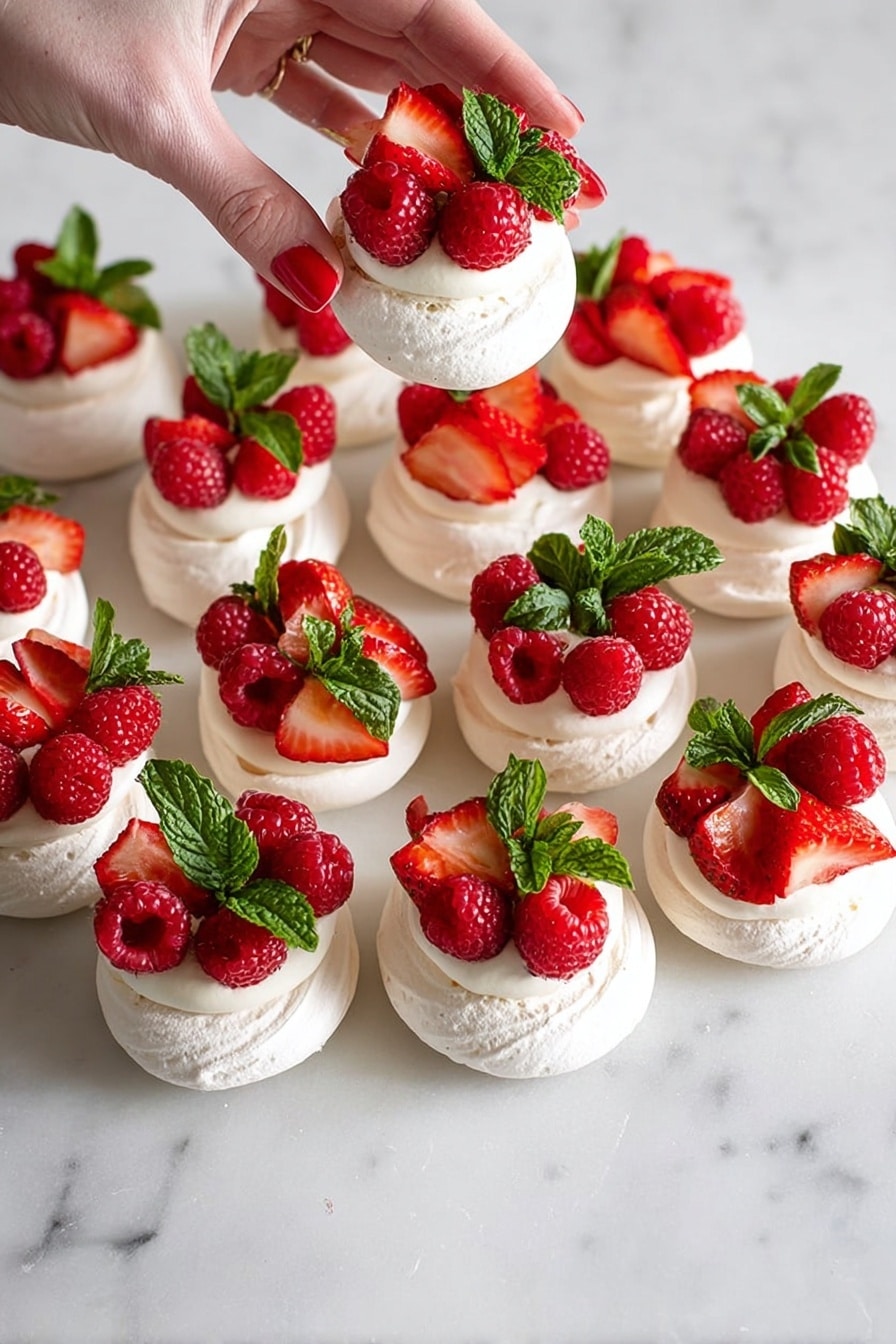
If you’re looking for a show-stopping dessert that’s as fun to eat as it is to look at, you’ve got to try this Pull Apart Pavlova Wreath with Fresh Fruit Recipe. I absolutely love how this dessert turns out—crispy on the outside with a cloud-like softness inside, topped with fresh cream and vibrant berries. When I first made this, my family went crazy for the interactive, pull-apart style that makes sharing a breeze, especially during holidays or celebrations. Stick with me, and I’ll walk you through everything you need to nail this gorgeous and delicious treat!
Why You’ll Love This Recipe
- Fun & Interactive: Pulling apart the pavlova mounds makes dessert time feel like playful sharing.
- Light Yet Decadent: Crisp meringue contrasts beautifully with whipped cream and juicy fresh fruit.
- Impressive Presentation: The wreath shape makes it perfect for festive occasions or a centerpiece dessert.
- Customizable: You can switch up fruits and garnishes to suit the season or your cravings.

Ingredients You’ll Need
This recipe shines because of its few, high-quality ingredients working in harmony. Each component plays a key role—whether it’s getting that perfect meringue texture or balancing sweetness with fresh brightness.
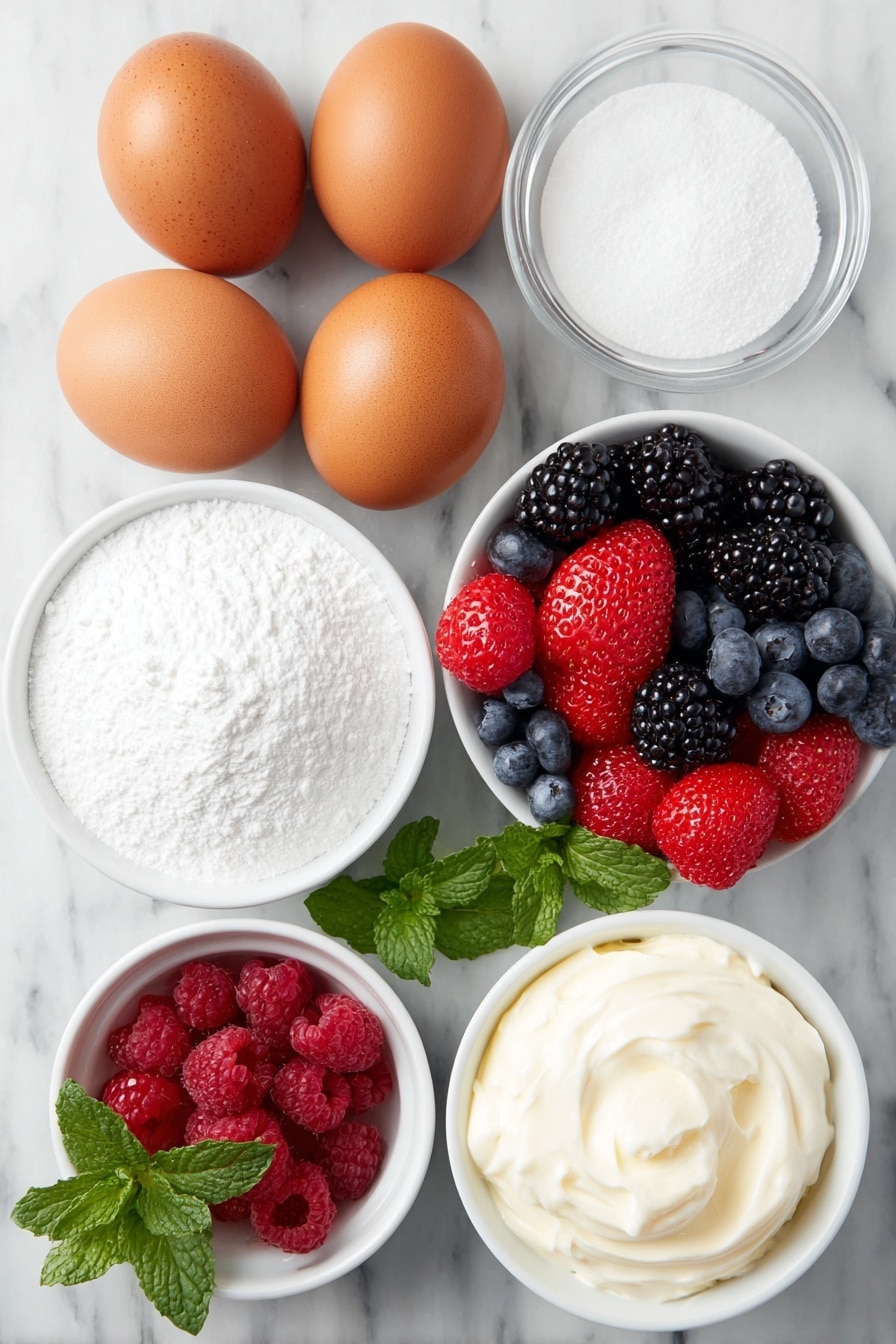
- Egg whites: Using extra-large eggs gives the best volume and stability in the meringue.
- Icing sugar (powdered sugar): Sifting is crucial here to avoid lumps, helping your meringue stay smooth and glossy.
- Cornstarch: This little addition helps stabilize the meringue and create that signature pavlova marshmallow-y center.
- Vanilla extract: Adds a subtle warmth that rounds out the sweetness beautifully.
- Heavy cream (whipping cream): For whipping to soft peaks—make sure it’s chilled for best results.
- Fresh fruit: I love using berries like strawberries, blueberries, and raspberries; their tartness cuts through the sweetness perfectly.
- Fresh mint: Adds a pop of color and an herbal brightness that pairs surprisingly well with the sweet elements.
Variations
One of the things I adore about the Pull Apart Pavlova Wreath with Fresh Fruit Recipe is how easy it is to personalize. Whether you’re switching out fruits or making it allergy-friendly, this wreath welcomes your creativity!
- Seasonal Fruit Swaps: During summer, I add stone fruits like cherries and apricots; in cooler months, pomegranate seeds offer a vibrant crunch.
- Dairy-Free Alternative: I once made this with coconut whipped cream for a friend with lactose intolerance, and it was just as delightful.
- Chocolate Drizzle: For a richer twist, drizzle melted dark chocolate over the finished wreath—my family could not get enough of this combo.
- Mini Meringue Sizes: If you want more pieces, make smaller meringues for bite-sized enjoyment; great for parties!
How to Make Pull Apart Pavlova Wreath with Fresh Fruit Recipe
Step 1: Whip Up the Dreamy Meringue Base
This first step is all about patience. Start by beating your extra-large egg whites in a clean, grease-free bowl until they’re frothy and foamy. Here’s a tip: I always make sure no yolk sneaks in because even a drop can keep your whites from whipping properly. Once foamy, slowly add sifted icing sugar in batches—this encourages the meringue to become super glossy and develop volume. It’ll usually take around 8 minutes in a stand mixer to reach stiff, shiny peaks. Then, gently fold in your cornstarch and vanilla to stabilize things further—this little secret keeps the inside lovely and soft even after baking.
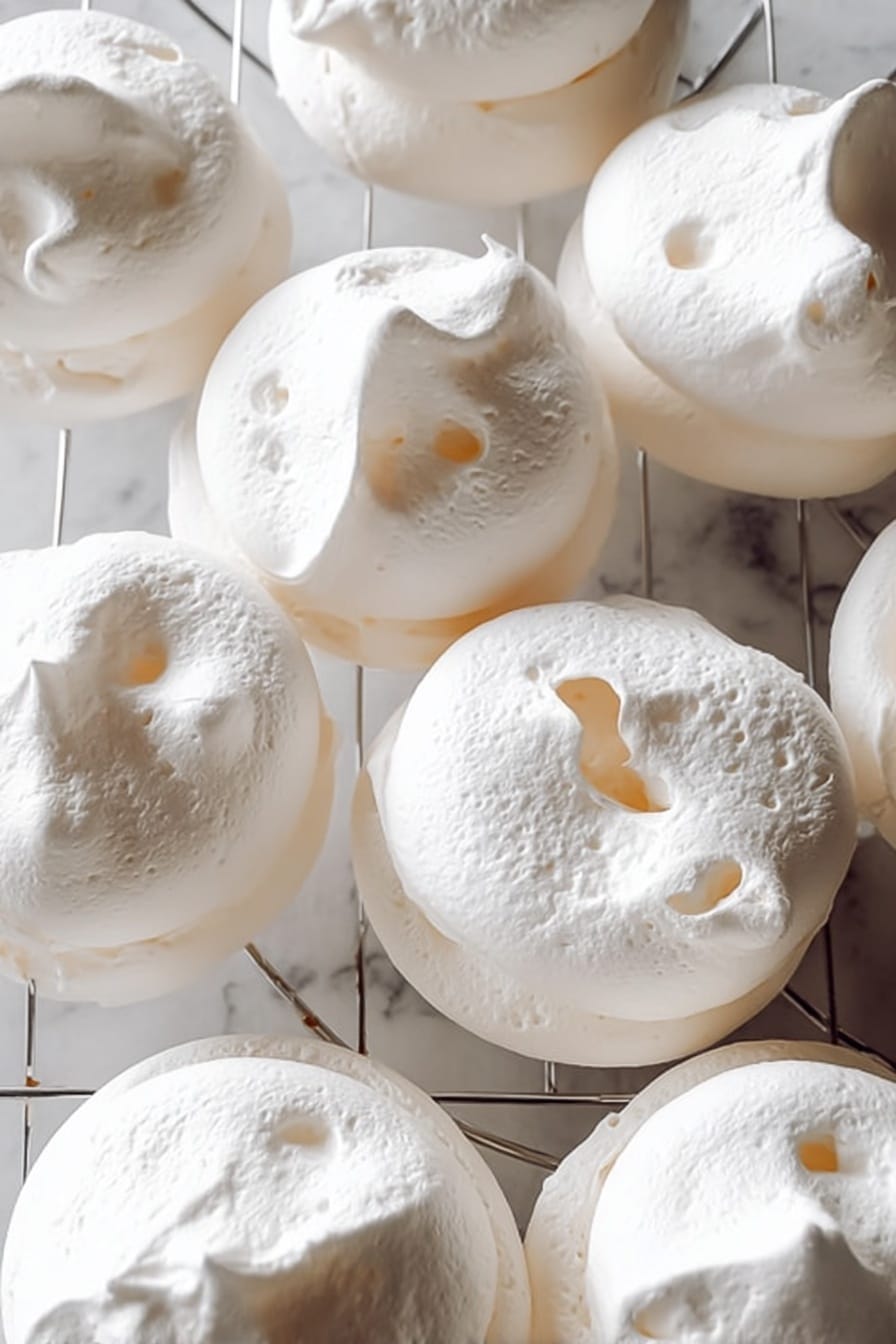
Step 2: Shape and Bake Your Mini Pavlovas into a Wreath
Line two baking sheets with parchment paper, then spoon or pipe small mounds about 5cm across, leaving enough space between each for them to hold their shape and dry well. I like to use a teaspoon to make a little dent on top of each mound—that’s where the cream will nestle later. Bake low and slow at 90°C (195°F) for an hour. Don’t rush this—your patience will pay off! After an hour, turn off the oven and let the pavlovas cool inside for about 2 hours. This slow cool-down prevents cracks and keeps them perfectly crisp on the outside while softening the insides.
Step 3: Whip the Cream and Assemble Your Wreath
While your pavlovas are cooling, whip your heavy cream with sifted icing sugar and vanilla until medium-stiff peaks form—this means the cream will hold shape but still be soft enough to pipe or spoon easily. Now comes the fun part: Arrange your pavlova mounds in a circular wreath shape on a big platter or wooden board. Spoon or pipe the whipped cream generously into each pavlova’s little dent, and top with colorful fresh fruit and mint leaves. I love how the freshness cuts through the sweetness and adds a lovely texture contrast.
Pro Tips for Making Pull Apart Pavlova Wreath with Fresh Fruit Recipe
- Use Room Temperature Egg Whites: I’ve found that egg whites whip better and achieve more volume when they’re not cold out of the fridge.
- Low and Slow Baking: Baking at low heat and cooling in the oven avoids cracking and keeps your pavlovas perfectly textured.
- Avoid Overwhipping Cream: Stop whipping as soon as medium-stiff peaks form to prevent the cream from turning grainy or butter-like.
- Don’t Assemble Too Early: I learned the hard way—putting cream on pavlova too soon makes it soggy, so assemble just before serving.
How to Serve Pull Apart Pavlova Wreath with Fresh Fruit Recipe
Garnishes
Whenever I serve this wreath, I like to add a little extra flair beyond just the fruit. A sprinkle of edible flowers or a light dusting of icing sugar right before serving adds that wow factor. Fresh mint leaves not only look vibrant but also bring a refreshing scent and subtle flavor that balances sweetness beautifully.
Side Dishes
This dessert is usually the star, so I keep sides light. A simple cup of freshly brewed coffee or a glass of sparkling wine pairs wonderfully. If I’m serving brunch, I’ll complement with a fruit salad or light cheese platter on the side to keep things fresh and bright.
Creative Ways to Present
For special occasions, I’ve arranged smaller wreaths as individual centerpieces or decorated the pavlovas with gold leaf or crushed pistachios for added elegance. One holiday season, I even swapped berries for diced kiwi and star fruit to create a festive red and green color palette—guests loved the creativity!
Make Ahead and Storage
Storing Leftovers
I usually recommend eating this pavlova wreath the same day you assemble it, but if you have leftovers, keep the meringue separate from the cream and fruit to avoid sogginess. Store the meringues in an airtight container at room temperature and the whipped cream and fruit in the fridge. Reassemble fresh before serving.
Freezing
I haven’t personally frozen the assembled wreath because the cream and fruit don’t freeze well, but the meringue shells freeze beautifully. Just make sure they’re completely cooled, then store in an airtight container or zip-top bag. When you’re ready to use, let them thaw at room temperature before adding cream and fruit.
Reheating
Because pavlova is crisp, reheating isn’t typical. However, if your meringues have softened slightly, you can pop them back in a preheated oven at 90°C (195°F) for 5-10 minutes to restore crispness—but watch closely, so they don’t brown or burn. Always add cream and fruit fresh after reheating.
FAQs
-
Can I make the meringue wreath ahead of time?
Yes! The meringue shells can be made ahead and stored in an airtight container at room temperature for up to 2 days. Just wait to whip the cream and assemble with fruit right before serving to keep everything fresh and crisp.
-
Why did my pavlova crack during baking?
Cracking is usually caused by baking at too high a temperature or rapid cooling. Following this recipe’s low-and-slow baking method and allowing the pavlovas to cool gradually in the turned-off oven helps prevent cracks.
-
What fruit works best for the Pull Apart Pavlova Wreath with Fresh Fruit Recipe?
Berries like strawberries, raspberries, blueberries, and blackberries are classic choices because they add a tart bite that balances the sweet meringue. You can also add kiwi, passion fruit, or stone fruits depending on the season and your preference.
-
Can I use regular sugar instead of icing sugar?
Icing sugar is preferred because it dissolves quickly into the egg whites, creating a smooth meringue. Using granulated sugar can result in a gritty texture, so try to stick to icing sugar for best results.
Final Thoughts
This Pull Apart Pavlova Wreath with Fresh Fruit Recipe is close to my heart because it turns dessert into a joyful, shared experience. Whether for a holiday, special event, or just a weekend treat, it never fails to impress — and it’s pretty fun eating it too! I hope you enjoy making this as much as I do, and that it brings a little extra sweetness and togetherness to your table.
Print
Pull Apart Pavlova Wreath with Fresh Fruit Recipe
- Prep Time: 25 minutes
- Cook Time: 1 hour
- Total Time: 3 hours 25 minutes
- Yield: Serves 15–30 (approximately 30 mini pavlovas) 1x
- Category: Dessert
- Method: Baking
- Cuisine: Australian
Description
This Pull Apart Pavlova Wreath is a stunning and delicious dessert featuring airy meringue pavlovas baked to perfection, topped with whipped cream, fresh berries, and mint. Perfect for serving a crowd, this elegant centerpiece combines crispy exteriors with marshmallow-soft interiors in a festive wreath style.
Ingredients
For the Meringue
- 6 extra-large egg whites
- 2 cups icing sugar / powdered sugar, sifted
- 2 tbsp cornstarch
- 1 tsp vanilla extract
For the Pavlova Wreath
- 3 cups heavy cream / whipping cream
- 1 cup icing sugar / powdered sugar, sifted
- 1 tsp vanilla extract
- Fresh fruit (berries)
- Fresh mint
Instructions
- Preheat Oven: Preheat the oven to 90°C (195°F) and line two baking sheets with parchment paper to prepare for baking the meringues.
- Beat Egg Whites: In a stand mixer fitted with the whisk attachment, beat the egg whites until foamy to start incorporating air for fluffy meringue.
- Add Sugar and Whip: Gradually add the sifted icing sugar while continuing to beat until the mixture becomes bright white, voluminous, and forms stiff peaks—this process can take up to 8 minutes, ensuring a stable meringue.
- Incorporate Cornstarch and Vanilla: Add cornstarch and vanilla extract to the meringue and whip just until combined to give the pavlovas their characteristic texture and flavor.
- Pipe Meringue Mounds: Pipe or spoon small mounds of meringue approximately 5cm in diameter onto the prepared baking sheets, spacing them about 5cm apart to prevent sticking.
- Create Indentation: Using a teaspoon, gently make a small dent in the center of each pavlova mound to hold the whipped cream later.
- Bake and Cool: Bake the meringues for 60 minutes, then switch off the oven and allow them to cool completely inside the oven for approximately 2 hours, which helps prevent cracking.
- Arrange Wreath: Once cooled, carefully remove the meringues from the baking sheets and arrange them on a large serving platter or board in a circular wreath shape.
- Whip Cream: Whip the heavy cream with icing sugar and vanilla until medium-stiff peaks form, perfect for topping the pavlovas.
- Assemble and Decorate: Spoon the whipped cream onto each pavlova and garnish with fresh berries and mint leaves to add color and fresh flavors.
- Serve: Serve the decorated pavlova wreath immediately for a delightful and impressive dessert experience.
Notes
- Ensure egg whites are at room temperature before beating for maximum volume.
- Sift the powdered sugar to avoid lumps in the meringue mixture.
- Cooling the meringues inside the oven gradually prevents cracking and maintains softness inside.
- Use fresh seasonal berries for the best taste and presentation.
- Can be made a day ahead, but decorate with cream and fruit just before serving to keep them fresh.
Nutrition
- Serving Size: 1 mini pavlova
- Calories: 120 kcal
- Sugar: 15 g
- Sodium: 10 mg
- Fat: 5 g
- Saturated Fat: 3 g
- Unsaturated Fat: 2 g
- Trans Fat: 0 g
- Carbohydrates: 18 g
- Fiber: 0.5 g
- Protein: 1 g
- Cholesterol: 0 mg

Your email address will not be published. Required fields are marked *