Description
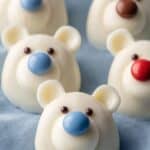
These adorable Polar Bear Cookies are a fun and festive treat perfect for winter or holiday celebrations. Made with double stuffed sandwich cookies dipped in creamy white candy melts, decorated with colorful candy coated chocolates for ears and noses, and finished with black icing eyes, these cookies are both visually charming and delicious. They offer a simple no-bake decorating method that yields a delightful, snowy polar bear look.
Ingredients
Scale
Cookies and Candy
- 12 double stuffed sandwich cookies
- 36 different coloured candy coated chocolates (light colors for ears; bright blue, brown, red, purple for noses)
- 12 oz. bag white candy melts
- 1 tube black icing
Instructions
- Prepare Work Surface: Lay out a sheet of parchment or wax paper to place the dipped cookies on, allowing them to set without sticking.
- Select Ears and Noses: Choose lighter-colored candy coated chocolates to serve as the polar bear ears and bright colors like blue, brown, red, and purple for the noses to add a playful touch.
- Set Aside Muzzles: Pick 12 nicely shaped white candy melts to be used as muzzles and set these aside. Melt the remaining white candy melts according to package instructions until smooth.
- Assemble and Dip: Gently press the ‘ear’ candies into the cream filling between the two cookie halves. Then dip the entire cookie into the melted white candy melts, fully coating it. Use a fork to lift the cookie out and gently tap the side of the bowl to remove excess coating.
- Attach Muzzle and Nose: Place the reserved white candy melt onto the coated cookie where the muzzle should be and press gently to form a ridge. Use a small amount of melted white candy to attach the colorful candy coated nose slightly higher on the muzzle.
- Decorate Eyes: Once the coated cookies are dry and set, use the black icing to carefully dot on the eyes, giving the cookie its final polar bear expression.
- Dry and Store: Let the decorated cookies dry completely before storing them in a sealed container to maintain freshness.
Notes
- Use parchment paper to prevent the cookies from sticking to the work surface.
- Choose smooth, well-shaped candy melts for the muzzles for an even finish.
- Work quickly when dipping as candy melts harden fast.
- Make sure cookies are fully dry before stacking or storing to avoid smudging decorations.
- Use a toothpick or small brush to help position small details if needed.
Nutrition
- Serving Size: 1 cookie
- Calories: 220
- Sugar: 20g
- Sodium: 90mg
- Fat: 11g
- Saturated Fat: 8g
- Unsaturated Fat: 2g
- Trans Fat: 0g
- Carbohydrates: 28g
- Fiber: 1g
- Protein: 2g
- Cholesterol: 0mg