
If you’re craving a sweet treat that’s simple, elegant, and totally foolproof, this No-Bake Cheesecake Cups Recipe is exactly what you need. I absolutely love how it comes together with just a handful of ingredients—no oven required! Whether it’s a busy weeknight or an impromptu get-together, these cheesecake cups feel special but don’t demand hours in the kitchen. Trust me, once you try this, you’ll wonder why you ever complicated cheesecake any other way.
Why You’ll Love This Recipe
- No Oven Needed: Perfect for hot days or when your oven is already busy.
- Super Quick to Make: You can whip this up in under 20 minutes, ideal for last-minute desserts.
- Customizable Toppings: From fresh berries to cookie crumbs, make it uniquely yours each time.
- Great for Individual Portions: Serving in cups means everyone’s happy and presentation is effortless.

Ingredients You’ll Need
The magic of this No-Bake Cheesecake Cups Recipe lies in its simplicity. Each ingredient plays an important role, creating texture and flavor that balance perfectly. I like to grab high-quality cream cheese for that rich, creamy base and fresh fruit for a bright finish.

- Graham Cracker Crumbs: Gives a wonderful, slightly crunchy base with a touch of sweetness.
- Salted Butter: Melting this into the crumbs helps them stick together nicely and adds richness.
- Cream Cheese: The star of the show—soft and smooth cream cheese delivers that classic cheesecake tang.
- Granulated Sugar: Sweetens the filling just right without overpowering.
- Pure Vanilla Extract: Adds a subtle aromatic warmth that elevates the whole dessert.
- Heavy Whipping Cream: Beaten to stiff peaks, it lightens the texture making the cheesecake delightfully airy.
- Optional Toppings: Fresh berries, whipped cream, or even crushed cookies personalize these cups beautifully.
Variations
One of the best parts about this No-Bake Cheesecake Cups Recipe is how easy it is to make it your own. I often switch up toppings depending on the season or what’s sitting in my fridge. You can even experiment with flavors in the filling itself!
- Berry Medley: I love tossing in fresh raspberries, blackberries, and blueberries on top for a vibrant, tangy contrast.
- Chocolate Lover’s Twist: Mix mini chocolate chips into the cream cheese mixture or sprinkle cocoa powder on top for a decadent dessert.
- Dairy-Free Option: Swap cream cheese with a plant-based alternative and use coconut cream instead of whipping cream for an allergy-friendly treat.
- Spiced Up: Add a pinch of cinnamon or pumpkin pie spice to the cream cheese blend for a cozy fall vibe.
How to Make No-Bake Cheesecake Cups Recipe
Step 1: Prep the Crust Layer
Start by mixing the melted salted butter with the graham cracker crumbs. This step is key because you want the crumbs to be evenly coated so they pack nicely at the bottom of each cup. I usually eyeball about 2 to 3 tablespoons per serving—it’s enough for a crunchy base without being overwhelming. Press the mixture gently down into the bottom using the back of a spoon or your fingers to compact it slightly.
Step 2: Whip the Cream
In a clean bowl or stand mixer, pour in the heavy whipping cream and beat on high speed until stiff peaks form. You’ll know you’re there when the cream holds firm peaks that don’t flop over when you lift your beaters. This usually takes about a minute for me with my mixer, but keep a close eye so you don’t overbeat and end up with butter.
Step 3: Prepare the Cream Cheese Filling
Next, transfer your whipped cream to another bowl so you can work with the cream cheese mixture separately. Beat the softened cream cheese with sugar and vanilla extract until completely smooth and creamy. The key here is to avoid any lumps—that velvety texture makes all the difference in the final mouthfeel.
Step 4: Fold Cream into Cream Cheese
Now comes the gentle part! Fold the whipped cream into the cream cheese mixture carefully. This step keeps the texture light and fluffy, so don’t rush or stir too vigorously. Use a spatula and turn the bowl while folding until everything is fully combined and creamy.
Step 5: Assemble and Chill
You can spoon the cheesecake mixture directly into your prepared graham cracker cups, or if you want to get fancy, load it into a piping bag for neat, elegant swirls. Either way works and looks great! Once all cups are filled, top with fresh fruit or other toppings of your choice. Cover them with plastic wrap and chill for at least an hour to let everything set perfectly.
Pro Tips for Making No-Bake Cheesecake Cups Recipe
- Use Room Temperature Cream Cheese: I learned the hard way that cold cream cheese makes your filling lumpy, so let it soften for about 30 minutes before mixing.
- Don’t Overbeat the Cream: Whipping cream too long can turn it grainy or even into butter. Stop as soon as stiff peaks form.
- Gentle Folding is Key: Mixing too hard deflates the whipped cream and your cups won’t be as light and airy.
- Chill for at Least an Hour: This isn’t just about thickening but also about flavors melding together; patience pays off here.
How to Serve No-Bake Cheesecake Cups Recipe

Garnishes
When I serve these cheesecake cups, I usually go for fresh raspberries or sliced strawberries—something juicy and colorful that contrasts with the creamy white filling. Sometimes I sprinkle additional graham cracker crumbs or add a dollop of lightly sweetened whipped cream for a finishing touch. Honestly, a few mint leaves brighten it up beautifully and impress my guests every time.
Side Dishes
I like pairing these No-Bake Cheesecake Cups with light, fresh sides like a citrus salad or a fruit sorbet if we want to keep dessert stations simple but varied. They also work surprisingly well alongside a hot cup of coffee or chamomile tea for a cozy afternoon treat.
Creative Ways to Present
For birthdays or celebrations, I’ve layered these cheesecake cups in a large glass trifle bowl—using layers of fresh fruit, crushed cookies, and even chocolate drizzle for a showstopper dessert centerpiece. If you’re hosting an outdoor picnic, tiny mason jars with twine ribbons add a charming rustic vibe. The best part? These cups are already individual servings, so they cut cleanly and look polished on any dessert table.
Make Ahead and Storage
Storing Leftovers
Once chilled, I cover the cheesecake cups tightly with plastic wrap or transfer them to airtight containers. They keep beautifully in the fridge for up to three days. I’ve found the texture stays just as creamy and the crust holds up nicely without getting soggy when properly covered.
Freezing
Freezing these No-Bake Cheesecake Cups is totally doable but I prefer to freeze them without the fresh fruit topping. Wrap them individually or together in a container with parchment paper between layers. When thawed in the fridge overnight, they hold their shape well, though the crust might be a touch softer. It’s a handy option for prepping ahead of a party.
Reheating
Because these are cold desserts, reheating isn’t necessary or really recommended. Instead, just let frozen cups thaw overnight in the fridge for best results. If you want to brighten flavors, a few extra fresh berries or a quick zest of lemon on top brings the cupcakes back to life perfectly.
FAQs
-
Can I use low-fat cream cheese or whipped cream for this recipe?
While you can technically use low-fat versions, I’ve found they don’t provide the same rich, creamy texture that makes these cheesecake cups so indulgent. The full-fat cream cheese and heavy whipping cream create that luscious mouthfeel you’re aiming for.
-
How long do these cheesecake cups keep in the fridge?
They stay fresh and delicious for about 3 days when properly stored in an airtight container. After that, the crust might start softening and the filling could lose some of its firmness.
-
Can I prepare these cheesecake cups a day ahead?
Absolutely! In fact, making them a few hours or even a day ahead helps the flavors meld and the texture set beautifully. Just keep them covered in the fridge until serving.
-
What can I use instead of graham cracker crumbs?
If you don’t have graham crackers, crushed digestive biscuits or vanilla wafers work nicely too. Just make sure to adjust the sweetness accordingly and use the same amount.
-
How do I keep the crust crunchy?
Press the crust mixture firmly into the base of the cups and chill immediately after assembly. Serving soon after chilling helps keep the crust from getting soggy. If you need to prep super early, consider adding a thin layer of melted chocolate on the bottom to seal it.
Final Thoughts
This No-Bake Cheesecake Cups Recipe has become a staple in my dessert rotation because it’s reliable, tasty, and endlessly adaptable. I remember the first time I shared it with close friends—they couldn’t believe it was no-bake and so simple! I highly encourage you to give it a go; it’s a great way to indulge without the fuss. The best part is seeing the smiles on people’s faces as they dig in to those creamy, dreamy layers. You’re going to love making this as much as eating it!
Print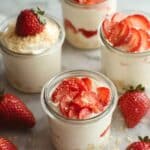
No-Bake Cheesecake Cups Recipe
- Prep Time: 15 minutes
- Cook Time: 0 minutes
- Total Time: 1 hour 15 minutes
- Yield: 6 cups 1x
- Category: Dessert
- Method: No-Cook
- Cuisine: American
- Diet: Vegetarian
Description
This No-Bake Cheesecake Cups recipe offers a quick and easy way to enjoy a creamy, rich cheesecake dessert without the need for an oven. Featuring a buttery graham cracker crust base topped with a smooth and fluffy cream cheese filling, these individual servings are perfect for gatherings or a delightful treat. Customize with your favorite fresh fruits or toppings for added flavor and texture.
Ingredients
Crust
- 3/4 cup graham cracker crumbs
- 2 tbsp salted butter, melted
Filling
- 8 oz cream cheese, softened
- 1/2 cup granulated sugar
- 1 teaspoon pure vanilla extract
- 1 cup heavy whipping cream
Optional Toppings
- Raspberries
- Strawberries
- Whipped cream
- Broken cookies
- Additional graham cracker crumbs
Instructions
- Prepare the crust: In a small bowl, mix the melted butter and graham cracker crumbs until evenly combined. Spoon about 2-3 tablespoons of this mixture into the bottom of each glass or serving dish, pressing lightly to form an even base.
- Whip the cream: In a large bowl or stand mixer bowl, beat the heavy whipping cream on high speed until stiff peaks form, which takes about one minute. Once whipped, transfer the cream to a separate bowl to set aside.
- Make the cream cheese mixture: In the original mixing bowl, blend the softened cream cheese, granulated sugar, and vanilla extract together until smooth and creamy using a mixer or whisk.
- Combine mixtures: Gently fold the whipped cream into the cream cheese mixture carefully to maintain the airy texture, stirring until fully combined and smooth.
- Assemble the cheesecake cups: Either spoon or pipe the creamy filling over the graham cracker crust layer in each cup, distributing it evenly.
- Chill and serve: Optionally, top each cheesecake cup with fresh fruit or other toppings of your choice. Cover the cups and refrigerate for at least one hour to set before serving.
Notes
- Ensure the cream cheese is at room temperature for easier mixing and a smoother texture.
- Use chilled heavy whipping cream for best whipping results.
- Customize the topping to suit your preference; berries add a fresh touch while cookie crumbles add crunch.
- These cheesecake cups can be prepared a day in advance and kept chilled.
- For a lighter alternative, substitute some of the heavy cream with Greek yogurt, although this will change the texture slightly.
Nutrition
- Serving Size: 1 cup
- Calories: 320
- Sugar: 20g
- Sodium: 120mg
- Fat: 26g
- Saturated Fat: 16g
- Unsaturated Fat: 8g
- Trans Fat: 0g
- Carbohydrates: 15g
- Fiber: 1g
- Protein: 4g
- Cholesterol: 90mg

Your email address will not be published. Required fields are marked *