
If you’ve ever strolled through a Korean bakery or seen those irresistible viral videos, you know that Korean Cream Cheese Garlic Bread Recipe is a game changer. This sweet, creamy, garlicky bread has a perfect balance of flavors and texture that’ll make you swoon from the very first bite. Trust me, once you try my recipe, you’ll be hooked — it’s soft, buttery, and decadently delicious, and I’m here to walk you through every step so you nail it perfectly at home.
Why You’ll Love This Recipe
- Ultimate Comfort Food: The combo of soft bread, rich cream cheese, and garlic butter is a total crowd-pleaser.
- Fun and Impressive to Make: This recipe teaches you classic bread-making techniques that build your confidence in the kitchen.
- Customizable Flavor: You can easily adjust garlic intensity or sweetness based on your family’s preferences.
- Perfect for Any Occasion: Whether it’s a lazy weekend brunch or a party snack, it’s always a hit.

Ingredients You’ll Need
For this Korean Cream Cheese Garlic Bread Recipe, the magic is in the quality and balance of ingredients. Each one plays a key role in getting that soft, fluffy bread and luscious filling just right. Here’s what you’ll want to have on hand.

- Warm water: This activates the yeast gently without killing it — aim for around 90-110°F.
- Active dry yeast: The heart of your bread’s rise and texture.
- All-purpose flour: Spoon and level it for accuracy to get a tender crumb.
- Granulated sugar: Adds light sweetness that complements the savory elements.
- Kosher salt: Essential for flavor balance — don’t skip!
- Large eggs: One for optional egg wash to get that golden crust, and two for the garlic butter mixture.
- Cream cheese: Softened and smooth, it’s the star filling’s creamy base.
- Unsalted butter: Melted for that silky garlic butter sauce.
- Whole milk (or half & half): Makes the garlic butter ultra smooth and rich.
- Garlic: Minced fresh for the authentic punch everyone loves.
- Dry parsley flakes: Adds color and a subtle fresh touch to the garlic butter.
Variations
I love how versatile this Korean Cream Cheese Garlic Bread Recipe is — you can make it your own in so many ways. Don’t be afraid to experiment with different cheeses, herbs, or even a touch more heat if you like things spicy.
- Cheese Variations: I’ve tried swapping cream cheese with mascarpone or ricotta for a lighter, fluffier filling — it’s delicious!
- Herb Twists: Adding fresh chopped chives or basil instead of parsley gives a whole new aroma and taste.
- Spicy Kick: Mixing a little chili powder or sriracha into the garlic butter amps up the flavor for fans of heat.
- Dietary Adaptations: For a dairy-free version, vegan cream cheese and plant-based milk work well, though texture will be a bit different.
How to Make Korean Cream Cheese Garlic Bread Recipe
Step 1: Activate Your Yeast for That Perfect Rise
Start by stirring your warm water with the active dry yeast to wake things up — it should get a bit foamy in just a couple of minutes. A neat trick I learned? Use a thermometer to check the water temperature because too hot will kill the yeast, and too cold won’t activate it properly. If it’s bubbling slightly, you’re good to go!
Step 2: Mix and Knead Your Dough Until Silky Smooth
In the bowl of your mixer, combine the flour, sugar, and salt before adding the yeast water. Use your dough hook on low speed until it starts coming together into a rough dough. I sometimes switch to kneading by hand at this point to really feel the dough develop its texture. Knead for about 8-10 minutes until the dough is smooth and stretchy. The “windowpane test” is your best friend here — if you can stretch the dough thin without tearing, you’re ready to proof.
Step 3: First Rise and Shaping Your Dough Balls
Place your dough ball in a lightly oiled bowl, cover it, and find a warm spot to let it double in size — this usually takes about 45 minutes to an hour. Once doubled, punch down the dough and divide it into six equal pieces. Roll each into smooth balls and space them on a parchment-lined sheet pan. Cover again and set aside for that second rise — you want them almost doubled again for the perfect fluffy texture.
Step 4: Bake the Bread to Gorgeous Golden Perfection
Preheat your oven to 350°F. If you want, brush the dough balls with beaten egg for an inviting golden sheen — I love how this looks, but it’s totally optional. Bake for about 20-25 minutes until golden and reaching an internal temp of 190°F. Let the rolls cool to lukewarm so they’re easier to handle for the next steps.
Step 5: Whip Up That Dreamy Cream Cheese Filling
While the bread cools, beat your softened cream cheese with sugar until it’s silky smooth. I like to use a piping bag or a ZipLoc with the corner snipped off to get the filling neatly between the bread wedges later on — it helps keep things tidy and makes assembly so fun!
Step 6: Prepare the Silky Garlic Butter Sauce
Whisk together melted butter, milk, sugar, minced garlic, parsley flakes, and eggs until smooth. This part felt tricky to me at first because eggs can scramble if overheated, so I heat it gently over a double boiler while whisking constantly to keep the mixture warm and fluid without cooking the eggs. Alternatively, the microwave (in short bursts) works if you’re careful — just keep an eye on it!
Step 7: Assemble the Korean Cream Cheese Garlic Bread with Love
Carefully cut each bread roll into 8 wedges — don’t slice all the way through or the bread will fall apart. Pipe cream cheese between every wedge, then generously dip the whole bread into your garlicky butter, ensuring the filling and gaps soak up that buttery goodness. Hold the bread upside down to drain any excess and lay them back on your parchment-lined pan. For a final touch, pipe a bit more cream cheese in the center and sprinkle kosher salt on top. Bake at 400°F for 8-10 minutes until crispy but not burnt. This step brings the whole dish together in that perfect sweet-savory harmony.
Pro Tips for Making Korean Cream Cheese Garlic Bread Recipe
- Perfect Dough Hydration: I learned that starting with slightly less water and adding more as needed helps achieve that tender, not-too-sticky dough.
- Gentle Garlic Butter Heating: Too hot, and the eggs scramble—so keep your heat low and whisk constantly.
- Cut Without Cutting Through: Leaving the wedge bottoms intact keeps the bread cohesive and makes it easy to share.
- Don’t Rush Proofing: Good things take time — letting your dough double twice gives that pillowy softness you want.
How to Serve Korean Cream Cheese Garlic Bread Recipe

Garnishes
I often add a sprinkle of extra parsley flakes or even a dusting of flaky sea salt on top just before serving — it adds such a nice contrast to the richness. Sometimes, I like to drizzle a touch of honey for a sweet-savory combo that gets raves every time.
Side Dishes
This bread pairs beautifully with a crisp green salad or a warm bowl of Korean spicy chicken stew if you’re going full-on Korean meal vibes. For a simple snack, a cup of hot green tea or even cold milk balances the richness perfectly.
Creative Ways to Present
For a fun twist when hosting, I arrange the breads on a wooden board, pile on fresh herbs, and serve with small bowls of extra cream cheese and garlic butter for dipping. It’s very shareable and a real showstopper at parties.
Make Ahead and Storage
Storing Leftovers
If you have leftovers (and you might, but honestly, they rarely last!), I wrap individual breads tightly in plastic wrap and keep them at room temperature for up to one day. After that, I move them to the fridge to prevent the cream cheese from spoiling.
Freezing
I’ve successfully frozen fully assembled bread (before the final bake) by wrapping it well and placing it in an airtight container. To enjoy, thaw it overnight in the fridge, then bake as directed — this keeps the bread fresh and the texture just right.
Reheating
When reheating, I pop the bread in a 350°F oven for about 5-7 minutes to refresh the crispiness and warm the garlic butter filling. Avoid microwaving as it tends to make the bread soggy or chewy.
FAQs
-
Can I use store-bought bread instead of making it from scratch?
Absolutely! Many people use soft bread rolls from the store to save time. While homemade bread offers the best texture and freshness, choose the softest rolls you can find and be gentle when cutting to keep the wedges intact.
-
How do I prevent the eggs from scrambling when making the garlic butter?
Heat the garlic butter mixture slowly over a double boiler and whisk constantly. Avoid direct high heat and don’t leave it unattended. Alternatively, use the microwave in short bursts, stirring in between.
-
Why does my bread sometimes turn out dense?
Often, using too little water or not kneading enough affects the bread’s crumb. Adjust the water starting at 1⅓ cup and add more if needed. Also, make sure your dough passes the windowpane test, which signals good gluten development.
-
Can I make this dairy-free?
Yes! Substitute vegan cream cheese and use non-dairy milk like almond or oat. For the garlic butter blend, try using vegan butter to keep the flavor close to the original.
Final Thoughts
Making this Korean Cream Cheese Garlic Bread Recipe feels like a mini celebration every time. It’s that cozy, indulgent treat that brings smiles around the kitchen. I love sharing it with friends and family because it’s approachable yet feels special. Give it a try—you’ll soon find it hard to stop at just one wedge. Happy baking, and enjoy every buttery, garlicky, cream cheese-filled bite!
Print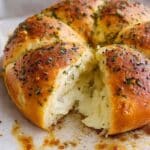
Korean Cream Cheese Garlic Bread Recipe
- Prep Time: 35 minutes
- Cook Time: 35 minutes
- Total Time: 2 hours 40 minutes
- Yield: 6 cream cheese garlic breads 1x
- Category: Bread
- Method: Baking
- Cuisine: Korean
Description
Korean Cream Cheese Garlic Bread is a delightful fusion treat featuring soft, fluffy bread filled with a sweetened cream cheese filling and coated in a rich, garlicky butter sauce. This recipe highlights homemade bread rolls that are perfectly tender on the inside and golden on the outside, then generously filled with a creamy, sweet cheese filling and dipped in a buttery garlic glaze for an irresistibly sweet and savory snack or dessert.
Ingredients
For the bread:
- 1½ cup warm water (around 90-110°F)
- 1 teaspoon active dry yeast
- 4½ cup all-purpose flour (spooned & leveled)
- ¼ cup granulated sugar
- ½ teaspoon kosher salt
- 1 large egg, beaten (optional for egg wash)
For the cream cheese filling:
- 8 ounce cream cheese, softened
- ¼ cup granulated sugar
For the garlic butter:
- 1 cup unsalted butter, melted (or 2 sticks)
- ½ cup whole milk (or half & half)
- 2 Tablespoon granulated sugar
- 2 Tablespoon garlic, minced (or to your preference)
- 1½ Tablespoon dry parsley flakes (or to your preference)
- 2 large eggs
- Kosher salt (for sprinkling)
Instructions
- Activate yeast: Stir together warm water and active dry yeast. Set aside to let dissolve, about 2-3 minutes.
- Mix dough: In the stand mixer bowl, combine flour, sugar, and salt. Pour in water with dissolved yeast. Mix on low speed using dough hook until shaggy dough forms.
- Knead dough: Increase mixer speed to medium-high and knead until dough is smooth and passes the windowpane test, about 8-10 minutes. Alternatively, knead by hand until smooth.
- First proof: Shape dough into a ball and let it proof in a covered bowl in a warm spot until doubled in size, about 45 minutes to 1 hour.
- Shape rolls: Punch down dough, fold onto itself to tighten, then divide into 6 equal pieces. Roll each into a smooth ball.
- Second proof: Arrange dough balls about 2-3 inches apart on parchment-lined sheet pan. Cover and proof until nearly doubled, about 45 minutes to 1 hour.
- Preheat oven and bake rolls: Preheat oven to 350°F. Optionally brush rolls with egg wash. Bake for 20-25 minutes until golden-brown and internal temperature reaches 190°F.
- Cool rolls: Let bread cool at room temperature until comfortable to handle.
- Prepare cream cheese filling: Whisk softened cream cheese and sugar until smooth. Transfer to piping bag or ZipLoc bag and set aside.
- Make garlic butter: In a large bowl, whisk melted butter, milk, sugar, minced garlic, parsley flakes, and eggs until smooth. Warm gently over bain-marie or simmering water, whisking constantly until sugar dissolves and mixture is fluid but not overheated to avoid scrambling eggs. Keep warm.
- Preheat oven for final bake: Preheat oven to 400°F.
- Cut rolls: When rolls are cool enough to handle, cut each roll into 8 wedges without cutting all the way through, keeping the base intact.
- Fill with cream cheese: Pipe cream cheese filling between each wedge carefully, avoiding breaking the segments.
- Dip in garlic butter: Dip entire bread into the warm garlic butter, ensuring coating between wedges. Hold upside down to drain excess.
- Assemble on pan: Place breads on parchment-lined sheet pan. Pipe remaining cream cheese filling in the center of each bread and sprinkle lightly with kosher salt.
- Bake final step: Bake for 8-10 minutes until breads are crispy but not overly browned.
- Cool and serve: Let breads cool for a few minutes before serving and enjoy the sweet, savory, creamy delight.
Notes
- Photo references, tips, and FAQs are available in the original post for better guidance.
- Store-bought rolls can be used for convenience, but homemade bread yields superior texture and flavor.
- Water amount for dough may vary by region; start with 1⅓ cups if you live in a warm, humid climate and adjust as needed.
- Egg wash is optional and skipping it may help prevent over-darkening after the second bake.
Nutrition
- Serving Size: 1 cream cheese garlic bread
- Calories: 490
- Sugar: 15g
- Sodium: 380mg
- Fat: 28g
- Saturated Fat: 16g
- Unsaturated Fat: 10g
- Trans Fat: 0g
- Carbohydrates: 50g
- Fiber: 2g
- Protein: 9g
- Cholesterol: 95mg

Your email address will not be published. Required fields are marked *