If you’re looking for a fun twist on a classic, you absolutely have to try this Green Velvet Cake with Cream Cheese Frosting Recipe. It’s vibrant, moist, and that cream cheese frosting? It just takes the whole thing to the next level. I first stumbled upon this recipe when I wanted something unique for St. Patrick’s Day, and honestly, it’s become a favorite anytime I want to impress without too much fuss. Stick with me—I’ll share all the little tricks that make this cake shine!
Why You’ll Love This Recipe
- Unique Color and Flavor: The green velvet cake is not just eye-catching but has a subtle cocoa undertone that pairs beautifully with the cream cheese frosting.
- Simple Ingredients: Using common pantry staples plus a splash of green food coloring makes this recipe super accessible and fun to bake.
- Versatile Baking Options: Whether you want a layered cake, cupcakes, or even whoopie pies, this recipe works like a charm.
- Perfect Texture: Moist, tender crumb that stays fresh for days, especially with the creamy frosting sealing in all that goodness.

Ingredients You’ll Need
The ingredients here all work together to give you that lovely green velvet with a hint of cocoa and a velvety cream cheese frosting that balances richness and sweetness just right. When shopping, I recommend picking high-quality cream cheese and fresh buttermilk if you can—it really makes a difference in texture and flavor.

- All Purpose Flour: Go for a good-quality, unbleached flour for the best crumb.
- Sugar: Regular granulated sugar works perfectly here.
- Cocoa Powder: Just a tablespoon adds a gentle chocolate note essential for balance.
- Salt: Enhances the flavors and balances sweetness.
- Baking Soda: For that perfect rise and tenderness.
- Eggs: Room temperature eggs help with better batter incorporation.
- Oil: Use a neutral flavored oil like vegetable or canola; it keeps the cake moist.
- Buttermilk: Gives acidity and tenderness—in a pinch, you can use milk with a bit of vinegar.
- Vinegar: Reacts with baking soda to give a light texture and reacted flavor note.
- Vanilla Extract: Brings warmth and depth to the batter and frosting.
- Green Food Coloring: The star of the show—use gel for vibrant color that won’t thin the batter.
- Cream Cheese: Use full-fat and softened for smoothest, creamiest frosting.
- Butter: Also softened, to blend beautifully with cream cheese in the frosting.
- Powdered Sugar: The sweetness and texture base for frosting; sift if lumpy.
- Milk: Use sparingly to adjust frosting consistency exactly how you want it.
Variations
I love making this Green Velvet Cake with Cream Cheese Frosting Recipe my own by tweaking flavors or shapes—it keeps things exciting. Feel free to adapt it to your favorite occasion or simply to fit what you have in the pantry!
- Spicy Twist: I sometimes add a pinch of cinnamon or cardamom to the batter which gives an unexpected, cozy depth—my family can’t get enough!
- Chocolate Layers: Swap a layer for classic devil’s food cake to create a striking contrast when you slice into it.
- Diet-Friendly: For a lighter version, try swapping half the oil for unsweetened applesauce; it keeps the moistness but cuts some fat.
- Mini Cakes or Cupcakes: Baking smaller sized portions (mini cupcakes or whoopie pies) is a fun way to serve guests, plus they bake faster.
How to Make Green Velvet Cake with Cream Cheese Frosting Recipe
Step 1: Whisk Together Your Wet Ingredients With Color
Start by lightly whisking your eggs in a medium bowl until they’re smooth—this helps everything blend easier. Then add the oil, buttermilk, vinegar, and vanilla extract. Whisk well until your mixture is combined. Now here’s a trick I learned: adding the green food coloring last and stirring gently prevents over-mixing yet gives that perfect even green hue you’ll absolutely love.
Step 2: Combine Dry Ingredients Fully
In a separate large mixing bowl, stir together the flour, sugar, cocoa powder, salt, and baking soda. Mixing these dry ingredients thoroughly avoids pockets of baking soda or flour later on, which could make your cake oddly textured. I always take a sec here to sift the cocoa powder if it’s clumpy, which helps!
Step 3: Mix Wet Into Dry Ingredients
Pour your wet ingredients into the dry, and mix on medium-high speed for about 1 to 2 minutes until everything is just combined and smooth. Don’t overmix here—it’s a common mistake that can make the cake dense. You’ll know you’re done when the batter looks shiny and flows off your spatula in thick ribbons.
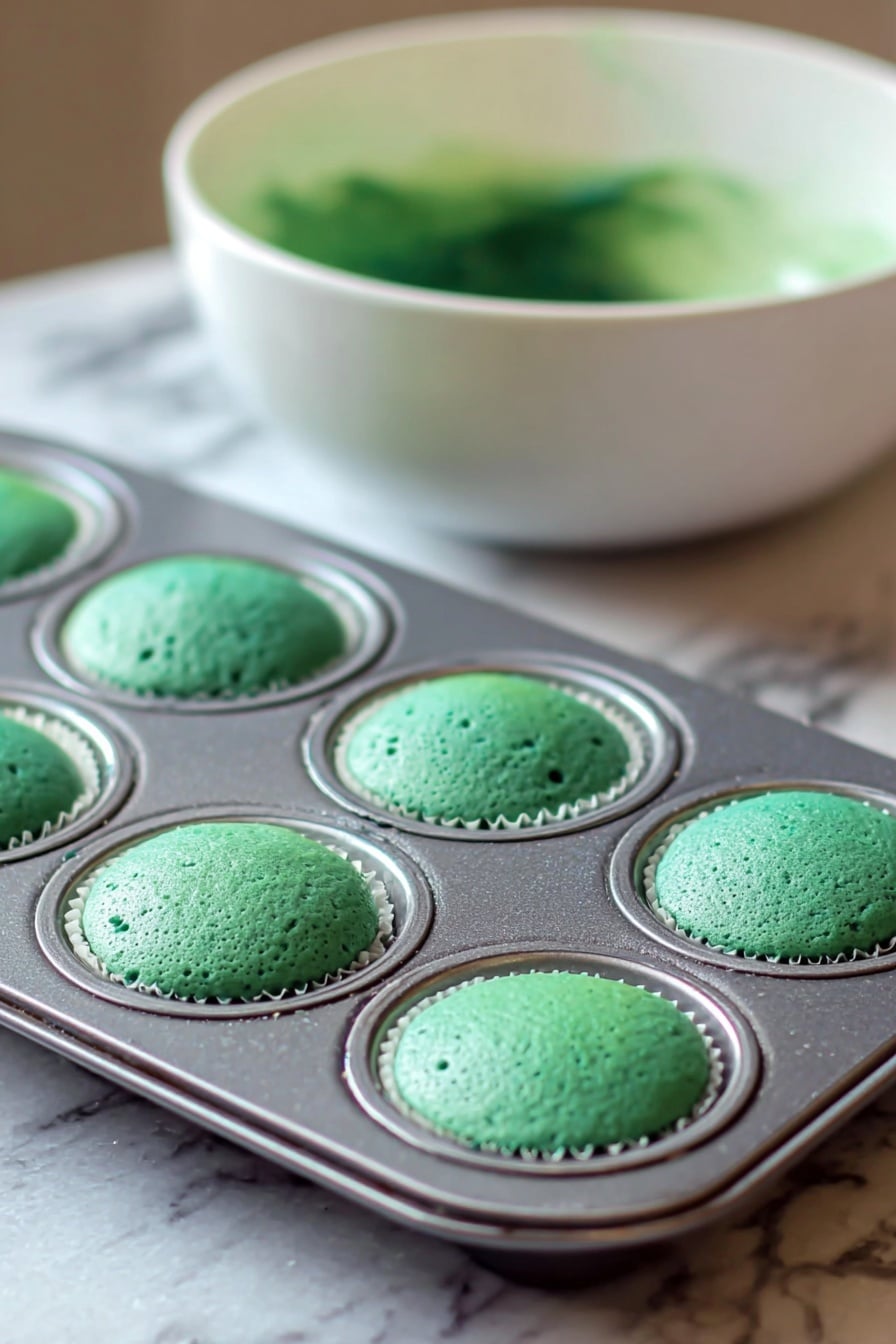
Step 4: Bake According to Your Chosen Method
Grease your cake pans, cupcake tins, or whoopie pie pans well. I love that this recipe is flexible: for an 8-inch cake pan, bake about 22 minutes; regular cupcakes take 16; mini cupcakes or whoopie pies bake closer to 13. Use a toothpick test—if it comes out clean or with a few moist crumbs, it’s ready. I’ve found rotating my pans halfway during baking makes sure everything browns evenly.
Step 5: Cream Cheese Frosting Magic
While your cake cools completely, whip together the frosting. Beat the softened cream cheese, butter, and vanilla until silky. Then gradually add powdered sugar and keep mixing until thick and fluffy. Add a touch of milk if you want it a bit softer for spreading or piping. Trust me, the key here is patience—beat it long enough for that meltingly smooth texture that everyone always raves about.
Pro Tips for Making Green Velvet Cake with Cream Cheese Frosting Recipe
- Use Gel Food Coloring: I discovered that gel coloring gives a richer green without watering down the batter.
- Room Temperature Ingredients: Make sure eggs, butter, and cream cheese are at room temp to blend smoothly with zero lumps.
- Don’t Overmix Batter: Mixing just enough helps keep the cake light and airy; overmixing can toughen it up.
- Cool Completely Before Frosting: Patience pays off—frosting a warm cake means melty, slippery frosting that’s hard to work with.
How to Serve Green Velvet Cake with Cream Cheese Frosting Recipe

Garnishes
When I serve this cake, a little something extra really brings it to life. I love sprinkling crushed pistachios or toasted coconut flakes on top for a little crunch and color contrast. Fresh mint leaves also add a refreshing aroma and make the presentation pop—perfect if you’re hosting!
Side Dishes
This cake pairs wonderfully with a scoop of vanilla bean ice cream or fresh berries on the side—especially raspberries or strawberries. For a less sweet option, a lightly brewed green tea complements the flavors of the cake and frosting beautifully.
Creative Ways to Present
I once layered this cake into a trifle with alternating layers of whipped cream and berries—visually stunning and a huge hit at parties. Another favorite is to turn the batter into cupcakes, pipe the cream cheese frosting with a star tip, and add edible gold glitter for a glam touch at celebrations.
Make Ahead and Storage
Storing Leftovers
I always keep leftover frosted cake tightly covered in the fridge to maintain moisture and prevent the frosting from absorbing other flavors. Wrapped well, it stays fresh and tasty for up to 4 days—if it lasts that long!
Freezing
If you want to freeze the cake, I recommend freezing unfrosted layers wrapped tightly with plastic wrap and foil. When you want to enjoy, thaw overnight in the fridge and then frost fresh. I’ve found this keeps the texture perfect without sogginess.
Reheating
I usually don’t warm the frosted cake since cream cheese frosting tastes best chilled, but if you’re reheating a plain slice, a few seconds in the microwave (about 10-15 seconds) does the trick. Just don’t overdo it or the cake can dry out.
FAQs
-
Can I use regular milk instead of buttermilk in this Green Velvet Cake with Cream Cheese Frosting Recipe?
Absolutely! If you don’t have buttermilk on hand, you can make a simple substitute by adding 1 tablespoon of vinegar or lemon juice to 1 cup of milk, then let it sit for 5-10 minutes. This will mimic the acidity and tenderness buttermilk provides.
-
How do I get the frosting smooth and not grainy?
Make sure your cream cheese and butter are fully softened before mixing. Sift your powdered sugar to remove lumps, and beat the frosting thoroughly to air it up and create a smooth texture. Adding a tiny splash of milk can help adjust consistency without making it grainy.
-
Why is my Green Velvet Cake not coming out green enough?
Using gel food coloring rather than liquid is key for that vibrant green color without altering the batter’s consistency. Also, don’t skimp on the quantity; 1 oz gel coloring is what gives a true, rich green.
-
Can I make this recipe dairy-free?
You can! Substitute the buttermilk with a dairy-free milk mixed with a bit of vinegar, and use dairy-free cream cheese and butter alternatives in your frosting. The texture might be slightly different but still delicious.
-
How long does this cake keep?
When stored in an airtight container and refrigerated, your frosted Green Velvet Cake should stay fresh for about 3-4 days. Unfrosted cake layers last a day or two longer if wrapped well.
Final Thoughts
I absolutely love how this Green Velvet Cake with Cream Cheese Frosting Recipe turns out every single time—it’s like a little party on your plate! From the first bite, you’ll notice the surprising balance between the colorful, cocoa-kissed cake and the rich, tangy frosting. I hope you enjoy making it as much as I do sharing it with friends and family. Go ahead, try it out for your next celebration or just because—your kitchen will thank you for it!
Print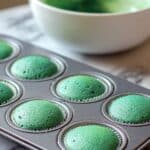
Green Velvet Cake with Cream Cheese Frosting Recipe
- Prep Time: 15 minutes
- Cook Time: 22 minutes (for 8-inch cake), 16 minutes (regular cupcakes), or 13 minutes (mini cupcakes/whoopie pies)
- Total Time: 37 minutes (based on 8-inch cake baking time including prep)
- Yield: 1 standard 8-inch layer cake or 24 cupcakes 1x
- Category: Dessert
- Method: Baking
- Cuisine: American
- Diet: Vegetarian
Description
This vibrant Green Velvet Cake is a delightful twist on the classic red velvet, featuring rich cocoa and a striking green color. Moist and tender, it’s perfect for festive occasions or whenever you want a unique dessert. Topped with a smooth and creamy homemade cream cheese frosting, this cake offers a perfect balance of flavors and textures.
Ingredients
CAKE
- 2 1/2 cups all-purpose flour
- 2 cups sugar
- 1 Tablespoon cocoa powder
- 1 teaspoon salt
- 1 teaspoon baking soda
- 2 eggs
- 1 cup vegetable oil
- 1 cup buttermilk
- 1 Tablespoon vinegar
- 1 teaspoon vanilla extract
- 1 oz green food coloring
CREAM CHEESE FROSTING
- 1 package (8 oz) softened cream cheese
- 1/4 cup softened butter
- 1 teaspoon vanilla extract
- 1 bag (2 lb) powdered sugar
- Milk as needed to adjust consistency
Instructions
- Preheat Oven: Preheat your oven to 350 degrees Fahrenheit (175 degrees Celsius) to prepare for baking the cake.
- Prepare Pans: Grease your cake pans, muffin tins, or whoopie pie pans depending on your preferred baking method to prevent sticking.
- Mix Wet Ingredients: In a medium bowl, lightly whisk the eggs. Add the oil, buttermilk, vinegar, and vanilla extract, whisking until well combined. Stir in the green food coloring and set aside.
- Combine Dry Ingredients: In a separate large mixing bowl, thoroughly stir the all-purpose flour, sugar, cocoa powder, salt, and baking soda to evenly distribute all components.
- Mix Batter: Pour the wet ingredients into the dry ingredients. Use a mixer on medium-high speed to blend everything together for about 1 to 2 minutes until smooth and fully combined.
- Pour Batter into Pans: Divide the batter into your prepared pans or cupcake tins evenly.
- Bake: Bake based on the pan or tin used: for one 8-inch cake pan, bake approximately 22 minutes; for regular-size cupcakes, bake about 16 minutes; for mini cupcakes or whoopie pie pans, bake about 13 minutes. Check doneness with a toothpick inserted in the center, which should come out clean.
- Make Frosting: In a bowl, cream together the softened cream cheese, softened butter, and vanilla extract until smooth and well combined.
- Add Powdered Sugar: Gradually mix in powdered sugar, continuing to blend the frosting. Add milk a little at a time until the frosting achieves your desired consistency for spreading or piping.
- Frost and Store: Once the cake or cupcakes have cooled completely, frost them generously. Store the finished cake or cupcakes in the refrigerator to maintain freshness.
Notes
- Recipe adapted from Bakerella.
- Servings yield 1 standard 8-inch layer cake or 24 cupcakes.
- Baking times vary depending on pan size and shape; monitor closely for best results.
- Green food coloring amount can be adjusted if a lighter or darker color is preferred.
- Keep frosted cake or cupcakes refrigerated to maintain cream cheese frosting freshness.
Nutrition
- Serving Size: 1 slice (1/12 of cake) or 1 cupcake
- Calories: 350 kcal
- Sugar: 30 g
- Sodium: 250 mg
- Fat: 18 g
- Saturated Fat: 7 g
- Unsaturated Fat: 9 g
- Trans Fat: 0 g
- Carbohydrates: 45 g
- Fiber: 1 g
- Protein: 4 g
- Cholesterol: 50 mg

Your email address will not be published. Required fields are marked *