If you’re looking for a fun and festive treat that doubles as a thoughtful gift, you’re in for a real treat with this Festive Chocolate Brownie Gifts Recipe. I absolutely love how these brownies transform into adorable little presents wrapped in colorful candy ribbons. Whether you’re baking for family, friends, or your holiday party, these brownies bring both the joy of baking and the excitement of gift-giving all in one delicious package.
Why You’ll Love This Recipe
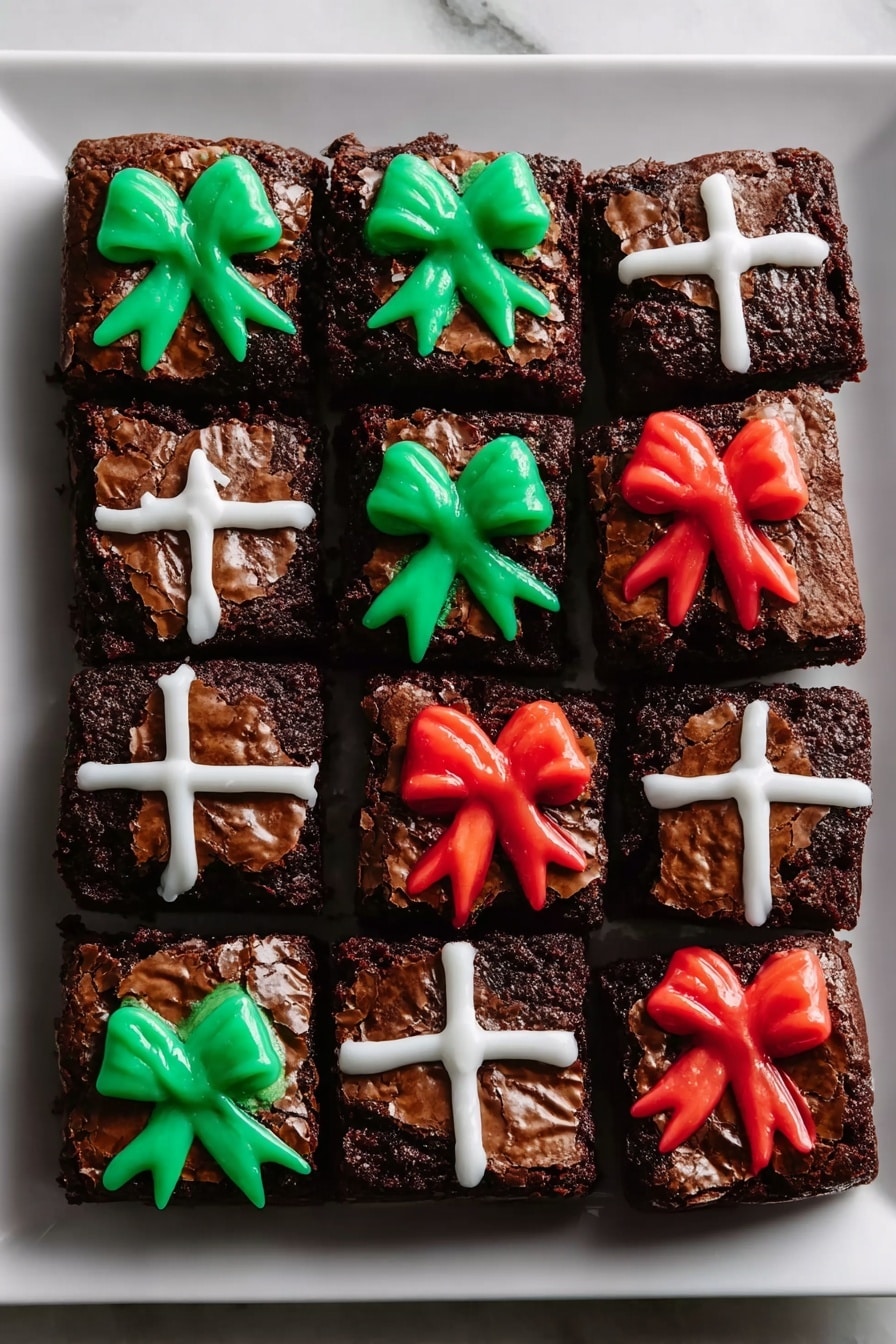
- Eye-Catching Presentation: These brownies are not just tasty, but look like cute little holiday gifts wrapped up with colorful candy ribbons—perfect for gifting!
- Rich, Fudgy Texture: The combination of butter, cocoa, and optional chocolate chips ensures your brownies are deliciously moist and indulgent every time.
- Simple Ingredient List: Made with common pantry staples so you can whip these up without a special trip to the store.
- Fun to Customize: You get to decorate these with candy melts, bows, or sprinkles—making each batch uniquely yours and festive.

Ingredients You’ll Need
I love that this Festive Chocolate Brownie Gifts Recipe uses ingredients you likely already have, plus a few colorful candies to amp up the holiday spirit. Picking quality cocoa powder and a good vanilla extract really makes a difference in the final flavor, and don’t skip the butter—it’s the secret to that rich fudginess you’ll crave.

- Unsalted butter: I always use unsalted so I can control the saltiness myself and keep that pure buttery flavor.
- Granulated sugar: Regular white sugar works perfectly to sweeten and help create that classic chewy texture.
- Large eggs: Eggs give brownies structure and richness; make sure they’re at room temperature for better mixing.
- Vanilla extract: A good quality vanilla extract enhances the chocolate notes beautifully.
- All-purpose flour: Simple and staple—don’t over-measure to keep brownies fudgy, not cakey.
- Unsweetened cocoa powder: Use good quality cocoa powder for deep chocolate flavor; I prefer Dutch-process.
- Baking powder: Just a small amount to help balance texture, so avoid using too much.
- Salt: A pinch to enhance sweetness and balance flavors.
- Semi-sweet chocolate chips (optional): Fold them in for extra melty pockets of chocolate; trust me, they’re worth it!
- Red, green, and white candy melts: These are your “wrapping ribbons” on the brownies; easy to melt and so festive.
- Mini candy bows or holiday sprinkles: Optional but I love adding these cute little touches for a real “present” vibe.
Variations
I like to make this recipe my own by tweaking the decoration styles or adding a little twist in the batter depending on the occasion. Feel free to get creative—you can switch up the candy melts colors or sneak in some nuts or orange zest for a festive flavor burst.
- Dairy-Free Version: I’ve replaced butter with coconut oil before, which gave it a subtle tropical note and kept things moist—just make sure your candy melts are dairy-free too.
- Nutty Brownies: Adding chopped pecans or walnuts was a hit with my family, giving a surprising crunch that contrasts perfectly with the fudgy bites.
- Spiced Up: Once, I sprinkled a tiny pinch of cinnamon and chili powder into the batter—my guests loved the warming, unexpected heat paired with chocolate.
- Mini Brownie Gifts: Use a mini muffin tin to bake small brownie bites, then decorate them similarly—great for making lots of tiny edible gifts!
How to Make Festive Chocolate Brownie Gifts Recipe
Step 1: Prepare Your Batter With Love
First off, preheat your oven to 350°F (175°C) and line a 9×13-inch pan with parchment paper, leaving enough overhang so you can lift the brownies out easily when baked—this makes cleanup and cutting so much simpler! Melt the butter gently in a medium saucepan over low heat, then whisk in the sugar while it’s still warm until smooth and glossy. This step really helps dissolve the sugar and gives that irresistible shine. Once the mixture has cooled a bit, whisk in the eggs and vanilla extract vigorously until thick and glossy—this part reminds me of frosting and it’s so satisfying to see that volume build up.
Step 2: Mix Dry Ingredients Carefully
In a separate bowl, sift together your flour, cocoa powder, baking powder, and salt. The sifting matters because it prevents lumps and helps your brownies stay light yet chewy. Fold these dry ingredients gently into the wet mix using a rubber spatula. I learned over time that overmixing dries out brownies fast—so stop as soon as everything looks combined and smooth. If you want to treat yourself, this is the time to fold in chocolate chips for gooey pockets of happiness.
Step 3: Bake to Perfection
Pour the batter into your prepared pan and smooth the top evenly. Pop it in the oven for 30–35 minutes, but keep an eye on it near the end. The secret is to pull them out when a toothpick inserted in the center comes out with moist crumbs, but no wet batter—that’s how you achieve that perfect fudgy texture. Let the brownies cool completely in the pan before moving on to the fun part: decorating.
Step 4: Transform Brownies Into Festive Gifts
Lift the cooled brownies out of the pan using the parchment overhang and place on a cutting board. Cut into neat squares—these are your “presents.” Melt your red, green, and white candy melts in separate bowls. I like microwaving in 15-second bursts, stirring in between, so you don’t burn them. Then, drizzle or pipe the candy melts in crisscross lines to mimic ribbon wraps. Finish by adding mini candy bows or sprinkles to make each brownie look like a tiny present under the tree.
Step 5: Let Your Decorations Set
Allow the candy ribbons to harden naturally at room temperature, or speed up by popping them in the fridge for 10–15 minutes. Once set, arrange your festive brownies on a beautiful platter or pack them up in a gift box lined with parchment paper. Trust me, they make a delightful presentation and a delicious gift that everyone will adore!
Pro Tips for Making Festive Chocolate Brownie Gifts Recipe
- Use Parchment Paper Overhang: This makes lifting out brownies so easy and saves you from crumbling edges or messy cutting.
- Don’t Overbake: I’ve learned that pulling brownies out with a few moist crumbs on a toothpick delivers the perfect fudgy texture—oven time can vary.
- Slow and Steady Candy Melts: Melting candy melts in short bursts and stirring between prevents burning and ensures smooth ribbons for decorating.
- Let Brownies Cool Completely: Decorating warm brownies can cause candy melts to melt off, so patience really pays off here.
How to Serve Festive Chocolate Brownie Gifts Recipe

Garnishes
For garnishes, I usually stick with mini candy bows because they add that perfect holiday charm without overwhelming the brownies. If I’m feeling extra festive, I sprinkle some crushed peppermint candy or festive star-shaped sprinkles—adds crunch and magical sparkle!
Side Dishes
I love pairing these festive brownies with a simple glass of cold milk or a warm cup of spiced chai tea—the spice complements the chocolate beautifully. At holiday parties, I sometimes serve alongside fresh berries or a scoop of vanilla ice cream to balance the richness.
Creative Ways to Present
One of my favorite ways to present these brownies is in a decorative tin lined with parchment paper, arranged neatly like little gifts waiting to be opened. You can also wrap individual brownies in cellophane tied with a ribbon—easy to hand out at holiday gatherings or slip into a gift bag alongside a mug or kitchen towel as a thoughtful, homemade present.
Make Ahead and Storage
Storing Leftovers
These brownies keep wonderfully in an airtight container at room temperature for up to 3 days—though they rarely last that long in my house! If I want them to last longer, I store them in the fridge, which slightly firms the texture but keeps them fresh for about a week.
Freezing
I’ve frozen these brownies multiple times with great results. I like to cut them first, then wrap each piece tightly in plastic wrap and place all wrapped brownies in a freezer-safe bag. This way, you can thaw only what you need. Frozen brownies keep well for up to 3 months.
Reheating
To reheat, I remove the plastic wrap and warm the brownie in the microwave for about 15-20 seconds. This softens the chocolate chips inside and brings out that freshly baked gooeyness. Just watch carefully so you don’t overheat and dry out the brownies.
FAQs
-
Can I make this Festive Chocolate Brownie Gifts Recipe gluten-free?
Absolutely! Substitute the all-purpose flour with a 1-to-1 gluten-free baking blend. Just make sure the blend contains xanthan gum or another binder to keep the texture chewy and fudgy.
-
What’s the best way to melt the candy melts without burning them?
I recommend melting candy melts in the microwave in 15-second intervals, stirring well after each burst. This prevents overheating and keeps the candy smooth and glossy, perfect for decorating.
-
Can I prepare the brownies ahead of time?
Yes! You can bake the brownies a day before decorating. Just keep them stored in an airtight container at room temperature to preserve freshness, then decorate right before gifting or serving.
-
How do I avoid crumbly brownies when cutting?
Using the parchment paper overhang to lift the brownies out and letting them cool completely helps a ton. Also, using a sharp knife warmed under hot water before slicing makes clean cuts without crumbling.
Final Thoughts
This Festive Chocolate Brownie Gifts Recipe truly holds a special place in my heart during the holiday season. It combines the comfort of classic homemade brownies with a playful, creative twist that’s perfect for sharing. Once you try it, you’ll see why my family goes crazy for these charming little “gifts” that pack so much flavor and fun. Give it a go—you’ll enjoy both the process and the smiles it brings!
Print
Festive Chocolate Brownie Gifts Recipe
- Prep Time: 20 minutes
- Cook Time: 35 minutes
- Total Time: 55 minutes
- Yield: 12 servings 1x
- Category: Dessert
- Method: Baking
- Cuisine: American
Description
Delight in these festive Christmas Present Brownies, rich and fudgy with a perfect blend of cocoa and chocolate chips, topped with colorful candy melt decorations and mini bows to mimic wrapped gifts. Ideal for holiday celebrations, these brownies combine classic comfort with joyful presentation.
Ingredients
Brownie Batter
- 1 cup (2 sticks) unsalted butter
- 2 cups granulated sugar
- 4 large eggs
- 1 teaspoon vanilla extract
- 1 cup all-purpose flour
- 1 cup unsweetened cocoa powder
- ½ teaspoon baking powder
- ¼ teaspoon salt
- 1 cup semi-sweet chocolate chips (optional for extra fudginess)
Decoration
- Red, green, and white candy melts
- Mini candy bows or holiday sprinkles (optional but festive)
Instructions
- Prepare the brownie batter: Preheat your oven to 350°F (175°C). Line a 9×13-inch baking pan with parchment paper, leaving an overhang on the sides for easy removal. Melt the butter in a medium saucepan over low heat. Remove from heat and whisk in the sugar until smooth and shiny. Let cool slightly, then whisk in the eggs and vanilla extract continuously until thick and glossy.
- Add the dry ingredients: Sift together the flour, cocoa powder, baking powder, and salt in a separate bowl. Gradually fold the dry ingredients into the wet mixture with a rubber spatula, stirring just until combined to keep brownies chewy. Fold in chocolate chips if using.
- Bake the brownies: Pour batter evenly into the prepared pan and smooth the top. Bake for 30–35 minutes or until a toothpick inserted in the center comes out with a few moist crumbs. Avoid overbaking. Let cool completely in the pan.
- Cut and decorate like gifts: Remove cooled brownies using the parchment paper overhang and place on a cutting board. Cut into even squares. Melt red, green, and white candy melts separately in the microwave with 15-second bursts, stirring until smooth. Drizzle or pipe the melts over each brownie in crisscross ribbons. Add mini bows or sprinkles for a festive look.
- Let the decorations set: Allow candy melts to harden at room temperature or refrigerate for 10–15 minutes. Arrange brownies on a platter or gift box lined with parchment paper for serving.
Notes
- Use parchment paper with overhang for easy brownie removal.
- Do not overmix batter to maintain chewy texture.
- Chocolate chips are optional but add extra fudginess.
- Let brownies cool completely before decorating to prevent melting candy melts.
- Refrigerate decorated brownies briefly to speed candy melt hardening if desired.
Nutrition
- Serving Size: 1 brownie (approx. 1/12 of recipe)
- Calories: 320
- Sugar: 28g
- Sodium: 110mg
- Fat: 19g
- Saturated Fat: 11g
- Unsaturated Fat: 7g
- Trans Fat: 0g
- Carbohydrates: 39g
- Fiber: 3g
- Protein: 4g
- Cholesterol: 70mg

Your email address will not be published. Required fields are marked *