
If you’re looking for that perfect, melt-in-your-mouth treat, let me introduce you to this Danish Butter Cookies Recipe that I absolutely adore. I first tried making these when a friend shared her family secret, and since then, they’ve become a beloved staple in my kitchen and a crowd-pleaser at every holiday gathering. These cookies are crisp, buttery, and have just the right hint of sweetness — basically, your new favorite cookie is about to happen.
Why You’ll Love This Recipe
- Buttery Richness: The use of European salted butter gives these cookies a wonderful depth of flavor you won’t find in typical butter cookies.
- Simple Ingredients: This recipe uses everyday pantry staples, so it’s easy to whip up whenever a cookie craving strikes.
- Perfect Texture: Thanks to a blend of all-purpose and cake flour, these cookies have that signature delicate crispness and melt-in-your-mouth feel.
- Customizable Shapes: You can pipe them into rosettes, pretzels, or circles — just like the classic Danish style, but personalized by you.

Ingredients You’ll Need
To make these Danish butter cookies shine, you’ll want to choose the right ingredients. The mix of all-purpose and cake flour is a little trick I learned that creates a tender yet crisp cookie. Also, using room temperature European salted butter really elevates the flavor.

- European salted butter: Its higher fat content and slight saltiness make these cookies incredibly rich and flavorful.
- Granulated sugar: Provides the perfect touch of sweetness and helps create that crisp texture.
- Salt: Enhances the overall flavor and balances the sweetness, especially if your butter isn’t salted.
- Egg yolks: Give the dough a lovely tender crumb and help bind everything together.
- Vanilla extract: Adds a warm aromatic note that makes these cookies extra special.
- Whole milk: Softens the dough just enough to make piping easy without losing structure.
- All-purpose flour: The base flour for structure and texture.
- Cake flour: Gives the cookies that melt-in-your-mouth softness distinct to Danish butter cookies.
- Coarse sugar: Optional for sprinkling—adds a pretty crunch and sparkle to the tops.
Variations
I love how versatile this Danish Butter Cookies Recipe is. While the traditional version is pure perfection, I sometimes like to shimmy things up a bit — it’s a fun way to keep everyone guessing and enjoying the classic with a twist.
- Chocolate-dipped cookies: My family goes crazy for dipping half the cookie in melted dark chocolate — adds a rich contrast that feels indulgent.
- Almond extract swap: Sometimes I replace vanilla with almond extract for a nutty flavor that complements the buttery dough beautifully.
- Gluten-free version: I once experimented with a gluten-free flour blend and it worked surprisingly well—just be sure to chill the dough more to prevent spreading.
- Festive shapes & toppings: During holidays, I pipe the dough into stars and sprinkle with colored sugar or edible glitter for a festive flair.
How to Make Danish Butter Cookies Recipe
Step 1: Prep your space and chill time
Before you even start mixing, clear some space in your fridge. You’ll need room for a baking sheet since chilling the cookie dough after shaping is crucial to prevent them from spreading too much while baking. Also, line two baking sheets with parchment paper or silicone mats to get ready for those luscious cookies.
Step 2: Creaming the butter and sugar
Pop your room temperature butter into the bowl of a stand mixer with the paddle attachment and beat it on medium speed until creamy and smooth. Then, add the sugar slowly while mixing on low to medium, along with a pinch of salt. This step is where the magic begins—I’ve found patience here means perfectly fluffy dough that yields tender cookies.
Step 3: Adding the egg yolks plus flavor
Mix in the egg yolks, vanilla, and a tablespoon of whole milk—all at once but on medium speed. Make sure to scrape down the sides of your bowl so everything blends evenly. This combination gives the dough a silky texture and irresistible aroma.
Step 4: Mix in the flour blend
In a separate bowl, whisk together the all-purpose and cake flours. Add them in two parts to the mixer, switching to low speed and scraping sides between additions. If you notice the dough is too stiff to pipe nicely, add a splash more milk—you want it soft but manageable. Trust me, getting the consistency just right means those perfect delicate shapes come out beautifully.
Step 5: Pipe & chill your cookies
Fill a large piping bag fitted with a ½-inch open star tip with your dough and pipe about 2-inch shapes—rosettes are my favorite, but you can do pretzels or circles too. Leave 2 inches between each. If you want, sprinkle some coarse sugar or festive sprinkles on top before popping them into the fridge for 20-30 minutes. Chilling is key to avoid over-spreading — a tip I discovered after my first attempt where the cookies turned out flat and sad.
Step 6: Bake your cookies to perfection
Preheat your oven to 350°F and position a rack in the middle. Slide in your chilled baking sheets and bake for 10-15 minutes, watching carefully so the edges just turn a mellow golden brown. Pull them out and let the cookies cool for a few minutes on the baking sheets before transferring to a wire rack to cool completely. This cooling time firms them up without drying them out.
Pro Tips for Making Danish Butter Cookies Recipe
- Use room temperature butter: I learned the hard way that cold butter won’t cream properly, so leave it out about 45 minutes before starting. When it’s soft but still cool to the touch, you’re golden.
- Don’t overmix the dough: Mixing too much develops gluten, making cookies tough instead of tender. Mix just until the flour disappears for the best texture.
- Watch baking times: Oven temperatures vary, so start checking at 10 minutes to avoid over-baking — the cookies should be lightly golden at the edges only.
- Perfect piping consistency: If the dough feels too stiff, add a tablespoon more milk to soften it. This little adjustment saved my first batch from cracking on piping.
How to Serve Danish Butter Cookies Recipe

Garnishes
I usually keep it classic with a sprinkle of coarse sugar for a crunchy finish, but I love topping some with a light dusting of powdered sugar or even a drizzle of melted chocolate for a fancy touch. This little extra makes them feel festive and inviting — especially when serving guests.
Side Dishes
These cookies pair perfectly with a hot cup of coffee or tea — I’m partial to Earl Grey or a strong black coffee to balance their buttery sweetness. They’re also delightful alongside a scoop of vanilla ice cream or fresh berries for a simple yet elegant dessert plate.
Creative Ways to Present
For holiday parties, I like to arrange these cookies in pretty tins lined with colorful parchment paper or stack them on a tiered dessert tray surrounded by sprigs of fresh rosemary or holly. Piping several shapes and mixing toppings makes the platter visually exciting and invites everyone to dig in.
Make Ahead and Storage
Storing Leftovers
After baking, I let the cookies cool completely, then store them in an airtight container at room temperature. They stay crisp and fresh for up to 5 days — perfect for those cookie cravings that strike throughout the week.
Freezing
I’ve also had great luck freezing both baked cookies and shaped, unbaked dough. For the dough, shape and pipe onto baking sheets, freeze until firm, then transfer to freezer bags. When ready to bake, no need to thaw; just add a couple extra minutes to baking time. Baked cookies freeze well too — just pop them into an airtight container for up to 3 months.
Reheating
Leftover cookies that have softened up a bit can be refreshed by warming in a 300°F oven for about 3-5 minutes. This brings back the crisp edges and warm, buttery aroma that makes these cookies so wonderful.
FAQs
-
Can I use unsalted butter instead of salted butter?
Yes! If you use unsalted butter, simply add about 1/4 teaspoon of kosher salt to the dough to balance the flavors. This way, you keep that signature salty-sweet balance that makes Danish butter cookies so irresistible.
-
What’s the purpose of cake flour in the recipe?
The cake flour lightens the texture, making the cookies more delicate and melt-in-your-mouth. It lowers the protein content compared to all-purpose flour, so the cookies come out tender yet crisp. If you don’t have cake flour, you can substitute with all-purpose flour, just keep an eye on the texture.
-
How do I prevent my cookies from spreading too much?
Chilling the shaped dough on a baking sheet for at least 20 minutes before baking is key. This firms up the butter so your cookies hold their shape and don’t flatten out in the oven. Also, avoid using room temperature dough when piping to keep the shapes tight.
-
Can I make these cookies without a piping bag?
While piping gives the classic Danish look, you can also shape the dough by hand or drop spoonfuls onto the baking sheet for a rustic version. Just keep in mind that the piping technique helps with even baking and that signature delicate shape.
Final Thoughts
This Danish Butter Cookies Recipe holds a special place in my kitchen because it’s simple enough to whip up anytime yet impressive enough to share with friends and family. Every bite takes me back to cozy afternoons sipping tea and enjoying good company. I can’t wait for you to try it and make beautiful memories around this buttery, crisp delight. Trust me — once you master this, it will become your go-to cookie for all seasons!
Print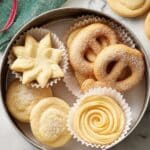
Danish Butter Cookies Recipe
- Prep Time: 15 minutes
- Cook Time: 15 minutes
- Total Time: 1 hour 30 minutes
- Yield: 24 cookies 1x
- Category: Dessert
- Method: Baking
- Cuisine: Danish
Description
Danish Butter Cookies are classic melt-in-your-mouth treats made from a rich blend of European butter, sugar, and a combination of all-purpose and cake flour. These delicate cookies are piped into beautiful shapes and baked until just lightly golden, creating a crisp yet tender texture perfect for holiday celebrations or any time you crave a buttery, elegant cookie.
Ingredients
Wet Ingredients
- 1 cup (227 g) European salted butter, room temperature
- 2 egg yolks
- 2 teaspoons (10 g) vanilla extract
- 1 tablespoon (15 g) whole milk, plus more if needed to soften
Dry Ingredients
- ½ cup (100 g) granulated sugar
- ⅛ teaspoon salt
- 2 cups (220 g) all-purpose flour
- ½ cup (50 g) cake flour
For Decoration
- Coarse sugar for decorating
Instructions
- Prepare for chilling: Make room in your refrigerator for a baking sheet to chill the shaped cookies for 20-30 minutes. Line two baking sheets with parchment paper or silicone baking mats and set aside.
- Cream butter, sugar, and salt: In a stand mixer fitted with a paddle attachment, cream the European salted butter on medium speed until smooth. Slowly add granulated sugar and salt while mixing on low, then increase to medium speed and whip until the mixture is light and fluffy.
- Add egg yolks, vanilla, and milk: While mixing on medium speed, incorporate the egg yolks, vanilla extract, and milk. Scrape down the bowl edges to ensure thorough mixing.
- Mix in dry ingredients: In a separate bowl, whisk together all-purpose flour and cake flour. Add the flour mixture to the wet mixture in two batches, mixing on low speed until fully combined and no flour streaks remain. If dough is too stiff for piping, add an additional tablespoon of milk to soften.
- Pipe the cookies: Transfer dough to a large piping bag fitted with a ½-inch open star tip. Pipe 2-inch rosettes, pretzels, circles, or squares on the prepared baking sheets, spacing cookies at least 2 inches apart. Optionally, sprinkle with coarse sugar or festive sprinkles. Chill the shaped cookies in the refrigerator for 20-30 minutes to prevent over-spreading during baking.
- Preheat oven: Set the oven rack to the middle position and preheat to 350°F (175°C).
- Bake: Bake the chilled cookies for 10-15 minutes until the edges are just lightly golden brown. Remove from oven and let cookies cool on baking sheets for 5 minutes before transferring to a wire rack to reach room temperature.
Notes
- Use room temperature butter, around 67°F (19°C), for easier mixing and better texture.
- Use room temperature eggs for even baking; warm cold eggs in slightly warm water for 5 minutes if needed.
- Do not overmix the batter to prevent tough cookies—overdeveloping gluten makes dough difficult to pipe and leads to a rough texture.
- Watch baking times carefully, as cookie size and shape affect how quickly they brown.
- You can substitute all-purpose flour for the cake flour by using 260 grams of all-purpose flour total for a slightly different texture.
- Measure flour accurately with a kitchen scale or use the spoon and level method to avoid adding too much flour.
- If using unsalted butter, add ¼ teaspoon kosher salt to the dough.
- Store cookies in an airtight container at room temperature for up to 5 days or freeze for up to 3 months.
- Chill shaped cookies on baking sheets for up to 2 days before baking (cover if longer than 30 minutes) or freeze unbaked shapes for 2-3 months; bake frozen dough adding extra cooking time.
Nutrition
- Serving Size: 1 cookie
- Calories: 110
- Sugar: 6g
- Sodium: 90mg
- Fat: 7g
- Saturated Fat: 4.5g
- Unsaturated Fat: 2.5g
- Trans Fat: 0g
- Carbohydrates: 11g
- Fiber: 0.2g
- Protein: 1g
- Cholesterol: 25mg

Your email address will not be published. Required fields are marked *