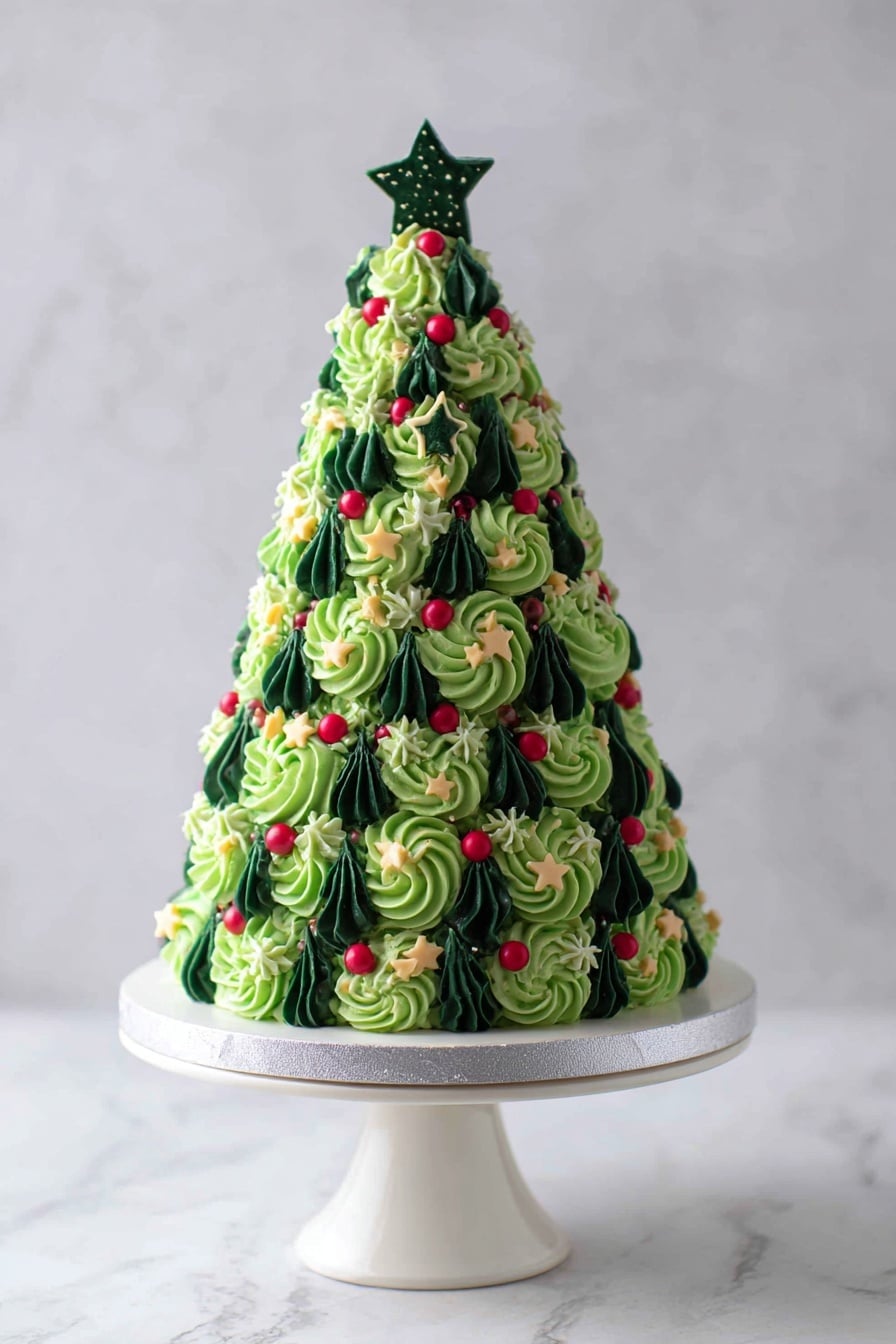
If you’re looking for a festive showstopper that’s as delicious as it is eye-catching, you’ve got to try this Christmas Tree Spice Cake Recipe. It’s packed with warm spices, layered with luscious buttercream, and decorated in greens and reds that bring holiday cheer to any dessert table. I absolutely love how this turns out every year — it’s my go-to cake to impress guests without the stress.
Why You’ll Love This Recipe
- Decadently Spiced Layers: The blend of cinnamon, nutmeg, ginger, and brown sugar makes each bite cozy and flavorful.
- Striking Christmas Tree Shape: The tapered layers stacked like a tree are both festive and fun to make.
- Creamy Buttercream Frosting: Customizable with vibrant colors that make decorating a breeze and a joy.
- Make-Ahead Friendly: The layers freeze beautifully, perfect for holiday planning and stress-free baking.

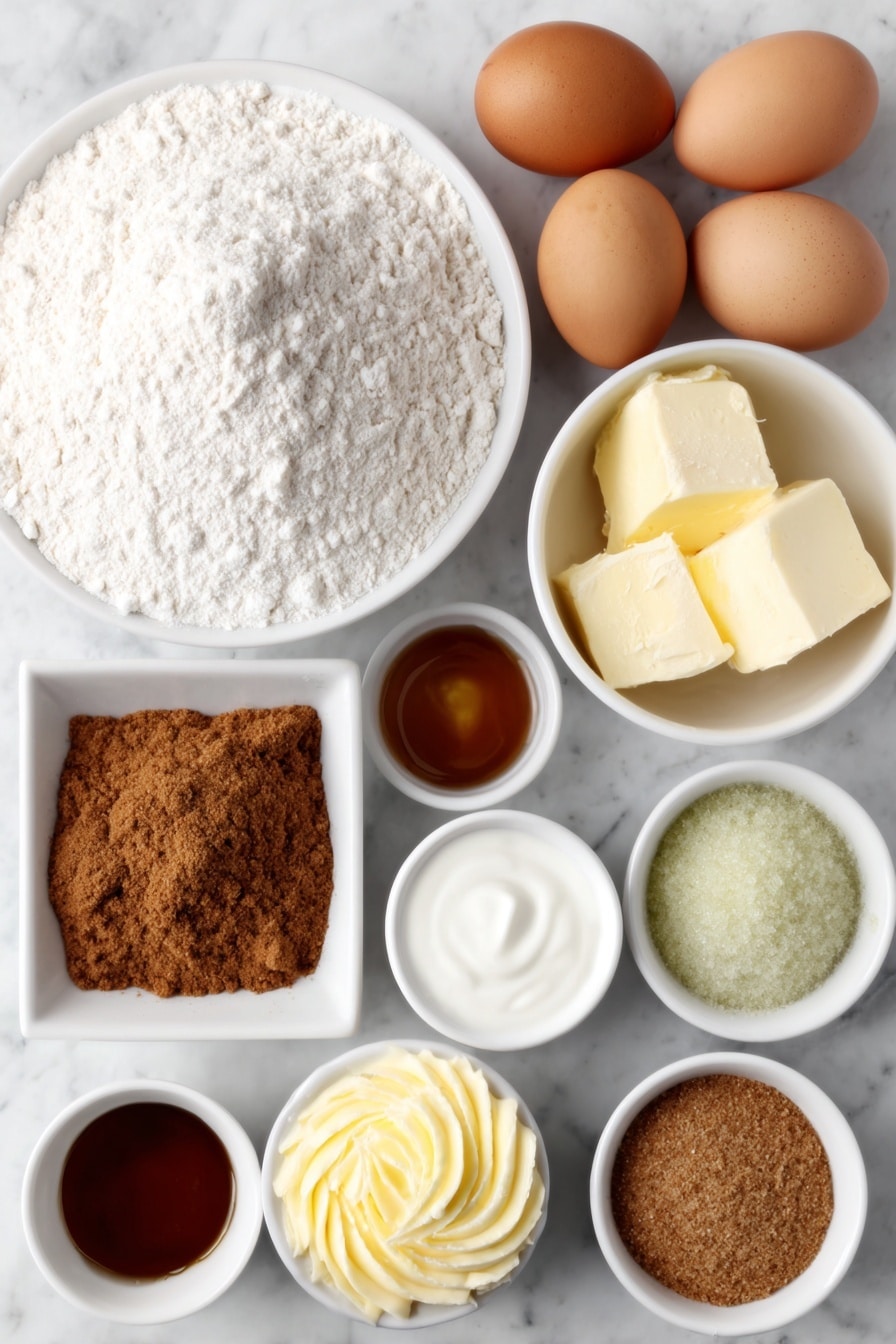
Ingredients You’ll Need
The magic of this Christmas Tree Spice Cake Recipe lies in the balance between aromatic spices and moist layers, complemented perfectly by a rich, velvety buttercream. Let me walk you through some key ingredients and why they matter.
- All-purpose flour: Provides the perfect structure for tender, spiced cake layers.
- Granulated and light brown sugar: The brown sugar adds moisture and caramel notes, elevating the spice flavors.
- Baking powder and fine salt: Help the cake rise evenly and balance sweetness.
- Ground cinnamon, ginger, and nutmeg: These classic holiday spices give the cake its signature warm and inviting flavor.
- Unsalted butter: For richness and tenderness.
- Large eggs: They bind everything together and add stability.
- Full-fat sour cream and unsweetened applesauce: Both help keep the cake moist and add subtle tanginess.
- Vegetable or canola oil: Adds extra moisture without weighing down the layers.
- Vanilla extract or vanilla bean paste: Enhances all the flavors, giving depth and warmth.
- Green gel food coloring: For that festive tree effect in the cake layers and frosting.
- Unsalted butter for frosting: Makes the buttercream rich and creamy.
- Powdered sugar and heavy whipping cream: Create the fluffy, smooth frosting that’s easy to pipe and decorate.
- Gel food coloring in green, yellow, and red: Bring the cake’s decoration to life with vibrant holiday colors.
Variations
I love that this Christmas Tree Spice Cake Recipe is flexible—you can make it your own, whether you want a nut-free version, a little extra texture, or even a different kind of frosting. Here are some tweaks I’ve tried that you might enjoy.
- Nutty twist: I sometimes fold chopped pecans or walnuts into the batter for a little crunch and earthiness, which my family goes crazy for.
- Gluten-free swap: Using a gluten-free flour blend works well—just be sure to check your mix’s instructions for any necessary tweaks.
- Spice adjustments: Feel free to increase the ginger or swap nutmeg for cloves if you like a bolder spice profile.
- Frosting flavors: Adding a touch of almond extract or even a dash of cinnamon to the buttercream makes it extra special.
How to Make Christmas Tree Spice Cake Recipe
Step 1: Prep and mix your spiced cake batter
First things first, preheat your oven to 350°F (175°C). Line your cake pans (an 8″, 7″, two 6″, and two 4″) with parchment rounds and grease them well. I like to use non-stick baking spray to help the cakes come out cleanly. In a large bowl, mix your dry ingredients: flour, sugars, baking powder, salt, and all those cozy spices until they’re well combined.
Next, add your softened butter gradually to the dry mix on a low speed—this is key! You want the butter broken down and evenly dispersed, but no big chunks. Then, add your eggs two at a time, mixing gently until just incorporated. Avoid overmixing; that keeps your cake tender.
Step 2: Incorporate the wet ingredients and add color
Pour in your room temperature sour cream, applesauce, vegetable oil, and vanilla. Mix those in on low speed until everything’s just combined. Give the bowl a good scrape with a rubber spatula, then beat on medium speed for about a minute to fully marry the ingredients—this step helps with the cake’s texture.
Now it’s time for the festive fun! Divide the batter into two bowls. Tint half with a lighter green gel food coloring and the other half a darker shade. When filling your pans, spoon a mix of both green batters in each pan and swirl with a butter knife or offset spatula to create a pretty marbled look—a little trick I discovered that adds so much character to the finished cake.
Step 3: Bake and cool your cake layers
Bake your cakes for about 28 to 33 minutes. You’ll know they’re ready when a toothpick inserted in the center comes out with just a few moist crumbs attached. Let them cool in the pans for 10 minutes before carefully running a spatula around the edges and flipping them out onto wire racks. Once fully cool, use a serrated knife to level the tops. Then it’s time to trim the edges to form that classic Christmas tree taper. Pro tip: If you want to prep ahead, these layers freeze wonderfully—just thaw them for about 20 minutes before assembling, keeping them slightly cool for easier handling.
Step 4: Whip up the buttery frosting
While your cake cools, tackle the buttercream. Beat your room temperature butter in a mixer on medium speed for about 30 seconds until smooth. Add vanilla and salt, then gradually beat in powdered sugar and heavy cream on low speed until creamy. Adjust with more cream or sugar to get your perfect frosting consistency. I wait to color the frosting until I’m ready to decorate to avoid it drying out or shifting shades.
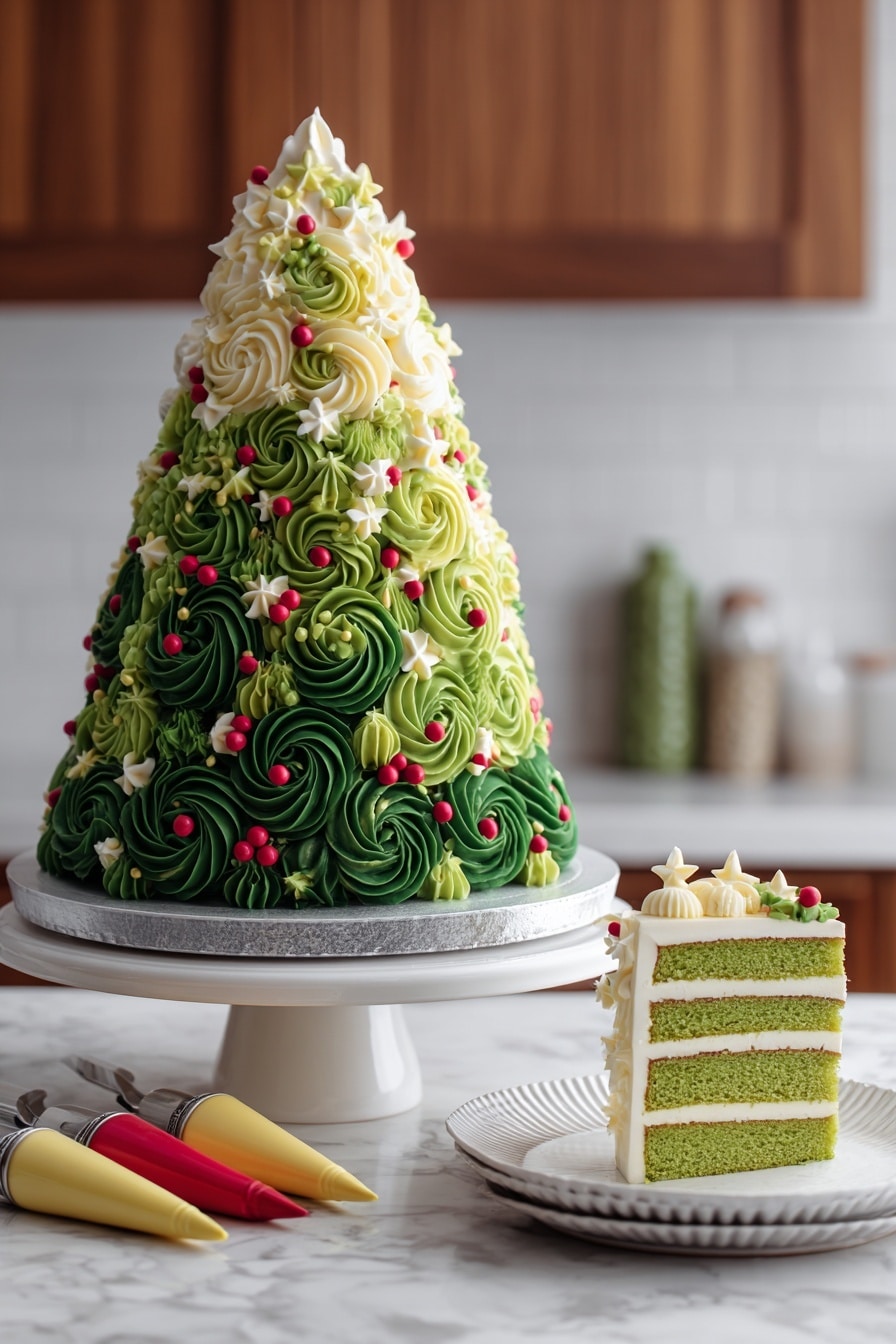
Step 5: Stack, crumb coat, and chill
Start stacking your trimmed cake layers largest to smallest on a greaseproof board or plate. Use a dab of frosting under the first layer to stabilize. Spread evenly between each layer, then insert a thick straw or wooden dowel through the center for support—especially important for that tree shape. Slather the entire cake with a thin crumb coat of frosting and smooth it out. Chill in the fridge for at least 30 minutes to let the frosting firm up—it makes decorating so much easier.
Step 6: Color and decorate like a pro
Divide your remaining frosting by color: green (light and dark), red, yellow, and white for classic Christmas colors. Using piping bags and various tips, pipe rosettes and dollops all over your cake. I especially love piping the green star tips to mimic pine needles—makes the tree come alive. The pops of red and yellow give it a playful, festive look that gets compliments every time.
Pro Tips for Making Christmas Tree Spice Cake Recipe
- Keep Butter and Eggs at Room Temperature: This makes mixing easier and helps the batter blend smoothly for a tender crumb.
- Don’t Overmix Your Batter: Stir until just combined to avoid a dense cake.
- Use a Serrated Knife for Slicing Layers: It keeps the edges clean and helps create that perfect tree shape without crushing the cake.
- Always Chill Your Cake Before Decorating: It prevents the frosting from sliding and makes piping clean designs way easier.
How to Serve Christmas Tree Spice Cake Recipe
Garnishes
I love adding a sprinkle of edible glitter or pearlized sugar over the frosted tree for a bit of sparkle, making it extra magical on the holiday table. Fresh cranberries also add a lovely natural pop of red and are a fun, edible decoration that guests enjoy nibbling on.
Side Dishes
This cake pairs beautifully with a simple cup of spiced hot apple cider or a creamy eggnog. I find that lighter fruit sides like a citrus salad or even roasted winter berries complement the rich, spiced cake without overwhelming it.
Creative Ways to Present
For parties, I’ve arranged the cake on a platter surrounded by sprigs of fresh rosemary and pine for an earthy holiday display. You can also place small edible gold stars on top of the cake or use candy canes angled like the trunk of a tree for a whimsical touch. It’s a conversation starter every time!
Make Ahead and Storage
Storing Leftovers
Once cooled and decorated, I store any leftover Christmas Tree Spice Cake wrapped in plastic wrap and covered with a cake dome or airtight container in the fridge. This keeps the cake moist and flavors bright for up to a week. If you cut the cake before storing, spread some extra frosting over the cut edges to lock in moisture—it’s a game changer!
Freezing
I often bake the cake layers ahead and freeze them before assembling. Wrapped tightly in plastic wrap and foil, they keep for up to three months. You can also freeze the whole frosted cake (double wrapped) for about a month. When you’re ready, thaw overnight in the fridge for best results.
Reheating
Since it’s a cake, you don’t really reheat it—just bring slices to room temperature to let the flavors shine. If you do want to warm a slice, a few seconds in the microwave works but don’t overdo it or the frosting might start to melt.
FAQs
-
Can I make the Christmas Tree Spice Cake Recipe gluten-free?
Absolutely! You can substitute a cup-for-cup gluten-free all-purpose flour blend. Just be sure to choose one with xanthan gum or add it separately to help with texture and structure. Also, keep an eye on bake times because gluten-free flours sometimes bake faster or slower.
-
How far in advance can I prepare this cake?
The cake layers freeze beautifully, and the frosting can also be made ahead and stored. I recommend baking and freezing the layers up to a month in advance, then thawing and assembling the cake a day or two before serving. The frosted cake itself keeps well refrigerated for up to a week.
-
What if I don’t have green gel food coloring?
You can use natural alternatives like spinach powder or matcha for a green tint, though the color may be more muted. Food coloring gels tend to give the brightest, most festive look, but natural options work fine if you prefer to avoid artificial colors.
-
Can I use a hand mixer instead of a stand mixer?
Yes! A hand mixer works perfectly. I like to use the paddle attachment on my stand mixer, but a hand mixer with beaters will get the job done just as well. Just be sure to scrape the bowl frequently for even mixing.
Final Thoughts
This Christmas Tree Spice Cake Recipe has become a beloved tradition in my home because it’s a delicious centerpiece that truly embodies the holiday spirit. It’s not just about how it looks; it’s the warm spices, the creamy frosting, and the joy of assembling something festive that makes this recipe so special. I encourage you to give it a try—whether for a party, family gathering, or just a cozy dessert to enjoy by candlelight. You’ll love the way it brings a little extra magic to your celebration!
Print
Christmas Tree Spice Cake Recipe
- Prep Time: 15 minutes
- Cook Time: 32 minutes
- Total Time: 1 hour 47 minutes
- Yield: 24 servings 1x
- Category: Dessert
- Method: Baking
- Cuisine: American
Description
This festive Christmas Tree Cake features beautifully marbled green spice cake layers stacked and shaped into a charming Christmas tree. The cake is richly flavored with cinnamon, ginger, nutmeg, and vanilla, and is generously frosted with a smooth, colorful buttercream. Perfect for holiday celebrations, this cake combines moist, spiced layers with creamy buttercream rosettes and decorative frosting dollops in red, yellow, and white to resemble ornaments and tree lights.
Ingredients
Spice Cake Layers
- 3 cups all-purpose flour (375g)
- 1 1/2 cups granulated sugar (300g)
- 1 1/2 cups packed light brown sugar (300g)
- 2 1/2 tsp baking powder (10g)
- 1 tsp fine salt (6g)
- 2 tsp ground cinnamon (6g)
- 1 tsp ground ginger (3g)
- 1/2 tsp ground nutmeg (2g)
- 1/2 cup unsalted butter, room temperature (113g)
- 4 large eggs, room temperature (224g)
- 1 cup full-fat sour cream, room temperature (255g)
- 1/2 cup unsweetened apple sauce (90g)
- 1/2 cup vegetable or canola oil (105g)
- 1 tsp vanilla extract or vanilla bean paste (4g)
- Green gel food coloring, as needed
Buttercream Frosting
- 3 cups unsalted butter, room temperature (678g)
- 1 Tbsp vanilla extract or vanilla bean paste (12g)
- 1 tsp fine salt (3g)
- 10 cups powdered sugar (1250g)
- 1/2 cup heavy whipping cream, room temperature (120g)
- Green, yellow, and red gel food coloring, as needed
Recommended Tools and Equipment
- Serrated Knife
- Spinning cake stand
- Electric hand mixer or stand mixer
- 8-inch greaseproof cake board
- Small offset spatula
- Thick bubble tea straw or wooden dowel
- 2 Large piping bags
- 3 Small piping bags
- 1 Open star piping tip (Wilton 1M)
- 1 Large French piping tip (Wilton 6B)
- 2 Small round piping tips (Wilton 10)
- 1 Small French piping tip
Instructions
- Preheat and Prepare Pans: Preheat the oven to 350°F (175°C). Line one 8″, one 7″, two 6″, and two 4″ cake pans with parchment paper rounds and grease them with non-stick baking spray.
- Mix Dry Ingredients: In a large bowl, thoroughly combine 3 cups flour, 1 1/2 cups granulated sugar, 1 1/2 cups brown sugar, 2 1/2 tsp baking powder, 1 tsp salt, 2 tsp cinnamon, 1 tsp ginger, and 1/2 tsp nutmeg.
- Add Butter: Slowly mix 1/2 cup unsalted butter into the dry ingredients on low speed until no large butter chunks remain and the mixture appears crumbly.
- Add Eggs: Incorporate 4 large eggs on low speed, two at a time, mixing just until combined.
- Add Wet Ingredients: Mix in 1 cup sour cream, 1/2 cup unsweetened apple sauce, 1/2 cup vegetable oil, and 1 tsp vanilla extract on low speed until just combined.
- Blend Batter: Scrape down bowl sides with a rubber spatula and beat on medium speed for about 1 minute to fully incorporate and smooth the batter.
- Color and Marble Batter: Divide the batter into two portions; tint one half light green and the other darker green using gel food coloring. Add spoonfuls of both colors alternately into prepared pans about 1-inch high, then use a butter knife or offset spatula to swirl together for a marbled effect.
- Bake Cake Layers: Bake layers for 28-33 minutes or until a toothpick inserted comes out with a few moist crumbs. Allow cakes to cool in pans for 10 minutes, then run an offset spatula around edges and invert onto wire racks to cool completely.
- Level and Shape Layers: Use a serrated knife to level the tops of the cooled cake layers. Stack and trim layers into the tapered shape of a Christmas tree.
- Make Buttercream Frosting: Beat 3 cups unsalted butter on medium speed for 30 seconds until smooth. Mix in 1 Tbsp vanilla extract and 1 tsp salt. Gradually add 10 cups powdered sugar and 1/2 cup heavy cream on low speed. Adjust consistency by adding more cream or powdered sugar as needed, but wait to color the frosting until after assembling.
- Assemble Cake: On a greaseproof cake board or flat plate, place the largest cake layer and secure with a dab of frosting. Spread an even layer of buttercream atop each layer as you stack from largest to smallest, forming the Christmas tree shape. Insert a wooden dowel or thick straw through the center to stabilize the stack.
- Crumb Coat and Chill: Apply a thin coat of frosting over the entire cake, smoothing with an offset spatula or bench scraper. Chill the cake in the fridge for 30 minutes or freezer for 10 minutes until firm to the touch.
- Color Buttercream: Divide remaining buttercream into portions. Tint 1/2 cup white frosting for a small round piping tip bag, 1/2 cup red frosting for small French tip bag, 1/2 cup yellow frosting for small round tip bag, half of the remaining frosting light green and the other half dark green for large piping bags with open star tips.
- Decorate: Pipe green rosettes around the cake, then add dollops of red, yellow, and white frosting to mimic ornaments and holiday lights, completing the Christmas tree look.
Notes
- This recipe can be made using either a stand mixer with a paddle attachment or an electric hand mixer with a whisk attachment.
- Making the cake layers in advance and freezing them breaks up the process and makes assembly easier; thaw frozen layers about 20 minutes before assembling.
- Buttercream frosting can be made ahead and stored airtight in the fridge for up to 2 weeks or the freezer for up to 1 month; stir well after thawing for smooth consistency.
- The assembled frosted cake keeps well in the refrigerator for up to 1 week or in the freezer for up to 1 month with moisture locked in by the buttercream.
- Leftover frosting can be used to cover cut sections of the cake to maintain moisture; store any leftover cake tightly wrapped in the fridge for up to a week.
Nutrition
- Serving Size: 1 slice (approximately 1/24th of cake)
- Calories: 420
- Sugar: 36g
- Sodium: 180mg
- Fat: 26g
- Saturated Fat: 15g
- Unsaturated Fat: 9g
- Trans Fat: 0.5g
- Carbohydrates: 48g
- Fiber: 1.5g
- Protein: 4g
- Cholesterol: 80mg

Your email address will not be published. Required fields are marked *