If you want a show-stopping dessert for the holidays that’s bursting with festive flavors and beautiful layers, you’re going to *love* this Christmas Red Velvet Lasagna Dessert Recipe. It’s basically a delicious holiday hug in a dish—rich red velvet cake, creamy layers of cream cheese and whipped topping, and a gorgeous green pudding layer that adds that extra Christmas cheer. Trust me, once you dig in, you’ll be hooked. Ready to make your holiday dessert unforgettable? Let’s dive in!
Why You’ll Love This Recipe
- Festive Flavors: The classic red velvet combined with peppermint and a hint of vanilla pudding creates a holiday taste sensation.
- Easy Layering: You don’t need to be a pro baker to pull off this beautiful layered dessert — it’s straightforward and fun.
- Make-Ahead Friendly: Chill it and serve later to save your time and stress during busy holiday gatherings.
- Crowd-Pleaser: My family goes crazy for this every Christmas — it’s always the first dish to disappear!

Ingredients You’ll Need
This dessert strikes a perfect balance between indulgence and simplicity, thanks to ingredients that play off each other beautifully. You’ll find that using a boxed red velvet cake mix makes things so much easier without sacrificing flavor.

- Red velvet cake mix: This is your base layer for that iconic rich, chocolatey red flavor.
- Butter: Melted butter adds moisture and richness to the cake mix for a wonderful texture.
- Egg: Helps bind the cake batter and gives structure.
- Cream cheese: Softened for a rich, tangy cream layer that complements the sweetness beautifully.
- Confectioners sugar: Sweetens and smooths out the cream cheese mixture.
- Crushed candy canes: Adds peppermint sparkle and a festive crunch.
- Milk: Used in two stages—once to mix with pudding and once to thin the cream cheese layer.
- Cool Whip (or whipped topping): Adds lightness and fluffiness to the layers, making this dessert feel luscious but not heavy.
- Vanilla instant pudding: This green layer brings vanilla flavor and fun holiday color. Use green gel food coloring to nail that festive shade.
- Green gel food coloring: For that perfect Grinch-y green without affecting flavor.
- Christmas sprinkles and extra crushed candy canes: For a cheerful, decorative finish.
Variations
I love making this Christmas Red Velvet Lasagna Dessert Recipe my own by tweaking a few things or adjusting the layering. It’s really flexible, so feel free to get creative!
- Trifle Style: I once chopped the red velvet cake into cubes and layered everything in a big trifle bowl — it looked stunning and was super easy to serve at a crowd party.
- Mint Chocolate Twist: Sometimes I add miniature chocolate chips to the cream cheese layer for a little extra texture and chocolate magic.
- Dairy-Free Version: Use dairy-free cream cheese and whipped topping, and swap pudding mix for a coconut milk-based instant pudding alternative.
- Extra Peppermint Kick: Add a few drops of peppermint extract to the cream cheese layer for a more pronounced holiday flavor.
How to Make Christmas Red Velvet Lasagna Dessert Recipe
Step 1: Bake the Red Velvet Cake Base
First things first, preheat your oven to 350°F and grease a 13×9-inch baking pan—this size is perfect for beautiful layers. In a large mixing bowl, whisk together the red velvet cake mix, melted butter, and an egg until combined. You’ll want a smooth batter with no lumps. Spread it evenly in the pan, then bake for 15-18 minutes or until a toothpick inserted in the center comes out clean. This makes a soft, rich cake base that’s not too thick — just perfect for layering.
Step 2: Cream Cheese Layer Magic
While the cake cools, it’s time for the creamy goodness. In a bowl, beat the softened cream cheese with the confectioners sugar until it’s silky smooth. Add ¼ cup of milk and keep beating to incorporate and thin it just a bit. Fold in one container of Cool Whip (my secret weapon for lightness!) along with the crushed candy canes for that festive crunch. Spread this layer evenly over your cooled red velvet cake, then pop it in the refrigerator to chill and firm up while you prep the pudding layer.
Step 3: The Perfect Green Pudding Layer
In a large bowl, whisk together the instant vanilla pudding packages and 2¾ cups of cold milk. This sets the base for that cool green layer. Add green gel food coloring slowly—start with a few drops and mix well until you get the vibrant Grinch-green hue that makes this dessert truly pop. Pour that luscious pudding over the cream cheese layer carefully so it doesn’t disturb what you’ve already done. Back into the fridge it goes for at least 4 hours to set beautifully.
Step 4: Whipped Topping and Festive Garnishes
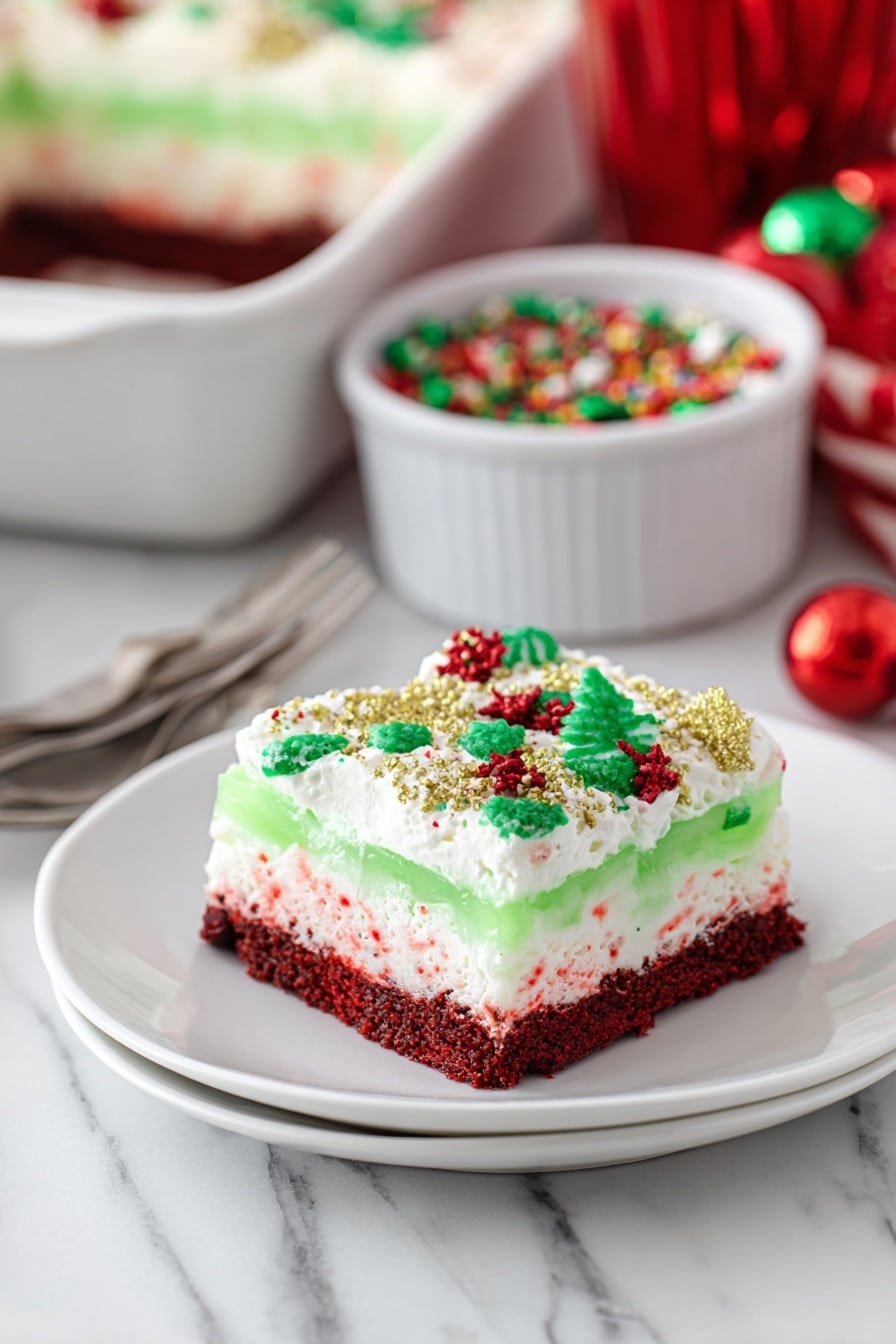
Once your pudding layer is firm and set, spread the second container of Cool Whip evenly on top for that final snowy finish. Now comes the best part—decorate with Christmas sprinkles and more crushed candy canes. This adds sparkle, texture, and all the holiday feels. Serve chilled and watch everyone swoon.
Pro Tips for Making Christmas Red Velvet Lasagna Dessert Recipe
- Don’t Overbake the Cake: I learned the hard way that a slightly underbaked cake layer stays moist and soft, preventing dryness in the final dessert.
- Soften Cream Cheese Thoroughly: Make sure the cream cheese is at room temperature for smooth mixing—no lumps allowed!
- Fold Cool Whip Gently: Folding the whipped topping preserves its fluffiness, making every bite light and creamy.
- Give it Enough Chill Time: Patience pays off—letting the layers set properly in the fridge ensures clean slices and perfect texture.
How to Serve Christmas Red Velvet Lasagna Dessert Recipe

Garnishes
I usually top this dessert with festive Christmas sprinkles—think stars, holly leaves, and red-and-green dots—and a sprinkle of crushed candy canes. That peppermint crunch pairs so well, and the colorful sprinkles make it feel extra magical. Sometimes, a few fresh mint leaves on top add a lovely touch if you want a pop of fresh green.
Side Dishes
Pair this dessert with a simple cup of hot cocoa or peppermint-flavored coffee to keep with the holiday theme. If you want to serve more festive treats, gingerbread cookies or a light fruit salad with pomegranate seeds are fantastic companions.
Creative Ways to Present
For a fun holiday party, I’ve layered this dessert in clear glass trifle bowls or even in individual parfait glasses. It’s a blast for kids to help assemble, and everyone loves seeing those beautiful layers glowing through the glass. You can also make mini versions in mason jars for easy grab-and-go treats.
Make Ahead and Storage
Storing Leftovers
I recommend covering leftover Christmas Red Velvet Lasagna Dessert tightly with plastic wrap or an airtight lid, then storing it in the fridge. It keeps well for up to 3 days and actually tastes better after a little more chilling, letting the flavors marry even more.
Freezing
I have frozen this dessert before by wrapping it tightly in foil and plastic wrap, but keep in mind the texture of the whipped topping may change slightly. If you plan to freeze, it’s best to do so before adding the whipped topping garnish and add that fresh after thawing.
Reheating
This dessert is best enjoyed cold straight from the refrigerator, so I don’t recommend reheating. Just let frozen portions thaw overnight in the fridge and give them a light stir if needed before serving.
FAQs
-
Can I use homemade red velvet cake instead of the box mix?
Absolutely! If you have a favorite homemade red velvet cake recipe, feel free to bake it thinly in the pan and use it as the base. It might take a bit longer to bake than the boxed mix, so adjust accordingly.
-
What if I don’t have green gel food coloring?
No worries! You can skip the green coloring and keep the pudding layer vanilla white or add a drop of regular food coloring, but gel colors are best for that vibrant shade without altering the pudding’s texture.
-
Can I make this dessert dairy-free?
Yes! Use dairy-free cream cheese and dairy-free whipped topping alternatives, and swap the milk and pudding mix for plant-based friendly options like almond or oat milk and dairy-free pudding mixes made from coconut milk.
-
How far ahead can I make this dessert?
You can assemble this dessert up to 2 days ahead and store it in the fridge. Just add the final whipped topping and sprinkles right before serving for best presentation.
Final Thoughts
I absolutely love how this Christmas Red Velvet Lasagna Dessert Recipe turns out every single time. It’s festive, fun, and brings people together around the table — which is what the holidays are all about. I remember making this for the first time a few years back when I wanted a dessert that was easy but impressive, and it quickly became a family tradition. So go ahead, whip up this beauty and get ready for tons of compliments and happy taste buds. You’re going to rock this holiday season, promise!
Print
Christmas Red Velvet Lasagna Dessert Recipe
- Prep Time: 15 minutes
- Cook Time: 15 minutes
- Total Time: 4 hours 30 minutes
- Yield: 18 servings 1x
- Category: Dessert
- Method: Baking
- Cuisine: American
Description
This festive Christmas Lasagna Dessert layers moist red velvet cake, a creamy cream cheese mixture with crushed candy canes, a vibrant green vanilla pudding, and fluffy Cool Whip, creating a delightful no-bake holiday treat perfect for gatherings. The dessert combines classic holiday flavors with a fun, colorful presentation and is chilled to perfection for a refreshing finish.
Ingredients
Red Velvet Cake Layer
- 1 box red velvet cake mix
- 1/2 cup butter, melted
- 1 egg
Cream Cheese Layer
- 16 ounces cream cheese, softened
- 1/2 cup confectioners sugar
- 1/4 cup crushed candy canes
- 1/4 cup milk
- 16 ounces Cool Whip (one container)
Vanilla Pudding Layer
- 2 3.4 ounce packages vanilla instant pudding mix
- 2 3/4 cups milk, divided
- Green gel food coloring
Topping
- 16 ounces Cool Whip (second container)
- Christmas sprinkles
- Crushed candy canes for garnish
Instructions
- Prepare and Bake Red Velvet Cake Layer: Preheat your oven to 350°F (175°C) and grease a 13×9 inch baking pan. In a large mixing bowl, combine the red velvet cake mix with melted butter and egg, stirring until just blended. Spread this batter evenly in the prepared pan and bake for 15-18 minutes, or until a toothpick inserted in the center comes out clean. Allow the cake layer to cool completely.
- Make Cream Cheese Layer: In a separate bowl, beat the softened cream cheese with confectioners sugar until smooth. Add 1/4 cup of milk and continue to beat until well combined. Gently fold in one container of Cool Whip and the crushed candy canes, mixing until evenly incorporated. Spread this creamy mixture over the cooled red velvet cake layer evenly. Place the pan in the refrigerator to chill while preparing the next layer.
- Prepare Green Vanilla Pudding Layer: In a large bowl, whisk together the vanilla instant pudding mixes and the remaining 2 1/2 cups of milk until the mixture thickens slightly. Add green gel food coloring a little at a time until the pudding reaches a vibrant ‘Grinch’ green shade. Pour this pudding layer over the cream cheese layer and smooth it out. Return the dish to the refrigerator and chill for at least 4 hours to allow the pudding to set completely.
- Add Final Topping and Garnish: After the pudding has set, gently spread the remaining container of Cool Whip over the pudding layer. Decorate with Christmas sprinkles and additional crushed candy canes for a festive touch. Serve chilled for a refreshing and colorful holiday dessert.
Notes
- For a fun twist, transform this dessert into a trifle by cutting the cake into chunks and layering all components in a trifle bowl.
- Make sure the cream cheese is softened to avoid lumps in the cream cheese layer.
- You can adjust the amount of green gel food coloring to achieve your desired shade of green.
- The dessert requires chilling time to ensure proper setting of layers, so plan ahead.
Nutrition
- Serving Size: 1 slice (1/18th of recipe)
- Calories: 320
- Sugar: 28g
- Sodium: 240mg
- Fat: 18g
- Saturated Fat: 9g
- Unsaturated Fat: 7g
- Trans Fat: 0.5g
- Carbohydrates: 35g
- Fiber: 1g
- Protein: 4g
- Cholesterol: 55mg

Your email address will not be published. Required fields are marked *