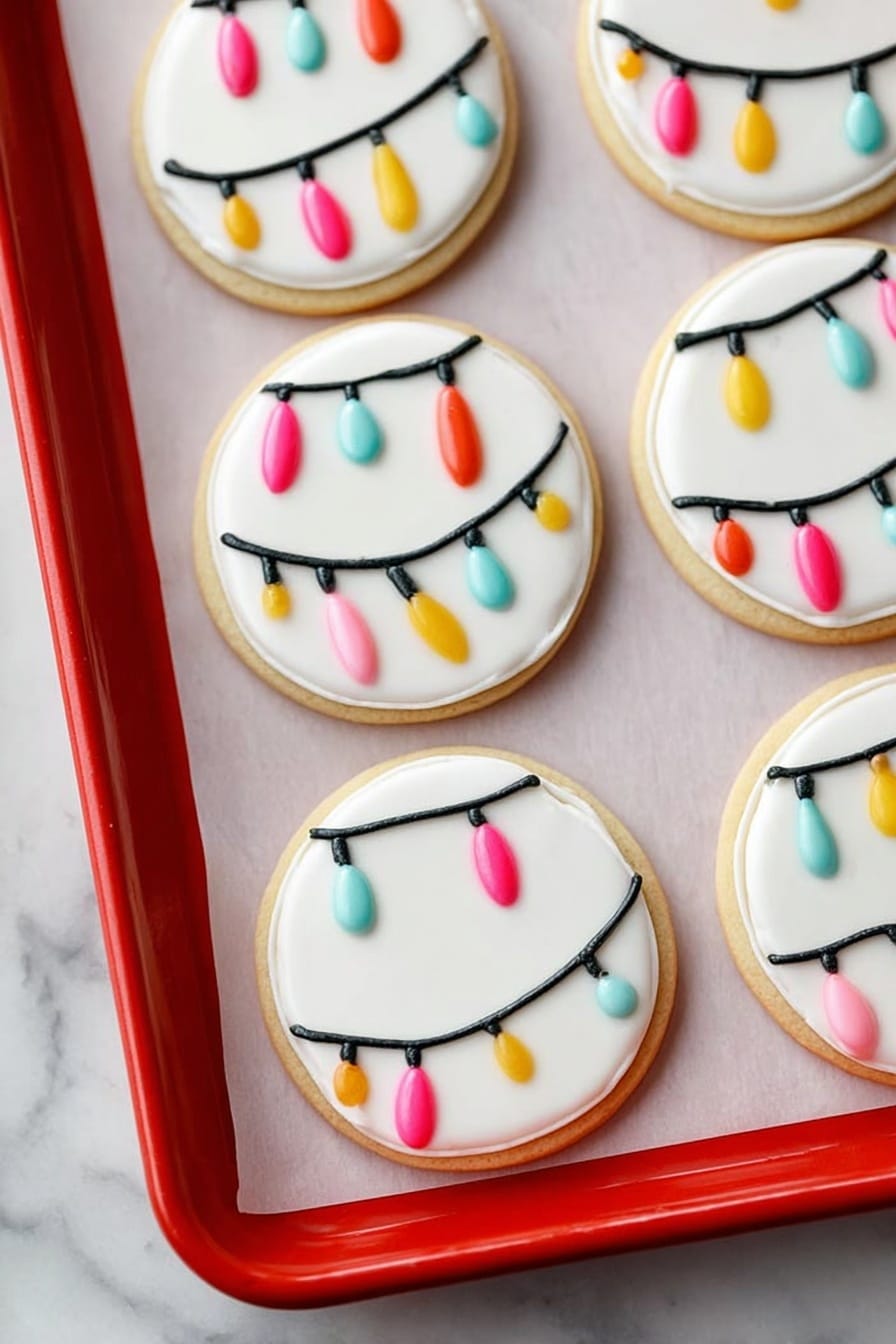
If you’re anything like me, the magic of the holidays just isn’t complete without baking something festive, fun, and utterly delicious. That’s why I’m so excited to share my Christmas Lights Sugar Cookies Recipe with you! These cookies aren’t just adorable—they taste incredible and become the centerpiece of any holiday gathering. With their classic sugar cookie base and beautifully bright royal icing that looks like twinkling Christmas lights, they’re guaranteed to bring smiles around your kitchen table. Stick with me, and I’ll walk you through every step to make these festive treats shine!
Why You’ll Love This Recipe
- Perfect Holiday Vibes: The decorating technique mimics colorful Christmas lights, adding that extra festive pop to your cookie platter.
- Classic & Reliable Sugar Cookie Base: The dough is buttery, slightly crisp on the edges, and soft inside—it’s a crowd-pleaser every time.
- Fun to Make & Customize: You’ll enjoy piping and flooding the royal icing, and the process is a great way to wind down and get creative.
- Make-Ahead Friendly: You can freeze the cookies before decorating, making holiday prep stress-free.

Ingredients You’ll Need
Let’s talk ingredients. You’ll find these are basic pantry staples that work together to create the perfect sugar cookie canvas. I always recommend using room temperature butter and eggs to get the right dough consistency and smooth icing.
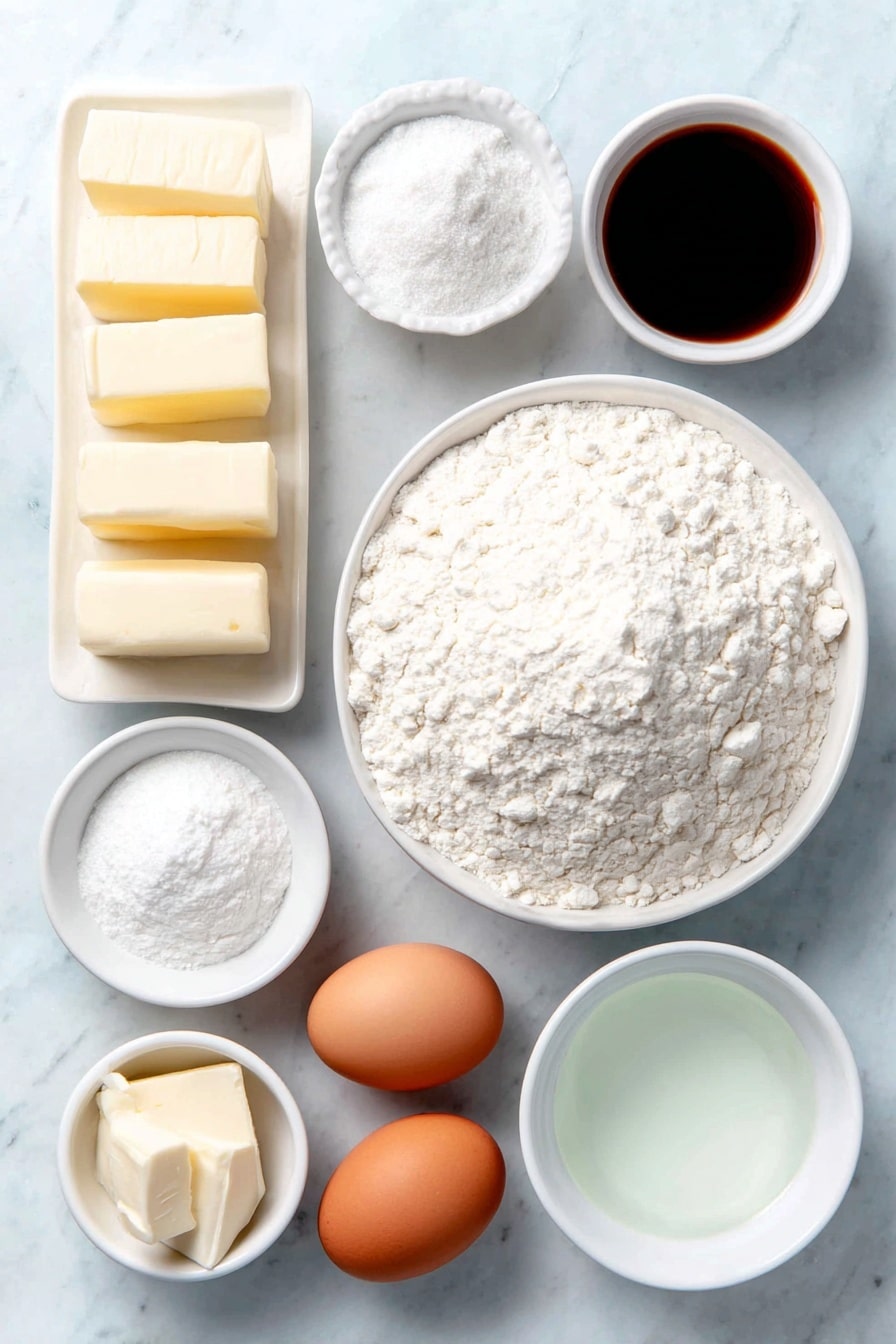
- All-purpose flour: Make sure to measure with a scale if you can—it’s the best way to avoid dense cookies.
- Baking powder: Helps the cookies rise ever so slightly, giving a tender crumb.
- Salt: Just a pinch to balance the sweetness and boost the flavors.
- Unsalted butter: Room temperature butter makes the creaming step so much easier and gives great flavor without extra salt.
- Granulated sugar: The classic sweetener for that perfect crunch and sweetness.
- Large eggs: Room temperature eggs bind everything together and add richness.
- Pure vanilla extract: Adds a warm, comforting note—don’t skip on real vanilla if you can.
- Powdered sugar (for royal icing): This keeps the icing smooth and silky.
- Meringue powder: The secret to royal icing’s stability and that gorgeous glossy finish.
- Water: Adjusts consistency for piping and flooding.
- Food coloring (like Wilton icing gel): This is what brings the Christmas lights to life!
Variations
I love how versatile my Christmas Lights Sugar Cookies Recipe is. You can stick with the classic or put your own spin on it depending on your mood or dietary needs—it’s all about making it your own!
- Gluten-Free Version: I once swapped out the all-purpose flour for a gluten-free blend with xanthan gum. The texture was a tiny bit different but still delicious and held up well for decorating.
- Flavor Twist: Adding a little almond extract alongside vanilla adds a lovely nutty depth that my family couldn’t get enough of.
- Vegan-Friendly: You can replace butter with vegan margarine and use a flax egg, although the royal icing might need tweaks like aquafaba instead of meringue powder for similar structure.
How to Make Christmas Lights Sugar Cookies Recipe
Step 1: Mix Your Dry Ingredients
Start by whisking together your flour, baking powder, and salt. I like to do this in a medium bowl to make sure everything’s evenly combined and free of lumps. Using a scale for the flour is a game-changer here—your cookies will bake up perfectly every time.
Step 2: Cream Butter and Sugar
In a large mixing bowl, beat the room temperature unsalted butter and granulated sugar together using an electric mixer for about 3 minutes. You want it nice and fluffy, like a cloud, which sets the stage for tender cookies.
Step 3: Add Eggs and Vanilla
Beat in your eggs one at a time, followed by the vanilla extract. This adds moisture and flavor, plus helps bind the dough. Beat everything for an additional minute until it’s smooth.
Step 4: Incorporate the Dry Ingredients
Slowly add the dry flour mixture to the wet ingredients on low speed. The dough will begin pulling away from the sides of the bowl—that’s your cue it’s ready! Then, take it out and knead gently on parchment paper for a couple of minutes.
Step 5: Chill the Dough
Divide the dough in half, wrap in parchment paper, and pop it in the fridge for about 30 minutes. This makes rolling easier and helps prevent spreading while baking.
Step 6: Roll and Cut Your Cookie Shapes
Place the chilled dough between two sheets of parchment and roll it out to about ⅛” to ¼” thickness. This thickness is ideal—thin enough to bake quickly but thick enough to hold shape. Cut your shapes (Christmas lights, of course!) and don’t move them—leave the cut shapes right on your rolling parchment, then transfer that to your baking sheet.
Step 7: Bake to Perfection
Bake in a preheated 350°F oven for 10-13 minutes, or until edges are just starting to turn golden. Keep an eye on them towards the end—overbaked cookies get too crisp and lose that melt-in-your-mouth charm.
Step 8: Make Your Royal Icing
For that Christmas lights magic, royal icing is key. Combine powdered sugar, meringue powder, and a bit of water—then beat for 6 minutes low and slow until fluffy. Add water in small amounts to get medium (toothpaste) and flood (like glue) consistencies. Separating half and adjusting water is how I get that perfect outline and fill effect.
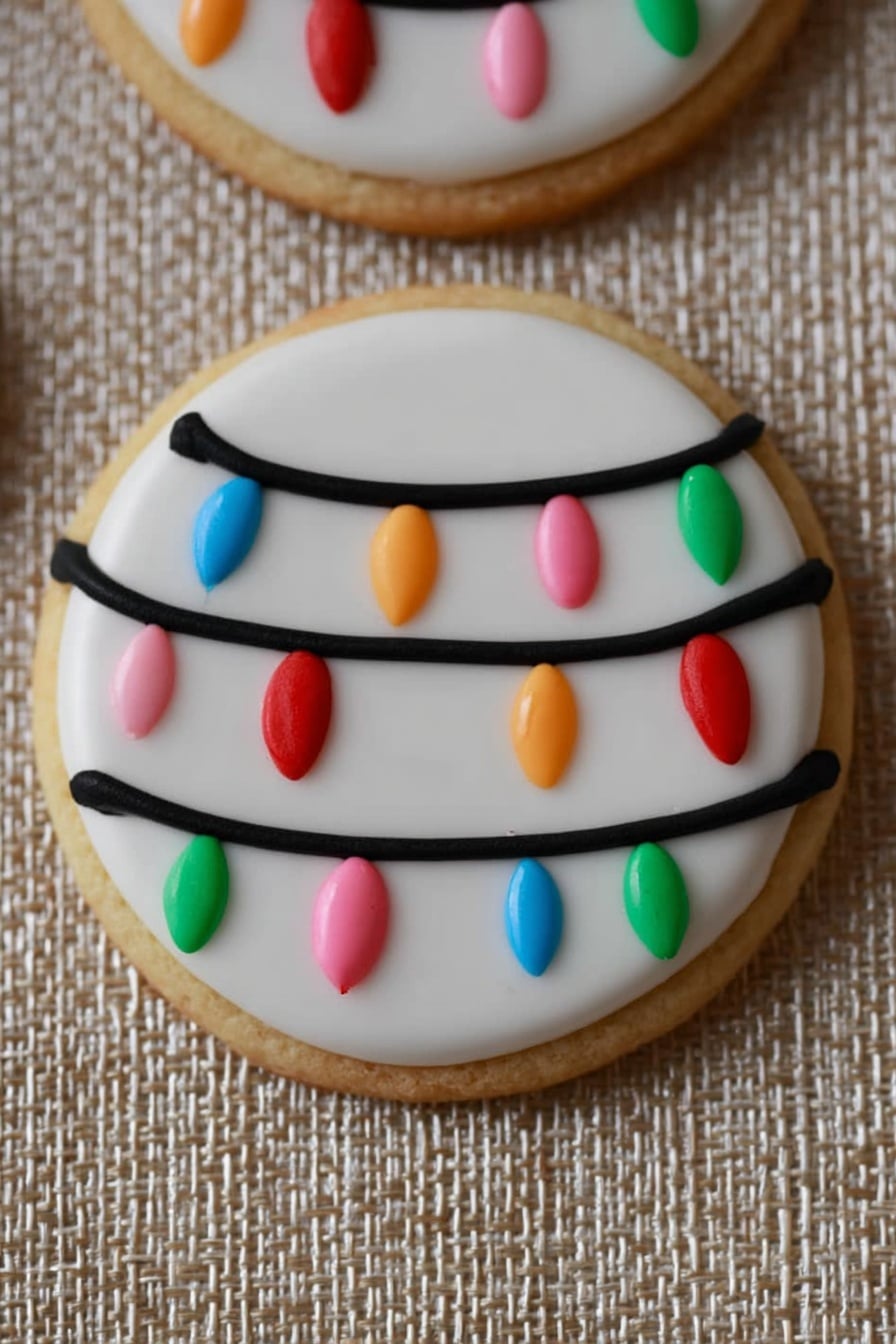
Step 9: Decorate and Let Dry
Start by piping an outline with medium consistency icing. Then fill with flood icing using a squeeze bottle or piping bag. After drying for an hour, come back with more medium consistency icing for details—add the tiny circles to look like bulbs and don’t forget to change colors! Trust me, your family will be mesmerized by how real these look.
Pro Tips for Making Christmas Lights Sugar Cookies Recipe
- Don’t Skip Chilling the Dough: Chilling helps the dough firm up and stops cookies from spreading too much while baking.
- Use a Scale for Flour: Measuring by weight means no more guessing—your dough won’t turn out too dry or sticky.
- Flood Icing in Thin Layers: Applying flood icing gradually helps avoid bleeding colors—a little patience goes a long way.
- Practice Your Piping on Parchment: Before icing the cookies, try a test run on parchment paper to get comfortable with the consistency and pressure.
How to Serve Christmas Lights Sugar Cookies Recipe
Garnishes
I often add a sprinkle of edible glitter or tiny silver dragées to make those Christmas lights sparkle even more. If I’m feeling extra festive, I’ll dust a little powdered sugar over the platter to mimic snow—super simple but stunning.
Side Dishes
These cookies steal the show, but I like to serve them alongside a warm cup of cocoa or a spiced holiday punch. They also pair beautifully with a cheese board featuring mild cheeses and fresh fruit for a cozy winter gathering.
Creative Ways to Present
I’ve wrapped these cookies individually in clear cellophane tied with colorful ribbon as little holiday gifts. Another favorite is arranging them on a gingerbread house-style cookie board shaped like a strand of Christmas lights—kids and adults alike get such a kick out of it!
Make Ahead and Storage
Storing Leftovers
Store your decorated Christmas Lights Sugar Cookies in an airtight container at room temperature—they last about a week and remain soft yet firm enough not to get soggy. If you need extra freshness, a single slice of bread helps absorb moisture without drying out your cookies.
Freezing
I’ve found freezing the baked but undecorated cookies works best. Wrap them tightly in parchment and foil, then freeze. When ready, thaw overnight and decorate fresh for the best texture and appearance.
Reheating
No need to reheat decorated cookies, but if you want that fresh-baked warmth without melty icing, pop undecorated ones in a 300°F oven for 3-4 minutes. Just remember: decorated cookies are best enjoyed as-is so the icing stays firm.
FAQs
-
Can I use store-bought cookie cutters for Christmas Lights Sugar Cookies?
Absolutely! You can find Christmas light-shaped cookie cutters online or at craft stores. If you can’t find that exact shape, using a simple bulb shape or small round cutter also works well—get creative with your decorations to capture the look!
-
How do I get royal icing to the right consistency for outlining and flooding?
Start with thick, fluffy icing after mixing, then slowly add water. Medium consistency is like toothpaste (holds shape but pipeable), ideal for outlines. Flood consistency is thinner, like runny glue, perfect for filling in. It might take a bit of practice but testing on parchment helps.
-
Can I decorate these cookies a day ahead?
Yes! Once your royal icing is dry, which usually takes about an hour depending on humidity, you can store decorated cookies in an airtight container for up to a week—perfect for getting ahead of holiday celebrations.
-
What if my dough is too sticky to roll out?
If your dough feels sticky, just pop it back in the fridge wrapped in parchment for 10-15 minutes. Cold dough is easier to handle and less likely to stick to your rolling surface.
Final Thoughts
I absolutely love how this Christmas Lights Sugar Cookies Recipe brings joy every holiday season. From rolling out the dough with the kids to piping colorful icing that sparkles like the real deal, it’s more than just a treat—it’s a shared experience full of laughter and warmth. If you try this recipe, I promise you’ll be baking these charming cookies year after year. So grab your piping bag, crank up your favorite holiday tunes, and let’s light up your kitchen with these delightful cookies!
Print
Christmas Lights Sugar Cookies Recipe
- Prep Time: 20 minutes
- Cook Time: 13 minutes
- Total Time: 33 minutes
- Yield: 20 cookies 1x
- Category: Dessert
- Method: Baking
- Cuisine: American
Description
Celebrate the holidays with these delightful Christmas Lights Sugar Cookies, featuring a classic sugar cookie base decorated with vibrant royal icing to mimic festive Christmas lights. These cookies are perfect for holiday parties, gifting, or festive family baking sessions, offering a crisp yet tender bite with beautifully piped icing accents.
Ingredients
Sugar Cookies
- 6 cups all purpose flour (2 pounds)
- 2 teaspoons baking powder
- 2 teaspoons salt
- 4 sticks unsalted butter, room temperature (1 pound)
- 2 cups granulated sugar
- 2 large eggs, room temperature
- 2 teaspoons pure vanilla extract
Royal Icing
- 16 ounces powdered sugar (1 pound)
- ¼ cup plus 1 tablespoon meringue powder
- ⅓ cup water, plus more if too thick
- Food coloring (Wilton icing gel recommended)
Instructions
- Prepare Dry Ingredients: In a medium bowl, whisk together the all-purpose flour, baking powder, and salt to combine thoroughly and remove lumps. Set the mixture aside.
- Mix Butter and Sugar: In a large bowl, beat the room temperature unsalted butter and granulated sugar using an electric mixer on medium speed for 3 minutes until light and fluffy.
- Add Eggs and Vanilla: Add the eggs and vanilla extract, then continue beating for another minute to incorporate fully.
- Combine Flour Mixture: On low speed, gradually add the flour mixture to the wet ingredients. Blend until the dough starts to pull away from the sides of the bowl.
- Knead and Chill Dough: Transfer the dough onto parchment paper and knead gently by hand for a few minutes. Divide the dough into two equal sections, wrap each in parchment paper, and refrigerate for about 30 minutes to chill.
- Roll and Cut Cookies: Preheat your oven to 350°F (175°C). Place a sheet of parchment paper over the dough and roll it out to between ⅛ and ¼ inch thickness. Use cookie cutters to cut shapes, leaving them on the parchment paper to maintain shape, then transfer to a baking sheet.
- Bake Cookies: Bake in the preheated oven for 10-13 minutes or until edges are slightly golden. Remove from oven and allow cookies to cool completely before decorating.
- Prepare Royal Icing: In a large bowl, combine powdered sugar, meringue powder, and ⅓ cup water. Beat on low speed for about 6 minutes until the mixture is thick and fluffy.
- Adjust Icing Consistency: Add 4-5 tablespoons of water to achieve medium consistency (toothpaste-like). Divide icing in half; add 1-2 tablespoons water to one half for flood consistency, which should flow off a spoon like glue.
- Color and Decorate: Tint icings with desired food coloring. Using medium consistency icing in a piping bag, outline cookie edges. Fill the inside with flood icing using a squeeze bottle or piping bag. Let dry for an hour, then add decorations with medium icing.
- Store or Freeze: Allow decorated cookies to dry completely before storing. Optionally freeze undecorated cookies before decorating to preserve freshness for several months.
Notes
- The calorie count provided is an estimate for the entire recipe, but actual intake will be less as you won’t consume all royal icing.
- Measuring flour by weight is recommended for accuracy.
- Make sure the eggs and butter are at room temperature to ensure proper mixing and texture.
- Allow cookies to cool completely before icing to prevent melting.
- If your royal icing is too thick, add water in small amounts until desired consistency is reached.
- You can substitute meringue powder with egg whites if desired, but be aware of food safety considerations.
- Use gel food coloring for more vibrant colors without thinning the icing.
- Cookies can be decorated a day ahead and stored at room temperature in an airtight container.
Nutrition
- Serving Size: 1 cookie (approx. 3 inches)
- Calories: 220
- Sugar: 15g
- Sodium: 110mg
- Fat: 9g
- Saturated Fat: 5g
- Unsaturated Fat: 3g
- Trans Fat: 0g
- Carbohydrates: 31g
- Fiber: 0.5g
- Protein: 2g
- Cholesterol: 30mg

Your email address will not be published. Required fields are marked *