
If you’re a fan of both brownies and chocolate chip cookies (and honestly, who isn’t?), you are going to absolutely adore this Chocolate Chip Cookie Brownie Bars Recipe. It’s the perfect mashup of two classic treats into one insanely delicious bar that satisfies every sweet craving in a single bite. Imagine rich, fudgy brownie base layered with warm, gooey cookie dough dotted with melty chocolate chips—and it’s surprisingly easy to pull off. Trust me, once you try these bars, they’ll quickly become a household favorite, just like they are in my kitchen!
Why You’ll Love This Recipe
- Best of Both Worlds: Combines gooey brownies and chewy chocolate chip cookies in one decadent bar.
- Simple and Reliable: Uses common pantry ingredients with easy steps that never fail.
- Perfect Texture: Crispy edges with a soft, fudgy center and melty pockets of chocolate.
- Crowd Pleaser: Whether for parties, potlucks, or a family dessert, these bars get rave reviews every time.

Ingredients You’ll Need
I’ve found that using a mix of brown sugar and granulated sugar in both the brownie and cookie layers is key for that perfect chewy yet tender texture. Also, a note on chocolate chips—you can’t go wrong with classic semi-sweet, but I sometimes toss in milk chocolate chunks for an extra melty surprise.

- Butter: Use softened butter for easy mixing and a tender crumb in both layers.
- Sugar and Brown Sugar: The combo gives depth of flavor and chewiness—brown sugar adds moisture while white sugar helps balance sweetness.
- Eggs: Help bind and enrich the batter, make sure they’re at room temperature for better mixing.
- Vanilla Extract: A splash enhances all the chocolate-y goodness and adds warmth.
- Unsweetened Cocoa Powder: For rich, deep chocolate flavor in the brownie base—don’t skip it!
- All-Purpose Flour: Gives structure to both layers without weighing them down.
- Baking Soda: Provides a slight lift and chewiness to the cookie layer.
- Salt: Balances sweetness and enhances the chocolate flavor.
- Chocolate Chips: Use semi-sweet or mix with milk chocolate chunks, like I do for that melty finish.
Variations
I love how versatile this Chocolate Chip Cookie Brownie Bars Recipe is. I often tweak it depending on what I have in the pantry or to suit different tastes. Don’t hesitate to make it your own!
- Nutty Delight: Adding chopped walnuts or pecans to the brownie layer adds a satisfying crunch and toasty flavor that my family goes crazy for.
- Peanut Butter Swirl: Swirl peanut butter into the brownie batter before layering for an irresistible nutty twist.
- Gluten-Free Version: Substitute gluten-free flour blend for regular flour to make this recipe allergy-friendly without sacrificing texture.
- Dairy-Free Option: Use dairy-free butter alternatives to keep this treat accessible to everyone.
How to Make Chocolate Chip Cookie Brownie Bars Recipe
Step 1: Prepare the Brownie Base
Start by preheating your oven to 350°F—a crucial step to make sure your bars bake evenly. In a large bowl, cream together softened butter with the sugar and brown sugar for about 3 to 4 minutes until the mixture is light and fluffy. This takes a little elbow grease or a hand mixer, but it’s worth it for that perfect texture. Beat in the eggs one at a time, making sure each egg fully incorporates before adding the next. Then mix in the vanilla extract. Next, stir in the cocoa powder, flour, baking soda, and salt until just combined—over mixing can make things tough, so take it easy. Finally, fold in those chocolate chips which add pockets of melty goodness throughout. Pour this brownie batter into a 9 x 13 aluminum pan and smooth it out evenly. A quick tip: avoid glass pans for this recipe because they cook slower, resulting in edges that get too hard and centers that stay underbaked. Aluminum traps heat just right, creating an even bake every time.
Step 2: Drop the Cookie Dough on Top
Next up, the cookie dough! In a clean bowl, cream together softened butter with brown sugar and granulated sugar until fluffy—again, about 3-4 minutes. Add the egg and vanilla, mixing for another minute so everything blends well. Stir in the flour, baking soda, and salt until it forms a soft dough. Gently fold in more chocolate chips—you want plenty because who doesn’t love extra chocolate? Using a spoon, drop dollops of cookie dough over the brownie layer, trying to cover as much surface as possible. Don’t worry if it’s not perfect; the dough will spread out while baking and create that beautiful marbled effect that makes these bars so irresistible. If you like, sprinkle milk chocolate chunks on top during the last five minutes of baking for an extra gooey finish.
Step 3: Bake and Cool
Bake for 28 to 32 minutes until the edges are just set but the middle still looks slightly soft (this ensures fudgy perfection). Once baked, resist the urge to cut immediately—letting them cool fully in the pan helps the bars set and makes slicing cleaner. When cool, pop the pan in the freezer for 20 to 30 minutes; this trick firms up the bars and makes cutting them into neat squares a breeze. You’ll thank me later when your bars hold shape without crumbling.
Pro Tips for Making Chocolate Chip Cookie Brownie Bars Recipe
- Pan Choice Matters: I learned early on to always bake this in an aluminum pan—not only does it guarantee even baking, but it also helps you avoid tough edges and undercooked centers.
- Room Temperature Ingredients: Using room temp eggs and butter helps everything blend seamlessly, preventing a grainy texture and ensuring smooth batters.
- Don’t Overmix: Once you add the flour in both layers, mix just until combined—this keeps the bars tender, not dense.
- Cooling is Key: Freezing before slicing saves you from crumbly messes and uneven cuts, making for picture-perfect brownie cookie bars.
How to Serve Chocolate Chip Cookie Brownie Bars Recipe

Garnishes
When I serve these bars, I sometimes dust them lightly with powdered sugar or drizzle a bit of melted dark chocolate on top for that fancy touch. Fresh raspberries or a scoop of vanilla ice cream on the side turns these bars into an indulgent dessert perfect for birthdays or weekend treat time.
Side Dishes
This recipe pairs perfectly with a cold glass of milk or a hot cup of coffee—my family and I enjoy them just as much with morning coffee as we do for afternoon snack time! For a grown-up twist, try serving with a scoop of bourbon vanilla ice cream or salted caramel sauce.
Creative Ways to Present
For parties, I’ve arranged these bars on a wooden board with assorted nuts and fresh berries for a rustic dessert display. You can also cut them into smaller bite-sized pieces and serve on mini cupcake liners for easy grab-and-go treats. Wrapping individual bars with clear cellophane and tying with a ribbon makes adorable homemade gifts too!
Make Ahead and Storage
Storing Leftovers
I keep any leftovers wrapped tightly in plastic wrap or stored in an airtight container at room temperature for up to 4 days, but honestly, they rarely last that long! Keeping them sealed keeps the bars moist and perfect to enjoy anytime.
Freezing
Freezing is a great option if you want to make these in advance. I usually cut the bars into individual servings, wrap each piece tightly in plastic wrap, then place them together in a freezer bag. They freeze well for up to 3 months, and thaw quickly at room temperature or in the fridge overnight.
Reheating
To revive the fudgy softness, I reheat leftovers briefly in the microwave for about 15-20 seconds or pop them in a warm oven (300°F) for 5-7 minutes. This softens the chocolate chips and brings that just-baked magic back to life.
FAQs
-
Can I use a glass pan instead of aluminum for this Chocolate Chip Cookie Brownie Bars Recipe?
It’s best to avoid glass pans for this recipe because they heat differently than aluminum, causing the edges to overcook and become overly hard while the center stays underbaked. Aluminum pans distribute heat evenly, resulting in perfectly cooked bars with great texture.
-
Can I make the brownie layer or cookie dough ahead of time?
Absolutely! You can prepare both batters a day ahead and keep them refrigerated separately. Just bring them to room temperature and mix again gently before layering and baking. This can actually enhance flavors as they meld overnight.
-
What’s the best way to cut the bars without them falling apart?
Letting the bars cool completely and then chilling them in the freezer for 20-30 minutes before slicing is a game changer. Use a sharp knife and wipe it clean between cuts for clean, intact squares every time.
-
Can I add nuts or other mix-ins to this Chocolate Chip Cookie Brownie Bars Recipe?
Definitely! Chopped nuts like walnuts or pecans work wonderfully in the brownie layer, and you can add dried fruit or white chocolate chips to the cookie dough portion for fun variations.
Final Thoughts
Honestly, this Chocolate Chip Cookie Brownie Bars Recipe has become one of my all-time favorites because it merges two beloved classics into one show-stopping dessert. Every time I make it, I get compliments galore and a happy crowd asking for seconds (or thirds). If you want a go-to treat that’s just the right mix of chewy, fudgy, and chocolatey, this recipe is it. So grab your mixing bowls and get ready—once you try these bars, you’ll be hooked for life, just like me!
Print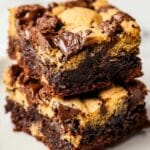
Chocolate Chip Cookie Brownie Bars Recipe
- Prep Time: 20 minutes
- Cook Time: 30 minutes
- Total Time: 50 minutes
- Yield: 20 servings 1x
- Category: Dessert
- Method: Baking
- Cuisine: American
Description
Delicious Brookies combine the rich, fudgy texture of brownies with the soft, chewy goodness of chocolate chip cookies in one perfect bar. This recipe layers homemade brownie batter with chocolate chip cookie dough and bakes to golden perfection, creating an irresistible dessert perfect for sharing or as a decadent treat.
Ingredients
Brownie Layer:
- 3/4 cup Butter (softened)
- 1 cup Sugar
- 1/3 cup Brown Sugar
- 2 large Eggs
- 1 teaspoon Vanilla Extract
- 1/2 cup Unsweetened Cocoa Powder
- 1 cup All-Purpose Flour
- 1/2 teaspoon Baking Soda
- 1/4 teaspoon Salt
- 1/2 cup Chocolate Chips (optional)
Chocolate Chip Cookie Layer:
- 1/2 cup Butter (softened)
- 3/4 cup Brown Sugar
- 1/4 cup Sugar
- 1 large Egg
- 1 teaspoon Vanilla Extract
- 1 1/4 cups All-Purpose Flour
- 1/2 teaspoon Baking Soda
- 1/2 teaspoon Salt
- 1 cup Chocolate Chips
- Milk chocolate chunks (to sprinkle on top, optional)
Instructions
- Prepare the Brownie Batter: Preheat your oven to 350°F (175°C). In a large mixing bowl, cream together the softened butter, sugar, and brown sugar for 3 to 4 minutes until the mixture is light and fluffy. Add the eggs one at a time, mixing well after each addition, then stir in the vanilla extract.
- Mix Brownie Ingredients: Gradually add the unsweetened cocoa powder, flour, baking soda, and salt to the wet ingredients. Stir until just combined, then fold in the chocolate chips if using. Pour the batter evenly into a 9 x 13 inch aluminum pan; avoid using a glass pan to ensure proper cooking.
- Prepare the Cookie Dough: In another large bowl, cream together the softened butter, brown sugar, and sugar for 3 to 4 minutes. Add the egg and vanilla extract, mixing for an additional minute. Stir in the flour, baking soda, and salt until combined, then fold in the chocolate chips.
- Assemble Layers: Drop spoonfuls of the cookie dough evenly over the brownie batter, covering most of the surface.
- Bake the Brookies: Bake in the preheated oven for 28 to 32 minutes or until the edges start to set. During the last 5 minutes, sprinkle milk chocolate chunks on top if desired.
- Cool and Serve: Remove from oven and allow the brookies to cool completely before cutting. For easier slicing, place the pan in the freezer for 20 to 30 minutes prior to cutting into bars.
Notes
- Do not use a glass pan as it will increase baking time and may cause the edges to become too hard while the center remains underbaked.
- Using an aluminum pan ensures more even cooking and a better texture.
- For easier slicing, chilling the baked brookies in the freezer is recommended.
- Optional: Add milk chocolate chunks on top in the last 5 minutes of baking for extra gooey texture.
Nutrition
- Serving Size: 1 bar
- Calories: 210
- Sugar: 18g
- Sodium: 110mg
- Fat: 11g
- Saturated Fat: 6g
- Unsaturated Fat: 4g
- Trans Fat: 0g
- Carbohydrates: 28g
- Fiber: 2g
- Protein: 2g
- Cholesterol: 40mg

Your email address will not be published. Required fields are marked *