
If you’re craving a cake that’s as visually stunning as it is decadently delicious, you’re in the right place. I absolutely adore sharing my Black Velvet Cake with Dark Chocolate Buttercream Recipe because this cake has everything I look for—deep, rich chocolate flavor with a velvety texture that melts in your mouth, plus that buttercream frosting is just the perfect creamy contrast you didn’t know you needed. Whether it’s a special occasion or just a sweet treat to brighten your day, this recipe is guaranteed to impress and satisfy every time.
Why You’ll Love This Recipe
- Rich Chocolate Flavor: The black cocoa powder combined with dark chocolate creates a uniquely intense, almost black-on-black chocolate experience.
- Velvety Moist Texture: The buttermilk and oil keep the cake tender and moist without weighing it down.
- Impressively Beautiful: Its dramatic color and smooth buttercream turn heads every time you pull it out.
- Flexible and Make-Ahead Friendly: You can bake layers in advance and even freeze both cake and frosting—super handy for busy days.

Ingredients You’ll Need
Everything in this cake works together to create that signature “black velvet” experience. I always recommend using quality black cocoa powder and real dark chocolate for the best results. Getting the right balance of wet and dry ingredients is key here, so don’t skip on measuring carefully!

- All-purpose flour: Make sure to spoon and level or better yet, use a kitchen scale for accuracy to get that perfect crumb.
- Granulated sugar: Sweetens the cake while helping with moisture retention.
- Black cocoa powder: This is the star for the deeply dark color and bold chocolate taste—don’t substitute with regular cocoa.
- Baking powder & baking soda: Provide just the right lift to keep your texture light and tender.
- Fine salt: Balances sweetness and enhances the chocolate flavor.
- Hot water: Helps bloom the cocoa powder and espresso for richer flavor and smoother texture.
- Instant espresso or coffee: I toss this in to deepen the chocolate flavor without adding a coffee taste.
- Buttermilk: Adds moisture and a subtle tang, helping with tenderness.
- Vegetable or canola oil: Keeps the cake moist and soft.
- Large eggs: Bind ingredients and aid with structure—room temperature eggs mix better.
- Vanilla extract or vanilla bean paste: Adds a warm undertone and rounds out the flavors wonderfully.
- Unsalted butter: For the buttercream, make sure it’s soft but not melted to get that perfect fluffy texture.
- Powdered sugar: Helps with smooth, silky buttercream.
- Heavy whipping cream: Lightens the buttercream, making it luxuriously creamy.
- Dark chocolate chips: Melted and cooled into the frosting for an extra dimension of intense chocolate goodness.
Variations
I love that this recipe is a great canvas for your creativity—you can tweak the buttercream or even add in some fun flavors. Try things out and make it your own!
- Espresso Boost: I once added an extra teaspoon of espresso powder to both the batter and the frosting, which made the chocolate flavor pop even more—perfect for coffee lovers.
- Spicy Kick: Adding a pinch of cinnamon or cayenne to the batter gave my cake an unexpected but delightful warming hint.
- Dairy-Free Version: For friends who avoid dairy, swapping butter with a high-quality vegan butter and using coconut cream instead of heavy cream for frosting works surprisingly well.
- Fruit Layer: If you want to add some fruity freshness, spread a thin layer of raspberry jam between the cake layers before frosting—it adds brightness that cuts through the richness.
How to Make Black Velvet Cake with Dark Chocolate Buttercream Recipe
Step 1: Prep and Combine Your Dry Ingredients
Start by preheating your oven to 350°F (175°C)—temperature is key here. Line and grease three 8-inch cake pans or four 7-inch pans if you prefer smaller layers. In a large bowl, whisk together your flour, sugar, black cocoa powder, baking powder, baking soda, and salt until evenly combined. I find that giving these ingredients a good whisk helps distribute the leaveners so your cake rises evenly.
Step 2: Mix the Wet Ingredients Separately
In a separate bowl, stir the hot water into the instant espresso until dissolved—this step unlocks the deep chocolate flavor. Then add your buttermilk, oil, eggs, and vanilla extract, giving everything a quick stir to blend. Keeping the wet ingredients in a separate bowl at this point ensures even mixing once combined with the dry ingredients.
Step 3: Combine Wet and Dry Ingredients
Pour the wet mixture into the dry mix and fold gently by hand just until everything is incorporated. Don’t overmix here—your batter will be on the thinner side, but that’s exactly what you want for a delicate crumb. Overworked batter means tougher cake, so patience pays off!
Step 4: Bake Your Cake Layers Evenly
Divide the batter evenly among your prepared pans. I’ve discovered that weighing batter into each pan takes the guesswork out—it seriously makes your cake layers bake evenly with a uniform height. Before popping the pans in the oven, bang them gently on the counter a couple of times to release trapped air bubbles. Bake for about 24–27 minutes until a toothpick inserted in the center comes out clean or with just a few crumbs.
Step 5: Cooling and Leveling
Allow your cake layers to cool in the pans for 10 minutes, then loosen with an offset spatula and flip onto wire racks. Once cooled completely, use a serrated knife to level the tops. Level layers stack better and create a more polished final cake. If you want to save time later, wrap them tightly and freeze—they thaw beautifully!
Step 6: Make the Dark Chocolate Buttercream
Beat softened unsalted butter for about 30 seconds until smooth. Then add black cocoa powder, vanilla extract, and salt, mixing on low until combined. Slowly add powdered sugar, pausing halfway to pour in the heavy cream—it keeps your frosting silky and workable. Finally, mix in the melted, cooled dark chocolate—make sure it’s not hot, or it will melt your butter. If you want a truly jet-black frosting, I like to add a bit of black gel food coloring here.
Step 7: Assemble and Frost Your Cake
Place your first cake layer on a greaseproof cake board and use a dollop of frosting to anchor it. Spread an even layer of buttercream on top, then repeat with remaining layers. Apply a thin crumb coat to seal in crumbs and chill the cake for 30 minutes in the fridge (or 10 minutes in the freezer) until firm. Then add a thicker second layer of frosting, smoothing it beautifully with a bench scraper. Feel free to decorate with piping or chocolate shavings if you want that extra wow factor.
Pro Tips for Making Black Velvet Cake with Dark Chocolate Buttercream Recipe
- Room Temperature Ingredients: I learned early on that using room temp eggs, butter, and buttermilk means smoother mixes and fewer lumps.
- Weighing Ingredients & Batter: Using a kitchen scale ensures consistent layers and more even baking—trust me, it’s a game changer.
- Timing Your Chocolate: Let your melted chocolate cool so it’s liquid but not hot before adding to buttercream, or it will ruin the texture.
- Chill Before Decorating: Chilling your crumb coat prevents crumbs from mixing into the final frosting layer for a clean finish.
How to Serve Black Velvet Cake with Dark Chocolate Buttercream Recipe

Garnishes
I usually keep garnishes simple so the cake itself shines—I like to sprinkle a few dark chocolate curls or shards on top or add some fresh berries for a pop of color and brightness. Edible gold leaf can make this cake really feel special too! Whatever you choose, keep it elegant and not over the top.
Side Dishes
If you’re serving this at a party, I love pairing this cake with whipped cream or a scoop of vanilla bean ice cream. For something lighter, a fresh berry compote or a simple fruit salad balances the richness perfectly.
Creative Ways to Present
For celebrations, I’ve piped elegant rosettes around the edges using an open star tip and added a dusting of cocoa powder or shimmer dust for extra drama. For a casual gathering, a simple naked cake style—just a thin crumb coat with exposed layers—inside a cake dome looks rustic but gorgeous.
Make Ahead and Storage
Storing Leftovers
After I’ve enjoyed a slice or two, I tightly wrap leftover cake slices or store whole cakes in an airtight container in the fridge—it keeps them moist and fresh for up to a week. Just remember to bring cake to room temperature before eating to enjoy the full flavor and texture.
Freezing
I highly recommend freezing cake layers before assembly if you want to get ahead. Wrapped tightly, they freeze beautifully for up to 3 months. You can also freeze frosted cakes; just flash freeze them until firm, then wrap well to prevent freezer burn. When ready, thaw overnight in the fridge.
Reheating
To refresh leftover cake slices, I pop them in the microwave for about 15 seconds—it warms the chocolate and softens buttercream just enough to recapture that freshly baked feeling without melting the frosting.
FAQs
-
Can I use regular cocoa powder instead of black cocoa powder?
While you can technically substitute regular cocoa powder, black cocoa powder is what gives this cake its signature pitch-black color and intense flavor. Regular cocoa will produce a lighter color and a different taste, so for the true Black Velvet Cake experience, I definitely recommend sticking with black cocoa.
-
How do I prevent my cake layers from drying out?
Make sure to measure ingredients accurately, avoid overbaking, and consider brushing layers lightly with simple syrup if you want extra moisture. Also, storing the cake properly wrapped or covered helps lock in moisture.
-
Can I make this cake gluten-free?
You can try substituting a high-quality gluten-free flour blend, but results may vary. Because the cake relies on the structure all-purpose flour provides, expect slight differences in texture. Adding xanthan gum can help, and testing the recipe once before serving guests is a good idea.
-
What’s the best way to store leftover buttercream?
Store leftover buttercream in an airtight container in the fridge for up to a month. When ready to use, bring it to room temperature and beat again to restore its creamy texture. It can also be frozen for up to 3 months.
-
Why is the batter so thin?
This batter is thinner than traditional chocolate cake batter because of the hot water and espresso that help bloom the cocoa powder, resulting in a more tender crumb. Don’t worry—it bakes up beautifully despite the thin consistency.
Final Thoughts
Honestly, this Black Velvet Cake with Dark Chocolate Buttercream Recipe has become my go-to when I want to wow friends and family without fuss. Its rich color and deep chocolate flavor always get compliments, and it’s surprisingly easy to make if you follow these steps. I hope you’ll try it out soon and enjoy every luscious bite just as much as I do—baking it always feels like a little celebration in my kitchen, and I’m sure it will for you, too.
Print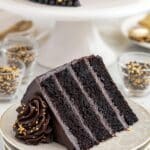
Black Velvet Cake with Dark Chocolate Buttercream Recipe
- Prep Time: 10 minutes
- Cook Time: 25 minutes
- Total Time: 1 hour 5 minutes
- Yield: 20 servings 1x
- Category: Baking
- Method: Baking
- Cuisine: American
Description
This Black Velvet Cake is a rich, moist, and tender cake made with black cocoa powder and a hint of espresso to deepen the flavors, layered and frosted with a luscious black dark chocolate buttercream. Perfect for those who love a dramatic, decadent twist on classic chocolate cake, this recipe delivers a beautiful black cake with intense chocolate flavor and a silky smooth buttercream frosting.
Ingredients
Black Velvet Cake
- 2 cups all-purpose flour (260g)
- 2 cups granulated sugar (400g)
- 3/4 cup black cocoa powder (75g)
- 2 tsp baking powder (8g)
- 1 1/2 tsp baking soda (9g)
- 1 tsp fine salt (6g)
- 1 cup hot water (240g)
- 2 tsp instant espresso or coffee (5g)
- 1 cup buttermilk, room temperature (240g)
- 1/2 cup vegetable or canola oil (110g)
- 2 large eggs, room temperature (112g)
- 2 tsp vanilla extract or vanilla bean paste (8g)
Black Dark Chocolate Buttercream Frosting
- 2 cups (4 sticks) unsalted butter, room temperature (454g)
- 1 cup black cocoa powder (100g)
- 1 tsp vanilla extract or vanilla bean paste (4g)
- 1/2 tsp fine salt (3g)
- 5 cups powdered sugar (625g)
- 2/3 cup heavy whipping cream, room temperature (180g)
- 1 1/3 cups dark chocolate chips, melted and cooled (230g)
Instructions
- Preheat and Prepare Pans: Preheat your oven to 350°F (175°C). Grease and line three 8-inch cake pans or four 7-inch pans to ensure easy removal after baking.
- Mix Dry Ingredients: In a large bowl, whisk together the flour, sugar, black cocoa powder, baking powder, baking soda, and salt until evenly combined to ensure consistent flavor and rise.
- Dissolve Espresso in Hot Water: In a separate medium bowl, stir the instant espresso or coffee into the hot water until fully dissolved; this intensifies the chocolate flavor of the cake.
- Add Wet Ingredients: Add buttermilk, oil, eggs, and vanilla extract to the espresso mixture. Stir quickly just to combine all wet ingredients thoroughly without overmixing.
- Combine Wet and Dry: Pour the wet ingredients into the dry ingredients and mix by hand until fully incorporated. The batter will be thin, which is expected for a tender crumb.
- Fill Pans and Bake: Divide the batter evenly among the prepared pans. Weighing the pans can help ensure equal distribution for even baking. Bake for 24-27 minutes until a toothpick inserted comes out clean.
- Cool Cake Layers: Let the cakes cool in the pans for 10 minutes. Then loosen edges with an offset spatula and invert onto wire racks to cool completely.
- Level Cake Layers: Once cooled, use a serrated knife to level the tops of each layer for uniform stacking and a professional finish.
- Prepare Buttercream: Beat the unsalted butter on medium speed for 30 seconds to soften. Add black cocoa powder, vanilla extract, and salt, mixing on low until combined.
- Add Sugar and Cream: Gradually add powdered sugar while mixing low. Halfway through, add heavy cream to achieve a creamy, smooth consistency.
- Incorporate Melted Chocolate: Mix in melted and cooled dark chocolate on low speed until fully incorporated and the frosting reaches desired thickness. Use a spatula to scrape bowl sides occasionally.
- Optional Food Coloring: For a deeper black hue, add a squirt of black gel food coloring and mix thoroughly. Cover with plastic wrap to avoid crusting when resting.
- Assemble Cake: Place a cake layer on a greaseproof board and secure with a dollop of frosting. Spread an even layer of buttercream between each layer.
- Crumb Coat and Chill: Apply a thin crumb coat around the stacked layers and smooth with a bench scraper. Chill in fridge for 30 minutes or freezer for 10 minutes until firm.
- Final Frosting and Decorate: Apply a thicker second layer of frosting, smooth with a bench scraper, then decorate as desired. Serve and enjoy your elegant Black Velvet Cake!
Notes
- Using room temperature ingredients allows better mixing and a more tender cake texture.
- Properly measure dry ingredients by spooning and leveling or use a kitchen scale for accuracy.
- Do not overmix the batter to keep cake layers soft and fluffy.
- Weigh cake pans to distribute batter evenly and ensure uniform cake layer height.
- Tap pans on the counter before baking to release trapped air bubbles for an even crumb.
- Level cake layers after cooling for neat stacking and professional presentation.
- Freeze cooled cake layers before assembling to make frosting and stacking easier.
- You can make cake layers and frosting in advance; freeze layers tightly wrapped and frost up to a week in the fridge.
- Buttercream keeps well in the fridge for up to a month and can be frozen for 3 months—stir when thawed to restore texture.
- A frosted cake lasts up to one week refrigerated or one month in the freezer
- Recipe updated May 2022 for a more tender texture.
Nutrition
- Serving Size: 1 slice (1/20th of cake)
- Calories: 450
- Sugar: 36g
- Sodium: 220mg
- Fat: 26g
- Saturated Fat: 12g
- Unsaturated Fat: 12g
- Trans Fat: 0g
- Carbohydrates: 54g
- Fiber: 3g
- Protein: 5g
- Cholesterol: 55mg

Your email address will not be published. Required fields are marked *