
If you’re craving a dessert that feels like a cozy autumn hug, I’ve got just the thing for you. The Autumn Chocolate Cupcakes with Gold Accents Recipe is everything you want in a fall treat — rich chocolatey goodness, that perfect soft crumb, and an elegant gold shimmer that makes them stand out. I absolutely love how these cupcakes bring warmth and a bit of sparkle to my kitchen, and I can’t wait for you to try them!
Why You’ll Love This Recipe
- Show-Stopping Presentation: The gold accents give these cupcakes a festive sophistication that will wow your guests.
- Moist, Chocolatey Centers: Injecting the cupcakes with rich chocolate filling keeps every bite deliciously indulgent.
- Beginner Friendly: Even if you’re new to baking, the simple steps and handy cake centres make success easy.
- Perfect for Fall Gatherings: These cupcakes add a seasonal touch without fuss, making them ideal for cozy afternoons or celebrations.

Ingredients You’ll Need
To nail the rich flavor and moist texture of these autumn chocolate cupcakes, you’ll want to gather ingredients that combine butteriness, sweetness, and luscious chocolate, plus a few decorative treats to give that elegant gold look.

- Caster Sugar: I recommend superfine sugar here because it dissolves easily, helping create that soft, tender crumb.
- Softened Butter: Brings richness and moisture; make sure it’s not melted or cold for the best creaming results.
- Eggs: Adds structure and helps the cupcakes rise nicely.
- Vanilla Extract: Just a touch rounds out the chocolate flavor beautifully.
- Self-Raising Flour: The built-in leavening means no extra baking powder needed — super simple.
- Dr Oetker Easy Fill Cake Centres Rich Chocolate: This ready-made filling injects moist, gooey chocolate right inside every cupcake.
- Dr Oetker Chocolate Icing: A smooth chocolate topping that’s perfect for swirling and decorating.
- White Sugar Paste (Fondant Icing Block): For shaping those pretty gold leaves — white lets your gold shimmer really pop.
- Dr Oetker Gold Shimmer Spray: Makes the cupcakes festive with a gorgeous golden glow.
- Chocolate Balls: Cute little accents that add texture and extra chocolatey charm.
- Cupcake Boxes or Cases and Two Leaf Cutters: Essential for shaping and presenting your cupcakes perfectly.
Variations
I love to mix things up with this recipe, so feel free to play around with what you add or skip. Personalizing it makes the baking process more fun and truly yours!
- Nutty Twist: I sometimes sprinkle finely chopped toasted pecans into the batter — it adds a delightful crunch that goes beautifully with the chocolate.
- Dairy-Free Version: Swapping butter for coconut oil and using dairy-free chocolate icing works great if you or a friend is avoiding dairy.
- Spiced Up: Adding a pinch of cinnamon or pumpkin spice to the batter gives a warm autumn vibe that’s irresistible.
How to Make Autumn Chocolate Cupcakes with Gold Accents Recipe
Step 1: Cream, Beat, and Fold Your Batter
Start by preheating your oven to 190°C (or gas mark 5). In a large mixing bowl, beat your softened butter and caster sugar together until the mixture becomes light and fluffy—that’s key for tender cupcakes. Then beat in your eggs one at a time, adding in the vanilla extract too, until everything is smooth and well combined. Finally, fold in the self-raising flour gently — you want to mix just until incorporated to keep that softness.
Step 2: Bake and Cool the Cupcakes
Spoon the batter evenly into your cupcake cases or boxes — filling about two-thirds full works best to give them room to rise without spilling over. Pop them into the oven and bake for about 15-18 minutes. Watch for the tops to be golden and risen; a toothpick inserted should come out clean. Once baked, let them cool just a few minutes in the tin before transferring to a wire rack to cool fully. Patience here really pays off!
Step 3: Inject the Gooey Chocolate Centers
When the cupcakes have cooled enough to handle but are still a little warm, it’s time for the magic — injecting that rich chocolate filling. I discovered this trick when I wanted every bite to be indulgent, and honestly, it transformed the whole cupcake experience. Use a piping bag or a special cake injector to gently fill the center of each cupcake with the Dr Oetker Easy Fill Cake Centres Rich Chocolate. Then let them cool completely before moving on.
Step 4: Create and Apply the Gold Leaves
While your cupcakes cool, roll out the white sugar paste on a clean, flat surface. Use your leaf cutters to press out neat shapes — two sizes look nice layered, but feel free to experiment. Place these cutouts onto baking paper, then spray them gently with your gold shimmer spray. I love how the shimmer catches the light, adding instant elegance. Let the spray dry completely so your leaves won’t smudge the icing later.
Step 5: Ice and Decorate Your Cupcakes
Once the cupcakes are fully cool, swirl on the Dr Oetker chocolate icing with a spatula or piping bag — I go for tall, swooping swirls for drama. Then carefully place your gold leaf shapes on top and dot with chocolate balls to finish. Each cupcake turns into a little golden jewel ready to impress anyone who sees them.
Pro Tips for Making Autumn Chocolate Cupcakes with Gold Accents Recipe
- Soft Butter is Key: I learned that starting with properly softened (not melted) butter helps achieve the fluffiest batter texture.
- Don’t Overmix the Flour: Folding gently keeps the cupcake light instead of dense, a mistake I made early on!
- Cool Before Injecting: Inject filling when cupcakes are warm but not hot; this prevents melting and keeps the filling intact.
- Gold Leaves Dry Time: Let the shimmer spray dry fully on your fondant leaves—otherwise, the moisture can blur your perfect gold finish.
How to Serve Autumn Chocolate Cupcakes with Gold Accents Recipe
Garnishes
I usually keep the decorations simple because the gold leaves do all the heavy lifting visually. Adding a few chocolate balls gives a nice texture contrast, but sometimes I toss in a tiny sprinkle of edible glitter for an extra festive feel — especially for parties.
Side Dishes
I like serving these cupcakes alongside a spiced chai latte or a rich hot cocoa. The warmth of the drinks complements the chocolate and highlights those autumn vibes perfectly. For a grown-up party, a splash of espresso makes an excellent pairing too!
Creative Ways to Present
For Thanksgiving or any autumn gathering, arrange the cupcakes on a rustic wooden board or a tiered cake stand. I once surrounded mine with fresh mini pumpkins and colorful leaves to echo the seasonal theme. If you want to go the extra mile, placing each cupcake in a gold-lined cupcake wrapper ties it all together nicely.
Make Ahead and Storage
Storing Leftovers
After your party or treat time, I store leftover cupcakes in an airtight container at room temperature for up to 2 days. This keeps them moist without sweating up the chocolate icing. Just don’t forget to keep them away from direct sunlight!
Freezing
I’ve found that freezing works great too — just pop cooled, unfrosted cupcakes in a freezer-safe container. When you’re ready, thaw overnight in the fridge and decorate fresh with icing, gold leaves, and chocolate balls to keep that crisp look.
Reheating
If you want a warm cupcake, I heat mine briefly in a microwave for about 10-15 seconds — but only the base, never the icing or decorations, or they’ll melt! This way, you get a soft, cozy experience without ruining the look.
FAQs
-
Can I make these cupcakes gluten-free?
Absolutely! Substitute the self-raising flour with a gluten-free self-raising blend, making sure it contains baking powder. Keep an eye on baking time as it may vary slightly.
-
What if I don’t have a cake injector for the filling?
No worries! You can use a small knife to carefully cut out a small cone shape from the center of each cupcake and fill it with the chocolate filling using a teaspoon or piping bag, then cover the hole with icing.
-
How do I keep the gold leaves from melting or sticking?
Make sure the sugar paste leaves are fully dry after spraying with shimmer. Apply them to firm, cold icing to avoid melting. If the icing is warm, the fondant can soften and lose shape.
-
Can I store the decorated cupcakes in the fridge?
Refrigeration can cause condensation, which may dull your gold accents and soften the icing. If you do refrigerate, keep cupcakes in an airtight container and bring back to room temperature before serving for best results.
Final Thoughts
These Autumn Chocolate Cupcakes with Gold Accents Recipe hold a special place in my heart because they combine the simple pleasure of chocolate cupcakes with that little spark of celebration thanks to the gold shimmer. Whenever I make them, my family goes crazy for the rich centers and beautiful presentation—it’s a guaranteed crowd-pleaser that feels like a warm hug on a cool autumn day. I really hope you’ll love making and sharing these as much as I do!
Print
Autumn Chocolate Cupcakes with Gold Accents Recipe
- Prep Time: 15 minutes
- Cook Time: 18 minutes
- Total Time: 33 minutes
- Yield: 12 cupcakes 1x
- Category: Dessert
- Method: Baking
- Cuisine: British
Description
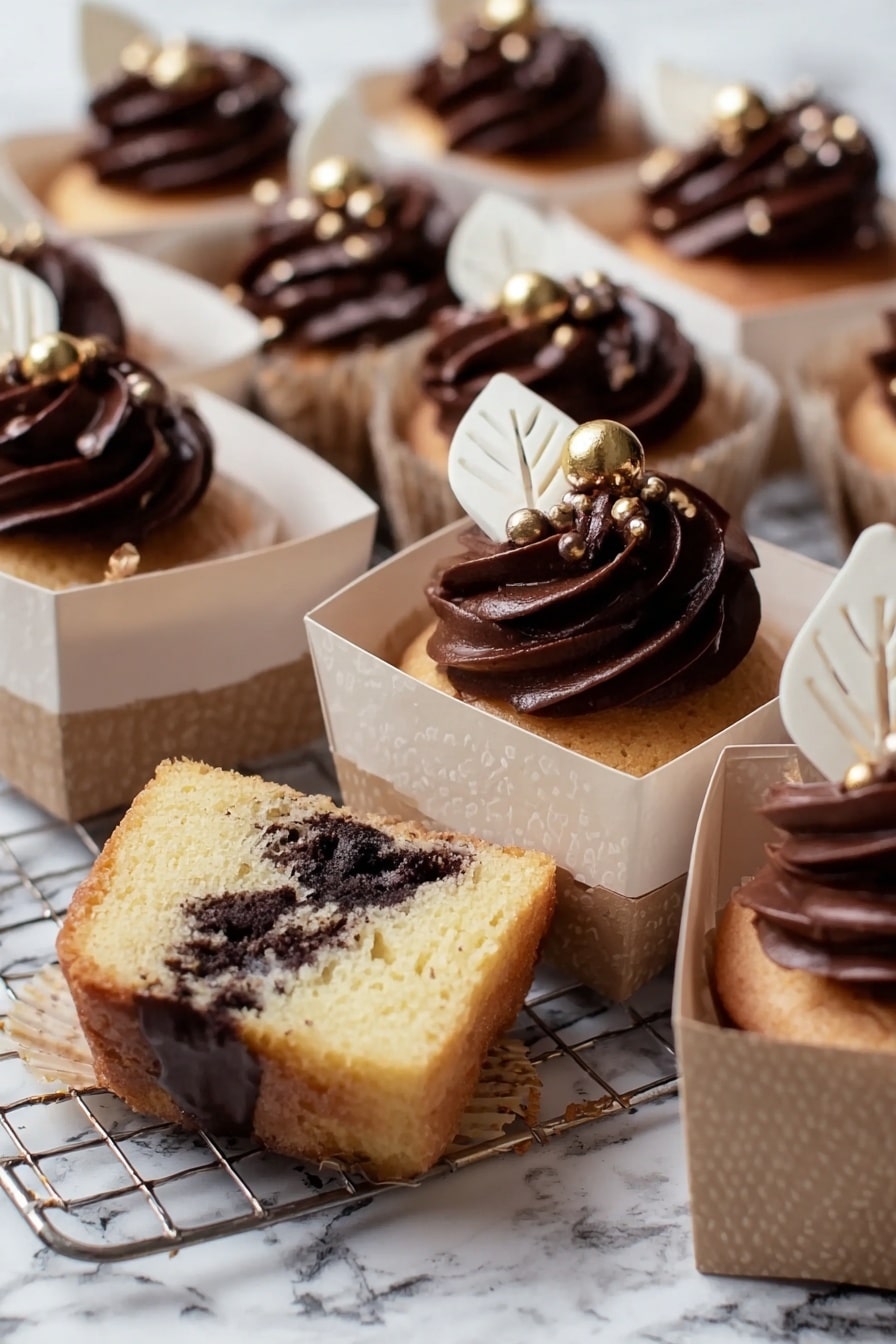
Delight in these Autumn Chocolate Cupcakes featuring moist, fluffy cake bases filled with rich chocolate centers, topped with creamy chocolate icing and decorated with elegant gold shimmer leaves and chocolate balls for a festive seasonal treat.
Ingredients
Cupcake Batter
- 125 g caster sugar (superfine baking sugar)
- 125 g softened butter
- 2 large eggs
- 1/2 tsp vanilla extract
- 125 g self-raising flour
Filling and Icing
- 1 pouch Dr Oetker Easy Fill Cake Centres Rich Chocolate
- 1 canister Dr Oetker chocolate icing
Decoration
- 50 g white sugar paste (fondant icing block)
- Dr Oetker gold shimmer spray
- Chocolate balls for decoration
Equipment
- 12 cupcake boxes or cases
- Two leaf cutters
Instructions
- Preheat oven: Set your oven to 190°C (gas mark 5) to ensure it reaches the perfect temperature for baking the cupcakes evenly.
- Prepare batter: In a large mixing bowl, beat the softened butter and caster sugar until the mixture is light and fluffy. Add the eggs and vanilla extract, beating until smooth. Gently fold in the self-raising flour just until combined to maintain a soft texture.
- Fill cupcake cases: Spoon the prepared batter evenly into 12 cupcake boxes or cases, filling them sufficiently but not to the brim to allow rising during baking.
- Bake cupcakes: Place the filled cases in the oven and bake for 15 to 18 minutes, or until the cupcakes have risen and are golden brown on top. Toothpick test can confirm doneness.
- Cool and fill centers: Let the cupcakes cool slightly before injecting the Rich Chocolate Easy Fill Cake Centres into the cupcakes. Allow to cool completely to set the filling.
- Prepare decorations: Roll out the white sugar paste on a clean surface to an even thickness. Using the two leaf cutters, stamp out leaf shapes. Place the leaves on baking paper and lightly spray with Dr Oetker gold shimmer spray to create a festive shimmer.
- Ice cupcakes: Once the cupcakes are completely cool, pipe or spread swirls of chocolate icing over each cupcake for a smooth, rich finish.
- Decorate and serve: Affix the gold shimmer leaf shapes to the icing, then dot each cupcake with chocolate balls for a final decorative touch. Serve and enjoy your beautifully festive Autumn Chocolate Cupcakes.
Notes
- Ensure that the butter is softened to room temperature for better creaming with sugar.
- Do not overmix the batter after adding flour to avoid dense cupcakes.
- Use a toothpick to check the doneness of cupcakes before removing from the oven.
- Allow cupcakes to cool completely before decorating to prevent melting of icing and decorations.
- Gold shimmer spray should be used in a well-ventilated area and allowed to dry before handling the leaves.
- Store cupcakes in an airtight container to keep them fresh for up to 2 days.
Nutrition
- Serving Size: 1 cupcake
- Calories: 280
- Sugar: 22 g
- Sodium: 120 mg
- Fat: 15 g
- Saturated Fat: 9 g
- Unsaturated Fat: 5 g
- Trans Fat: 0.1 g
- Carbohydrates: 30 g
- Fiber: 1 g
- Protein: 3 g
- Cholesterol: 55 mg

Your email address will not be published. Required fields are marked *